Other Forms and Dialogs
Module: Core | Platform: Web
Appello opens dozens of small forms and dialogs that aren't the main create/edit screen of any one documented page -- a "Set Resource URL" modal here, a "Copy Wage Rates" popup there, an inline pencil icon on a list cell. This page is a catalogue: if you've landed on a dialog you don't recognize, find its on-screen name below to see what it does and, for the ones with an existing home, a link to the page that covers it in full. A handful of dialogs have no other home in the docs -- those are documented completely here instead.
This page was written against the current release of Appello, checked on a demo instance. A few dialogs described below (Tags and HR Document) cannot be opened from any screen in that release -- that is called out explicitly rather than guessed at.
Where each dialog lives
| Dialog (on-screen name) | Opens from | What it does | Full docs |
|---|---|---|---|
| Create Account / Edit Account | Settings → Accounting → Chart of Accounts → + Create Account | Adds accounts (Name, GL Number) under a chosen account type and category. | Accounting |
| Edit Account Type | Settings → Accounting → Account Types → row's edit (pencil) icon | Renames an account type, sets its sort order and financial-summary visibility, and manages its categories. | Accounting |
| Application Notification Control System (per-type row) | Settings → Notification Control System → Application Notification Control System | Assigns specific users/user groups as forced recipients of one notification type, with its own In-App/SMS toggle. | Notification Control System |
| Business Settings tab | Settings → Business Settings | Configures company identity, financial defaults, payroll rules, billing information, and branding instance-wide. | Business Settings |
| Reset Password panel | Your profile (or any user's profile) → System Information → Reset Password | Sets a new password directly, emails a reset link, or generates a secure random password. | My Profile |
| Set Resource URL | Settings → Business Settings → Company Resources → Set Links & Access | Sets the external resource URL field workers reach from the mobile app's Resources tab. | Business Settings |
| Copy Wage Rates | An employee agreement contract's Wage Rates tab → Copy From | Copies one wage-rate label's dollar values onto another, with a confirmation step before overwriting. | Employment Agreements |
| Cost Codes tab (add/edit a code) | A job's Planning & Tracking → Cost Codes tab | Adds or edits the job's cost codes, including a bulk margin-percentage update and applying a saved cost code template. | Cost Codes & Schedule of Values |
| Create SOV Templates | Settings → Schedule of Values Templates → + Create SOV Templates | Builds a reusable line-item template for a job's Schedule of Values. | Cost Codes & Schedule of Values |
| (generic dynamic form) | Most "Create X" / "Edit X" panels across the app | Renders whatever fields are configured for a record type -- see The Data Model Form below. | Documented below |
| Add Custom Property | Settings → Property Settings → any model → Custom Properties tab | Defines one custom field (type, required flag, and linked-object rules) shared across the instance. | Property Settings |
| Create Section | Settings → Property Settings → any model → Manage Layout / Detail View Layout | Adds a new collapsible section to that model's detail-page layout. | Property Settings |
| Estimate/CO template save prompt (Name + Private Template) | Settings → Estimate and Change Order Templates → Create New File → Save | Names a new estimate/change-order letter template and marks it private or shared. | Templates |
| Create a Download Template (Equipment sub-tab) | Settings → Download Templates → Equipment sub-tab | Builds a PDF export template scoped to one Equipment Category. | Templates |
| Resolve Form | Form Inbox → open a Fail submission → Resolve Failed Submission | Records how a failed safety-form issue was investigated and marks the submission Resolved. | Form Inbox |
| (HR Document) | Not reachable from any current screen | See HR Document below. | Documented below |
| Add a Holiday | Settings → Human Resources → Company Holidays → Add Holiday | Adds one statutory or company holiday, global or region-scoped, one-off or recurring. | Human Resources Settings |
| Schedule Maintenance | Equipment → an equipment record → Maintenance tab → Schedule Maintenance | Books a one-off maintenance service for a piece of equipment on a future date. | Equipment Maintenance |
| Add Maintenance Threshold | An equipment category or equipment record → Threshold Settings tab | Defines a recurring service interval (hours, distance, or calendar days) that drives the maintenance-due status. | Equipment Maintenance |
| Create/Edit Note Feed View Filter | Dashboard → Note Feed widget → + tab | Saves a named, shareable filter (author, project, job, contact, etc.) for the dashboard's note feed. | Documented below |
| Create a Download Template (other sub-tabs) | Settings → Download Templates → Projects / Jobs / Companies / etc. sub-tab | Builds a PDF export template scoped to one record type. | Templates |
| Property Values row-add (e.g. Job Status values) | Settings → Property Settings → a model's Default Properties tab → Property Values | Adds, renames, reorders, or archives one value in a dropdown option list. | Property Settings |
| Create a Travel Rate Card | Settings → Human Resources → Employee Agreements → an agreement → Travel & Board Rates | Defines a zone- or distance-based travel/board rate card for an employee agreement. | Travel Rate Cards & Zones |
| Manage Wage Rates / Manage Line Items (row) | An employee agreement contract → Wage Rates or Line Items tab | Adds or edits one wage-rate label or line-item row: rate type, default flag, and overtime eligibility. | Human Resources Settings |
| Log Service Entry | Equipment → an equipment record → Maintenance tab → complete/log service | Records a completed maintenance service: technician, cost, date, and meter reading at time of service. | Equipment Maintenance |
| (Tags) | Not reachable from any current screen | See Tags below. | Documented below |
| Create Tax Rate | Settings → Tax Settings → Create Tax Rate | Defines a tax rate's name, abbreviation, compounding/recoverable behavior, and dated rate history. | Tax Settings |
| Manage Trade Classifications | An employee agreement → Trade Classifications tab | Adds, renames, colors, and sets the labour account for a trade/job classification. | Trade Classifications |
| Twilio Settings card | Settings → Integrations | Stores the Twilio Account SID, Auth Token, and phone number Appello sends SMS notifications from. | Integrations |
| Create a Wage Region | Settings → Human Resources → Wage Regions → Create Wage Region | Adds a named geographic pay zone usable on wage rates, break-time allowances, and jobs. | Human Resources Settings |
| Add Signature | Form Inbox → open a submission → Signatures | Captures a required signer's electronic signature with a PIN before a form submission counts as complete. | Form Inbox |
| Upload Link | A job's or project's Files tab → Upload → Upload Link | Saves a reference to an external URL (SharePoint, Google Drive, etc.) without uploading a copy into Appello. | Project Files |
| Browse Appello Files | A Document/Image custom-property field on a job-linked record, or the Labs Drawing Viewer | Attaches an already-uploaded job or project file instead of uploading a new copy. | Documented below |
| Edit Forecast | A job → Financials & Reporting → Cost to Complete → edit a forecast row | Adjusts one progress-report period's forecast cost/value before it's approved. | Job Cost Report |
Inline pencil icon / Update <Field> | Any list table with editable columns (Jobs, RFIs, and others) | Edits one cell's value in place, or in a small modal for longer field types -- see Quick Edit below. | Documented below |
| Filters flyout | Map → Filters | Narrows the map's job, equipment, or worker pins by status, category, or assignment. | Administrative Map |
| "Version n is locked..." confirmation | Documents & Policies → a policy document → New Version | Confirms creating the next version of a locked, already-signed policy document. | Documents & Policies |
| Create OAuth Application | Settings → API Credentials → Create API Credential | Generates a new OAuth Client ID/Secret pair for an external system to call Appello's public API. | Integrations |
| Edit OAuth Application | Settings → API Credentials → a row's Edit action | Changes an existing credential's redirect URIs and grant types. | Integrations |
| Import Holidays | Settings → Human Resources → Company Holidays → Import Holidays | Bulk-imports a country's statutory holidays instead of adding them one at a time. | Human Resources Settings / Exports, Imports and Bulk Actions |
| Instance Settings tab | Settings → Instance Settings | Instance-wide display, rounding, numbering, and workflow-default settings. | Instance Settings |
Fully documented here
The dialogs below have no other page in these docs, either because the feature is small and cuts across many pages (Data Model Form, Quick Edit), or because the dialog is not currently reachable from any screen (Tags, HR Document).
Note Feed saved filters
Where it opens from: Dashboard (/) → the Note Feed widget in the lower-right → click the
+ tab next to your existing note views (or, on a fresh instance with no views yet, the "No
note views have been created yet. Click here to create one" prompt).
What it's for: The dashboard's Note Feed shows notes as a row of tabs, each backed by a saved filter -- the default is All Notes. This dialog creates (or, from a tab's own edit control, updates) one of those saved views: a name, an optional description, who it's shared with, which note-linked record types to show, and an optional author filter.
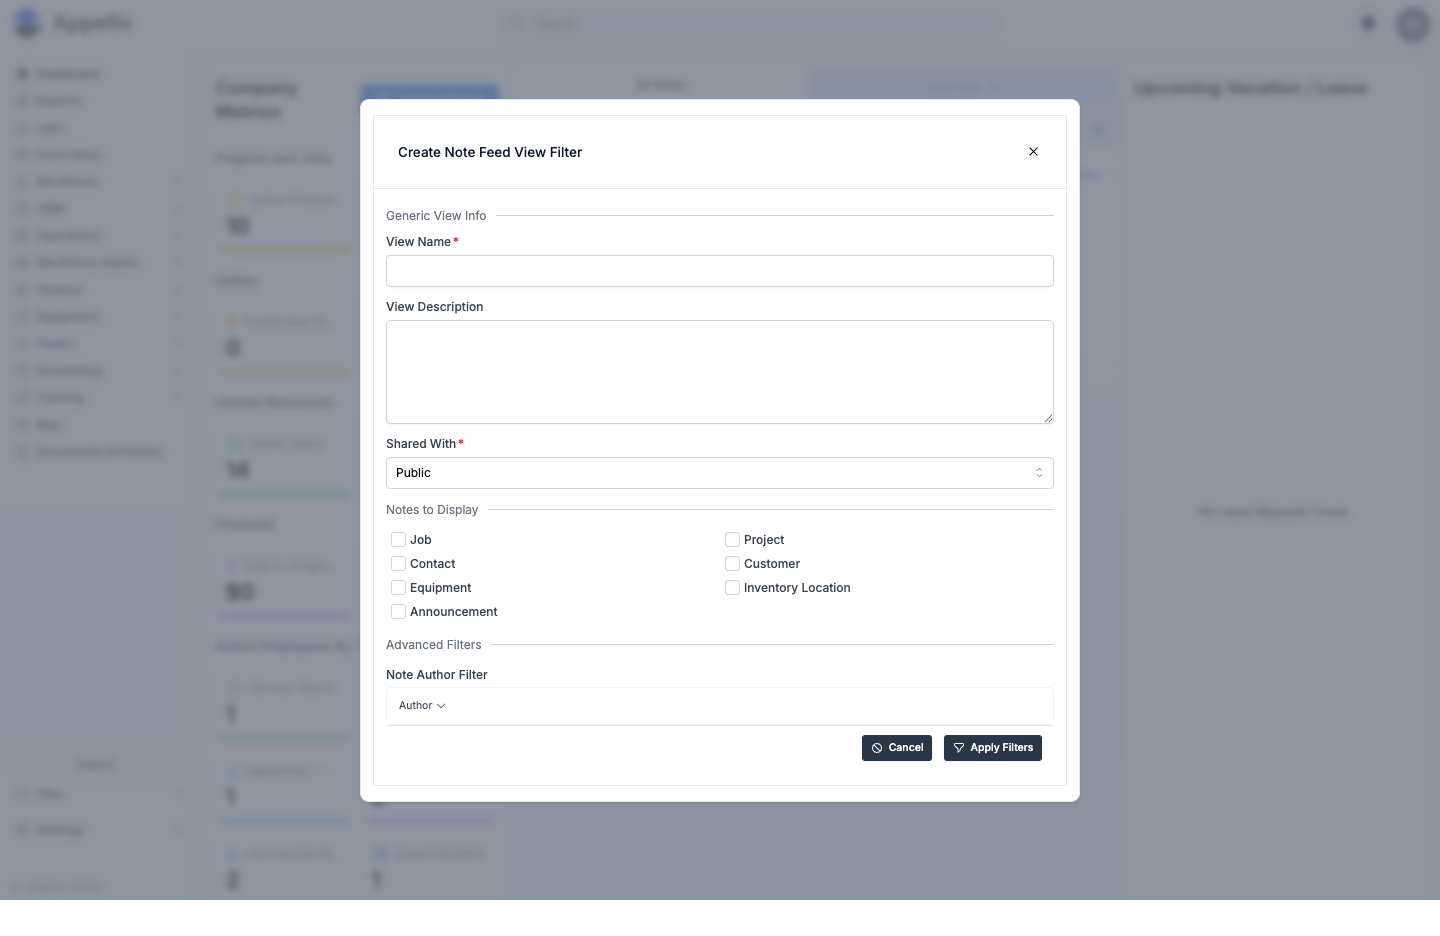
| Field | Required | Type | Effect |
|---|---|---|---|
| View Name | Yes | Text | The tab label shown on the Note Feed widget. |
| View Description | No | Textarea | Not shown on the tab itself; internal notes about what the view is for. |
| Shared With | Yes | Select (Public, Private, Groups) | Public shows the view's tab to every user with note-view permission; Private shows it only to you; Groups reveals a group picker and shows it only to members of the chosen group(s). |
| Notes to Display | No | Checkboxes (Job, Project, Contact, Customer, Equipment, Inventory Location, Announcement) | Which linked-record types of note are included. Leaving all unchecked shows every note type. |
| Note Author Filter | No | Combobox | Restricts the view to notes created by a specific author. |
The full dialog also renders per-type filter sections (Project, Job, Contact, Company, Estimate, Equipment) once a checkbox under Notes to Display is checked, each narrowing that note type by its own status/customer/lead/estimator fields -- these were not expanded on the demo instance for this page, since doing so risks changing the saved filter's scope.
Steps:
- Open the Dashboard.
- In the Note Feed widget, click the + tab (or the "click here to create one" link if no views exist yet).
- Enter a View Name, optional View Description, and choose Shared With.
- Optionally check one or more Notes to Display types and set an author filter.
- Click Apply Filters to save the view as a new tab, or Cancel to discard it.
Permissions: creating a view requires the Note Feed View Filter → Create permission; deleting a view's tab (the x on a removable tab) requires Note Feed View Filter → Delete. Viewing the underlying notes on each tab requires Notes → View separately.
Related pages: Dashboard, Job Notes & Activity
The Data Model Form
Where it opens from: Most "Create X" / "Edit X" panels across the app -- Departments, Companies, Contacts, Jobs, RFIs, Inventory Locations, User onboarding fields, and many more.
What it's for: The Data Model Form is the generic, configurable form most of Appello's create and edit panels are built on. Rather than a one-off form for every record type, it shows whatever fields Settings → Property Settings has configured for that record type's layout -- the same field set and requirement rules used on the record's own detail page. In practice this means "what a Create/Edit panel looks like" is mostly a Property Settings question, not a form question: see Property Settings for how a model's fields, requirements, and layout are configured.
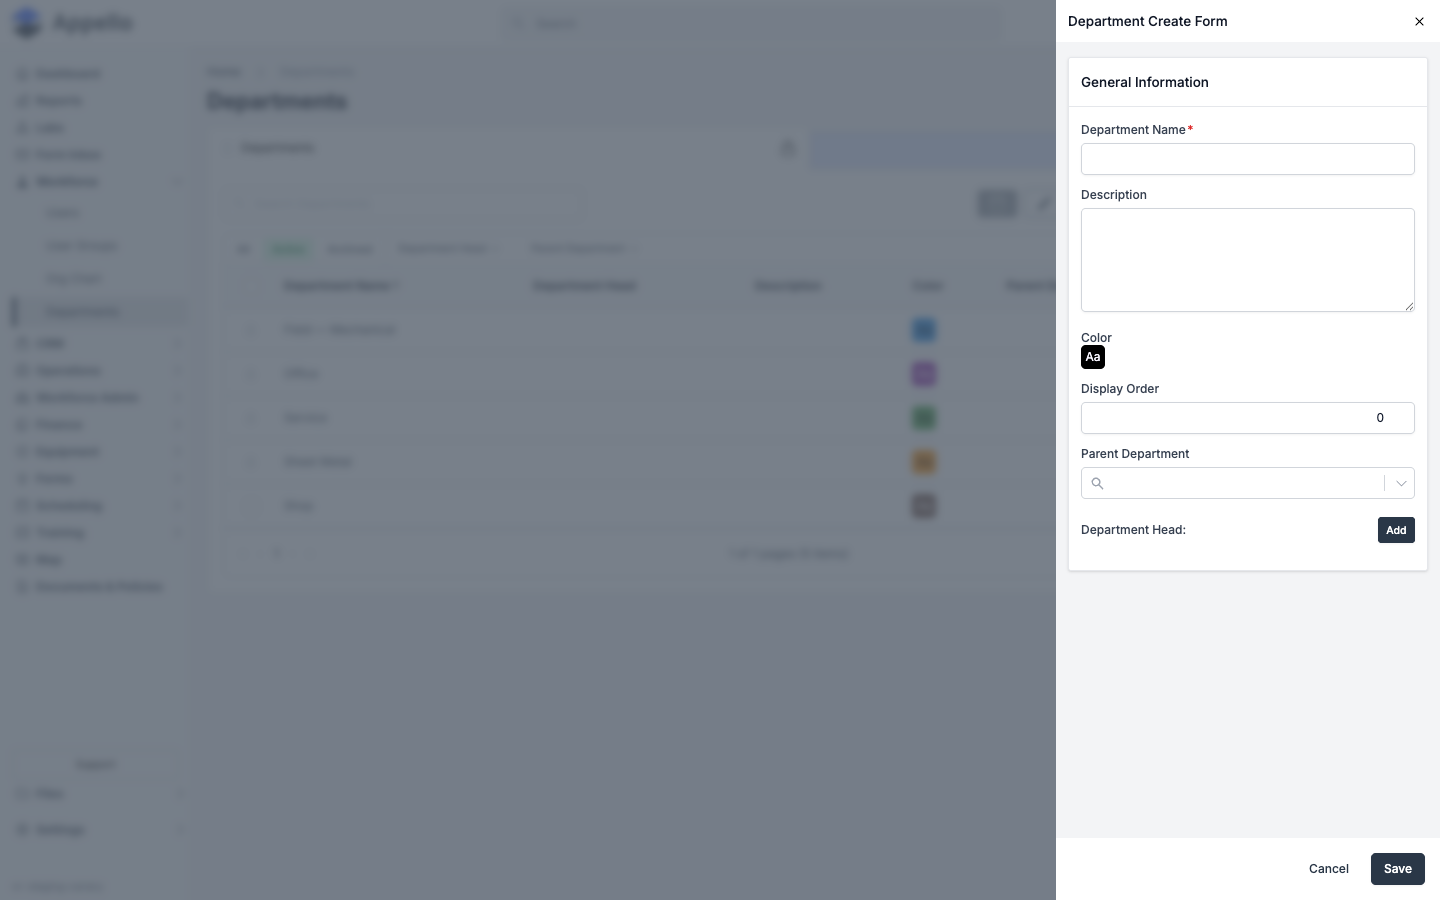
The screenshot above is the Department Create Form, reached from Sidebar → Workforce → Departments → Create Department. Its field set (Department Name, Description, Color, Display Order, Parent Department, Department Head) comes from the Department layout configured in Property Settings, not from anything specific to Departments in the form itself -- open the same form for a Company, Contact, Inventory Location, or RFI and it renders that record type's fields instead, each already documented on its own page (see Companies, Contacts, RFIs).
| Behavior | Effect |
|---|---|
| Record type | Determines which configured layout and fields the form shows (for example Department, Company, Job). |
| Create vs. edit | Controls whether the form starts blank or pre-filled from an existing record. |
| Field requirements | Come from that record type's Manage Layout / Manage Forms configuration in Property Settings, not from the form itself. |
| Cancel / Save | Standard on every one of these panels -- Cancel discards changes, Save commits them. |
Steps (generic -- see each model's own page for its specific field table):
- Open the relevant list page and click its Create button (or an existing record's edit control).
- Fill in the fields shown -- these come from that model's configured layout.
- Click Save, or Cancel to discard and close the panel.
Permissions: determined entirely by the record type's own create/edit permission (for example Departments → Create or Companies → Edit) -- there is no separate permission for the form itself.
Related pages: Property Settings, Departments
Quick Edit and inline table editing
Where it opens from: Any list table with editable columns -- confirmed on the Jobs list and referenced on several other list pages (for example the RFIs list's inline-editable Status column). Hover over an editable cell to reveal a small pencil icon at its right edge.
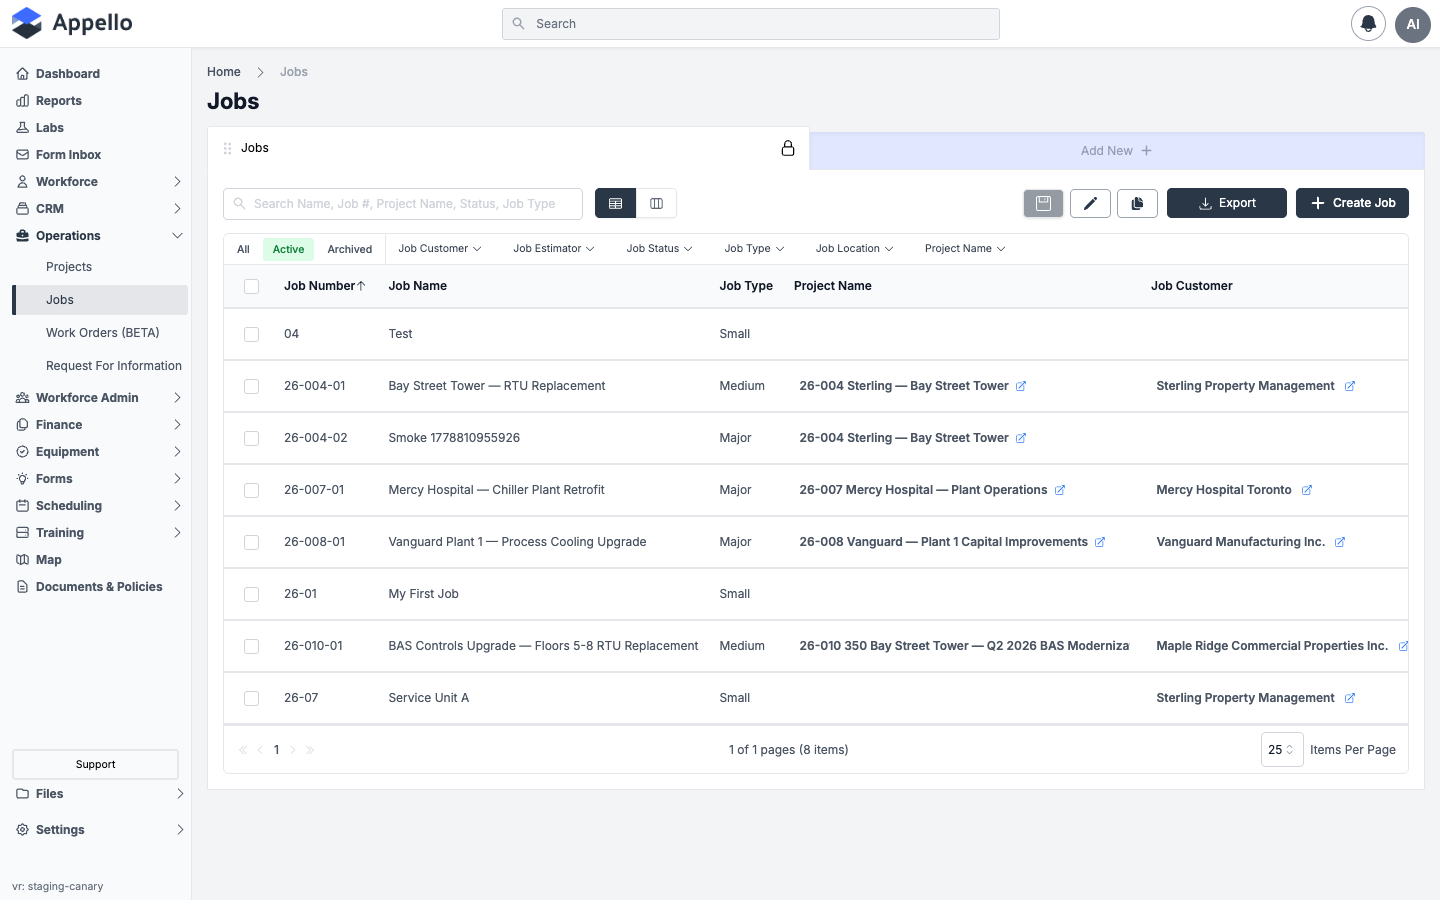
What it's for: Inline editing lets you change one field on one record without leaving the list or opening its full detail page. Clicking the pencil does one of two things depending on the field's type:
- Short fields (list, multiselect, object(s), boolean, lookup, date, year, color) turn the cell itself into an inline input, with a checkmark to save and an X to cancel.
- Longer fields (paragraph, rich text, document, image) instead open Quick Edit -- a small
popup titled Update
<Field Name>with just that one field and Cancel / Save buttons, since those field types need more room than a table cell allows. - A status-style field backed by a Property Value list (for example a Job's Status column) renders as a colored dropdown directly in the cell -- no separate edit toggle -- so clicking it opens the option list immediately.
The pencil icon only appears on hover, so it and the resulting inline input / Quick Edit popup could not be captured in the screenshots for this page. The column also stayed read-only when clicked on the demo instance, which is what you would expect when your role does not have field-level edit permission on that particular column.
| Control | Effect |
|---|---|
| Pencil icon (hover) | Appears on an editable cell on hover; click to start editing. |
| Inline input + checkmark/X | For short field types: edits the value in place; checkmark saves, X (or Escape) cancels. |
Quick Edit modal (Update <Field>) | For paragraph/rich-text/document/image fields: opens a small popup with just that field, plus Cancel/Save. |
| Status dropdown (Property Value columns) | Opens immediately on click; no separate edit-mode toggle. |
Steps:
- Hover a cell in an editable column on a list table.
- Click the pencil icon that appears.
- For a short field: edit the value inline, then click the checkmark to save or X to cancel.
- For a longer field: fill in the Quick Edit popup and click Save, or Cancel to discard.
Permissions: requires edit permission on the underlying record type (for example Jobs → Edit) and field-level edit permission on that specific column, both configured in Roles and Permissions. A user with model-edit but not field-edit sees the value as read-only text with no pencil icon.
Related pages: Roles and Permissions, RFIs
Existing File Picker
Where it opens from: Two confirmed entry points:
- A Document or Image type custom property field on a job-linked record's detail page -- click Browse next to the field's upload control (requires the record to have an associated Job, and optionally a Project, for the file list to scope to).
- Labs → Drawing Viewer's Browse Appello photos toolbar button, used to attach an existing job/project PDF instead of uploading a new one.
What it's for: Lets you attach a file that's already been uploaded to a job's or project's Files tab, instead of uploading a duplicate copy. It never uploads anything itself -- it only picks from what's already there.
| Field / control | Type | Effect |
|---|---|---|
| Job Files / Project Files tabs | Tabs | Switches which folder's files are listed; Project Files only appears when the record has a parent project. |
| Search box | Text | Filters the visible file list by name. |
| File checkboxes | Multi-select | Choosing an Image-type field hides non-image files; a Document-type field shows all types. Files already attached are excluded from the list. |
| Attach (confirm) / close (X) | Button | Attaches the selected file(s) to the field, or closes without attaching. |
The dialog's on-screen title, subtitle ("Select existing files to attach"), tab labels, and field behavior are described above, but it could not be opened on the demo instance used for this page -- no job or project there had a PDF staged for the Drawing Viewer, and no Document/Image custom property field was configured on a job-linked record's layout -- so no screenshot is included.
Steps:
- From a Document/Image custom property field (or the Drawing Viewer toolbar), click Browse (or Browse Appello photos).
- Switch between Job Files and Project Files if both are available.
- Optionally search by file name.
- Check one or more files.
- Click Attach to add them to the field, or close the dialog to cancel without attaching.
Permissions: governed by edit permission on whichever field or feature opened it (the custom property's field-level permission, or Files → View for the underlying job/project files) -- there is no separate permission for the picker itself.
Related pages: Project Files, Property Settings
Tags (not reachable)
Where it would open from: No current screen. Nothing in the current release opens this dialog.
What it's for: Would create or edit a Tag -- a name, a description, and a badge color picked from a fixed palette. Tags themselves, and attaching a tag to another record, are supported behind the scenes, but there is no page anywhere in the web app that lists tags, creates one, or attaches one to a record.
| Field | Required | Type | Effect |
|---|---|---|---|
| Name | Yes | Text | The tag's label. |
| Description | No | Textarea | Free-text description. |
| Badge (color) | No | Radio (5 preset colors) | The badge color the tag would display in, previewed live as you type the name. |
| Slug | -- | (not shown as a field) | Never shown as a control -- Appello derives it from Name. |
No screenshot is included because there is nothing to open.
Steps: Not applicable -- no reachable entry point exists in the current build.
Permissions: Not applicable.
Related pages: None currently link to a tagging feature.
HR Document (not reachable)
Where it would open from: No current screen. Nothing in the current release opens this dialog.
What it's for: Would create or edit a simple named HR document record with a Name and a Description field. This is a different, smaller feature than the onboarding paperwork covered in Onboarding Documents (which sends Dropbox Sign document packages for signature) and Policy Documents (handbooks and safety manuals for read-and-acknowledge) -- neither of those features uses this dialog.
| Field | Required | Type | Effect |
|---|---|---|---|
| Name | Yes | Text | The document's name. |
| Description | No | Textarea | Free-text description. |
No screenshot is included because there is nothing to open. If your instance needs a general-purpose "name + description" document record distinct from onboarding packages and policy documents, talk to Appello support -- there is no screen for it today.
Steps: Not applicable -- no reachable entry point exists in the current build.
Permissions: Not applicable.
Related pages: Onboarding Documents, Documents & Policies
Related pages
- My Profile -- where Reset Password and Reset PIN live for your own account.
- Exports, Imports and Bulk Actions -- the Import Holidays step-by-step, plus the export and bulk-action patterns shared across list pages.
- Property Settings -- custom properties, layout sections, and property values referenced by several dialogs above.
- Dashboard -- home of the Note Feed widget and its saved view filters.
- Roles and Permissions -- how model-level and field-level edit permissions gate inline table editing.