Templates
Module: Settings | Platform: Web
Appello provides three template management areas for different document types — estimate/change order document templates, Schedule of Values templates, and download (export) templates. Each controls a different generated-document surface: the customer-facing estimate/CO letter, a job's progress-billing line items, and the PDF you get from a record's Download button.
Navigation
Settings is not a page with its own URL — it opens as a slide-over panel on top of whatever screen you're on, the same panel used by Business Settings and Property Settings. Open each area from the panel's left-hand list:
- Sidebar → Settings → Estimate and Change Order Templates
- Sidebar → Settings → Schedule of Values Templates
- Sidebar → Settings → Download Templates
Estimate and Change Order Templates
This is a WYSIWYG document editor for building reusable Estimate/Change Order document templates ("Letters") — not a file upload manager. There is no control here for uploading an external file (Word, PDF, etc.); every template is authored directly in the same rich-text editor used to write an estimate or change order letter.
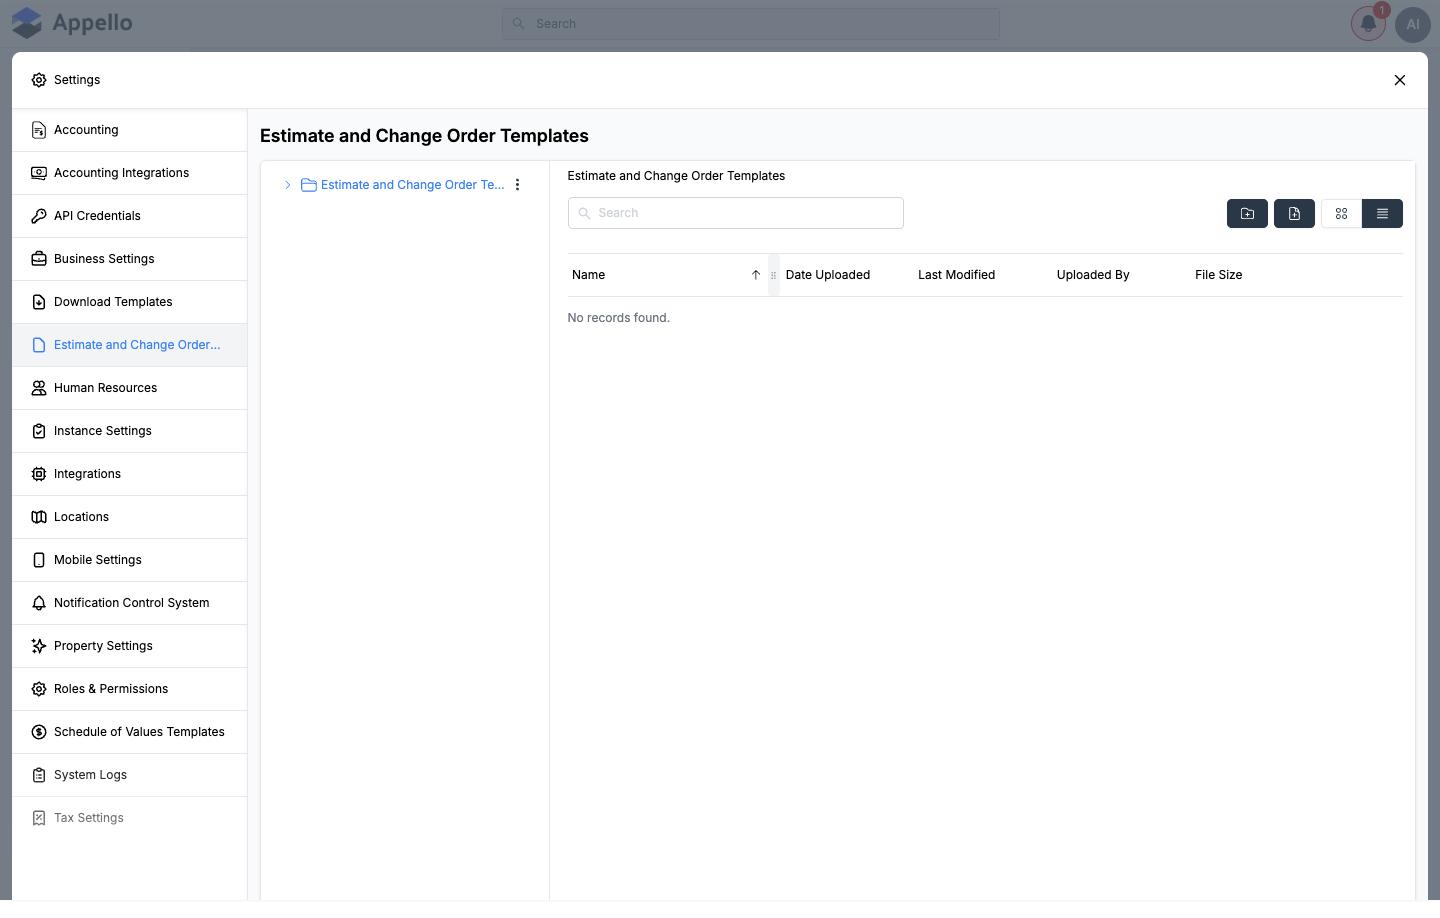
The folder tree on the left organizes templates hierarchically. A toolbar above the list has four icons:
| Control | Effect |
|---|---|
| Create New Folder | Prompts for a folder name and adds it to the tree. |
| Create New File | Opens the document editor (below) to author a new template. |
| Grid view toggle | Switches the list between grid and row layout. |
| List view toggle | Switches back to the row layout with the columns below. |
The list shows:
| Column | Description |
|---|---|
| Name | Template name. |
| Date Uploaded | When the template was created. |
| Last Modified | Most recent modification date. |
| Uploaded By | User who created the template. |
| File Size | Size of the template's content. |
Creating or editing a template
- Select Create New File in the folder tree toolbar (or Edit Template from an existing template's action menu).
- The document editor opens, pre-seeded with your instance's company header (name, logo, and address, from Instance Settings) if this is a new, blank template.
- Write the letter body using the formatting toolbar (bold/italic/underline/strike, text color, lists, blockquote, alignment, line height, indent/outdent) and the File / View / Edit / Insert / Format / Table menus.
- Insert dynamic content from the Insert menu (see The editor, below) — merge tags, images, tables, page breaks, equations, and endnotes.
- If this is a new template, select Save; a modal prompts for a Name and a Private Template toggle (private templates are visible only to their creator). Editing an existing template saves in place.
This documentation only opens the editor and cancels out — it does not click Save, since doing so would create a live document template on the demo tenant.
The editor
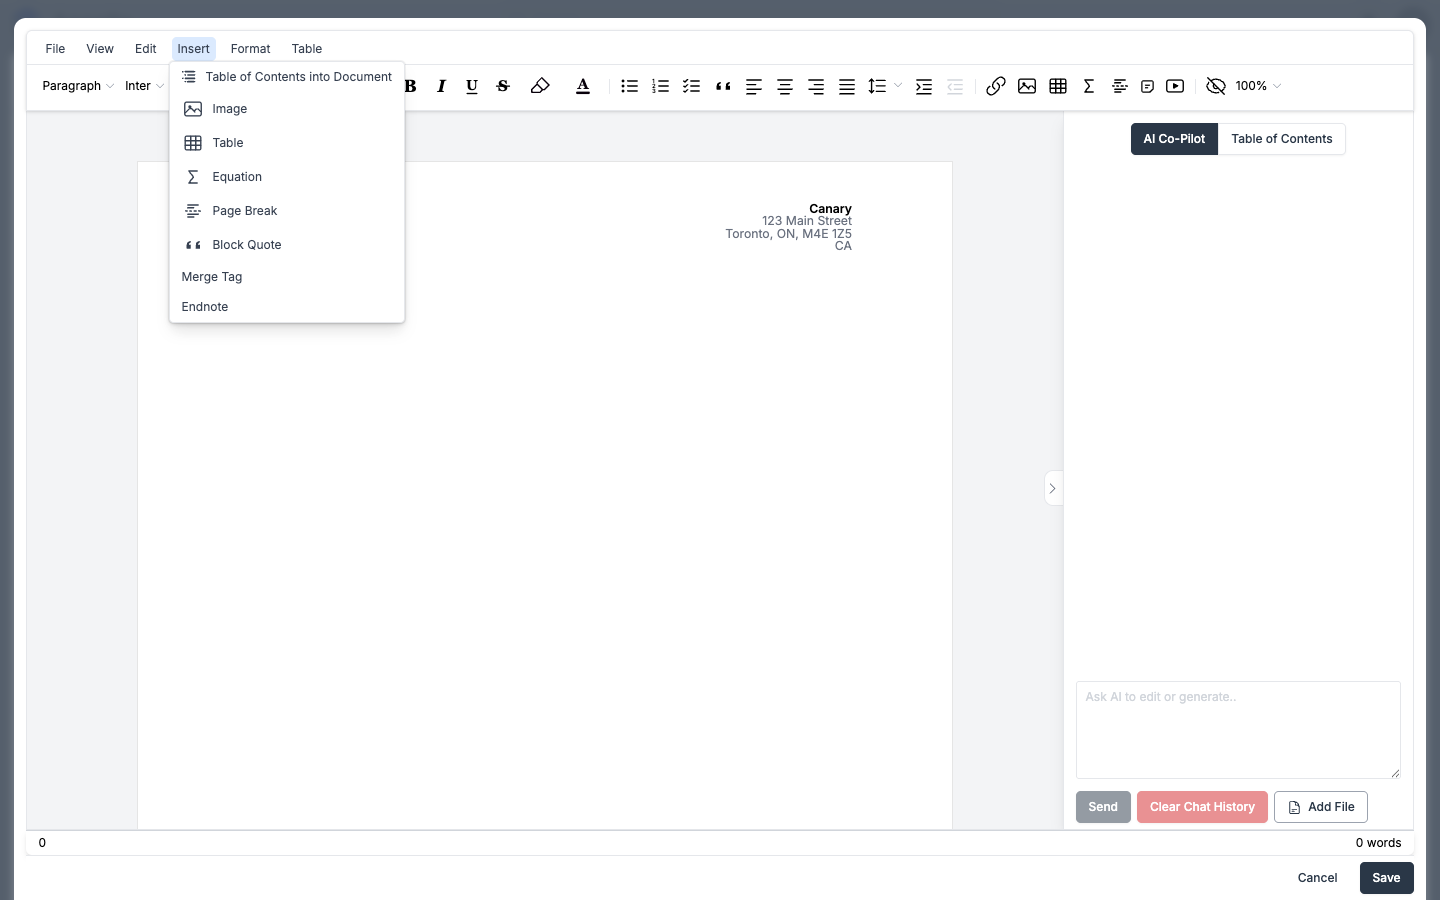
| Insert menu item | Effect |
|---|---|
| Table of Contents into Document | Inserts a generated table of contents at the cursor. |
| Image | Inserts an image (uploaded via upload_document_image when done through the API/MCP tools). |
| Table | Inserts an editable table. |
| Equation | Inserts a math equation block. |
| Page Break | Forces a new page at the cursor. |
| Block Quote | Inserts a quoted block. |
| Merge Tag | Opens the merge-tag picker (see Merge Tags, below). |
| Endnote | Inserts a numbered endnote reference. |
Clicking directly on the header (or footer) area of the page switches the editor into header/footer editing mode, with its own settings panel:
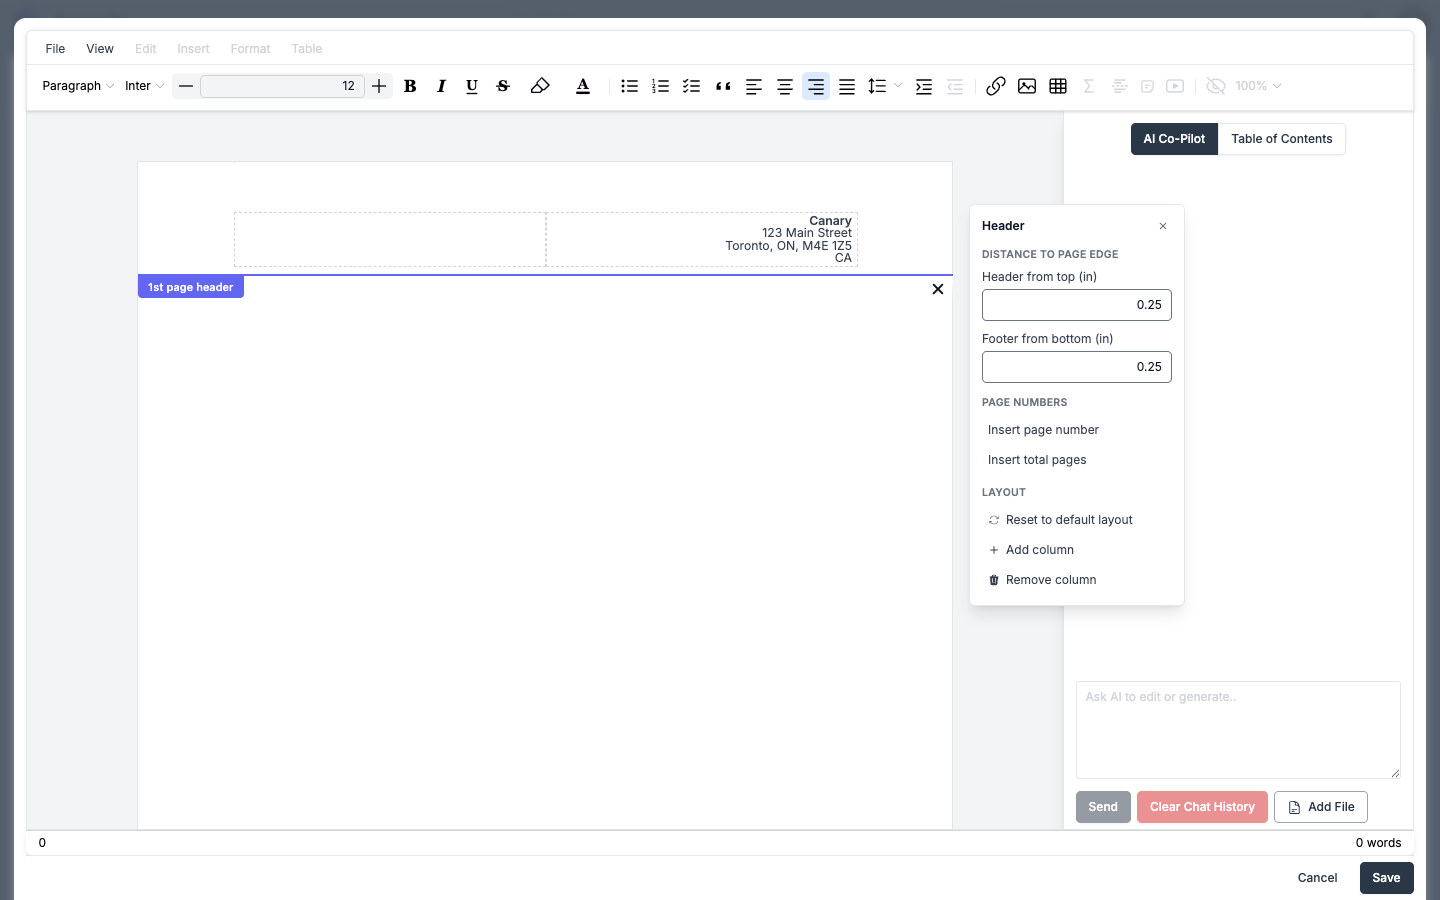
| Field / control | Effect |
|---|---|
| Header from top (in) | Distance from the top of the page to the header content, in inches. |
| Footer from bottom (in) | Distance from the bottom of the page to the footer content, in inches. |
| Insert page number | Inserts a {page}-style auto-numbering field. |
| Insert total pages | Inserts the document's total page count. |
| Reset to default layout | Reverts the header/footer back to the instance's default header/footer. |
| Add column / Remove column | Adds or removes a column in the header/footer's layout grid. |
| Close header and footer settings (X) | Exits header/footer editing mode, back to the document body. |
A 100% zoom control and a page-count/word-count footer bar sit below the document canvas.
Merge Tags
Merge tag options (surfaced through the editor's Insert → Merge Tag control, and returned by
the list_document_merge_tags tool of the Appello MCP Server) are pulled dynamically from your
permission-limited fields on four record types, grouped into sections:
- Customer — fields from the company on the estimate/change order
- Job — fields from the associated job
- Project — fields from the associated project
- Estimate — fields from the estimate/change order record itself
Which specific tags appear within each section depends on your role's field permissions — there is no fixed, universal list. Fields flagged as documents or images are excluded, as are a handful of internal columns (id, timestamps, sync status, and similar).
How a template is chosen and rendered to PDF
Templates aren't attached to a specific estimate/CO record directly — they're inserted as content into the letter you're editing. On an estimate or change order's Letter tab, the toolbar's File menu offers:
| File menu item | Effect |
|---|---|
| New Document | Clears the letter back to a blank document. |
| Insert Template | Opens a searchable picker of your instance's saved document templates (same Name / Date Uploaded / Last Modified / Uploaded By / File Size columns as the Settings list) and drops the chosen one into the letter. |
| Save as Template | Saves the letter's current content as a new reusable template, via the same Name/Private modal described above. |
Once the letter is finalized, the estimate or change order's export action (the download icon on the record) generates a combined PDF from whichever of Estimate Letter / Estimate Worksheet (or their change-order equivalents) you check — this is the same export covered in Estimate Report → Generating and sending a quote letter and on Change Orders.
Managing existing templates
Each template's action menu (the ⋮ icon) offers:
| Action | Effect |
|---|---|
| Edit Template | Opens the document editor on this template. |
| Rename Template | Opens a modal to change the template's Name (and Private/Public toggle). |
| Duplicate Template | Creates a copy of the template and its content. |
| Archive Template | Archives the template (shown only when it isn't already archived). |
| Restore Template | Restores an archived template (shown only when it is archived). |
| Delete Template | Permanently deletes the template, with a confirmation that reports related records affected (shown only when it's archived). |
| Make Private / Make Public | Toggles whether the template is visible only to its creator (Private) or to everyone (Public). |
Each action is individually permission-gated (see Permissions, below) — a role without
DocumentTemplate: edit, for example, sees Edit Template and Rename Template hidden from
the menu even though it can still view the list.
Schedule of Values Templates
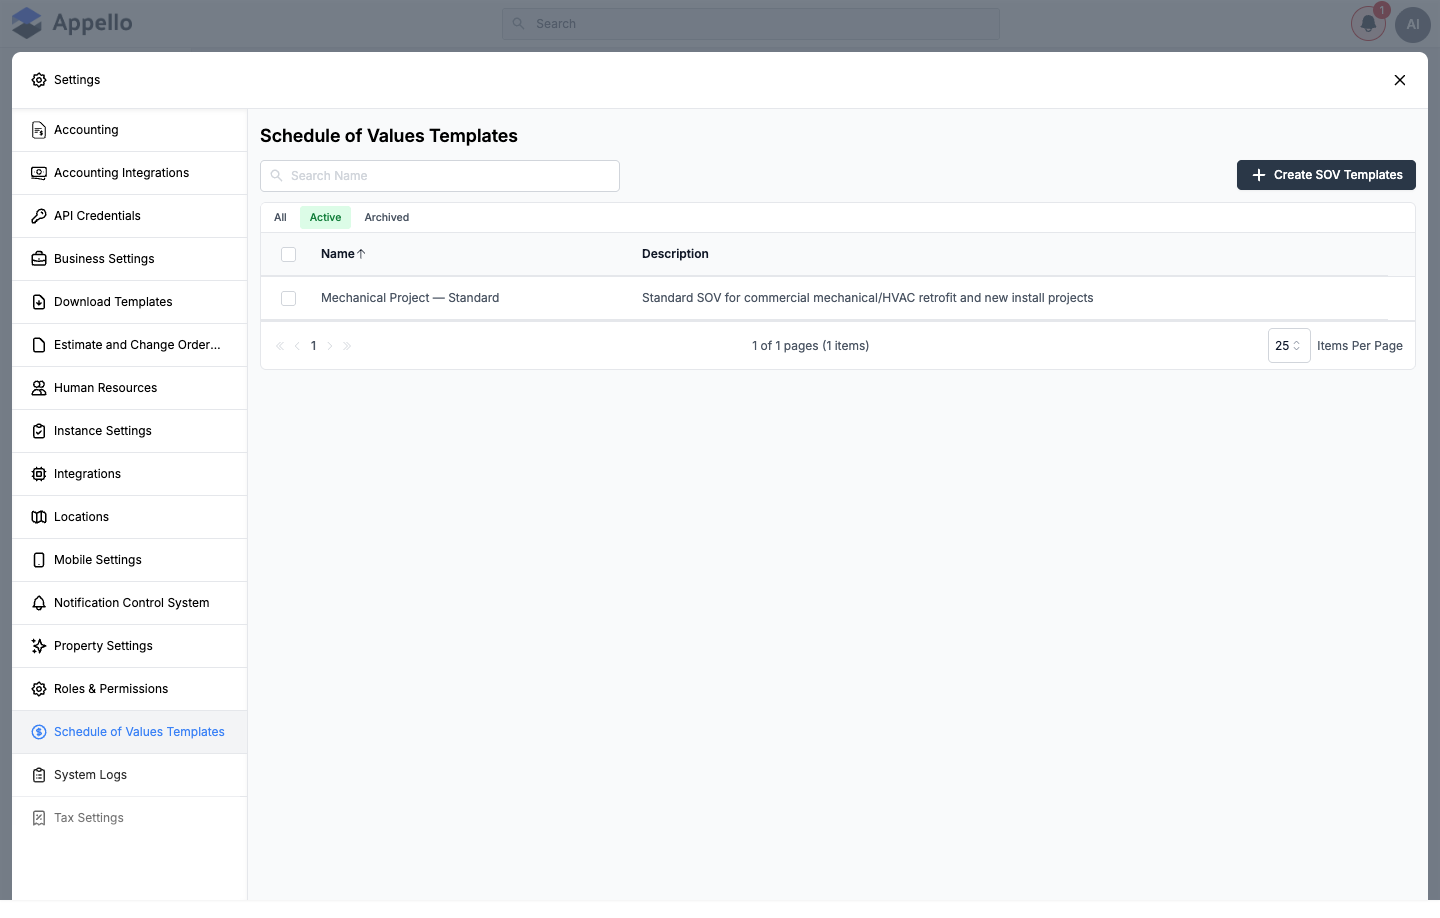
SOV templates define reusable, pre-built cost-code line item structures for progress billing, so you don't rebuild the same breakdown on every job.
| Column | Description |
|---|---|
| Name | Template name. |
| Description | Description of the template's intended use. |
Actions: Create SOV Templates, Search Name, filter (All/Active/Archived), and the standard bulk Archive/Delete/Restore row-checkbox actions.
- Select + Create SOV Templates.
- Enter a Name and optional Description.
- Select + Add Item to add line items one at a time.
- Select Save.
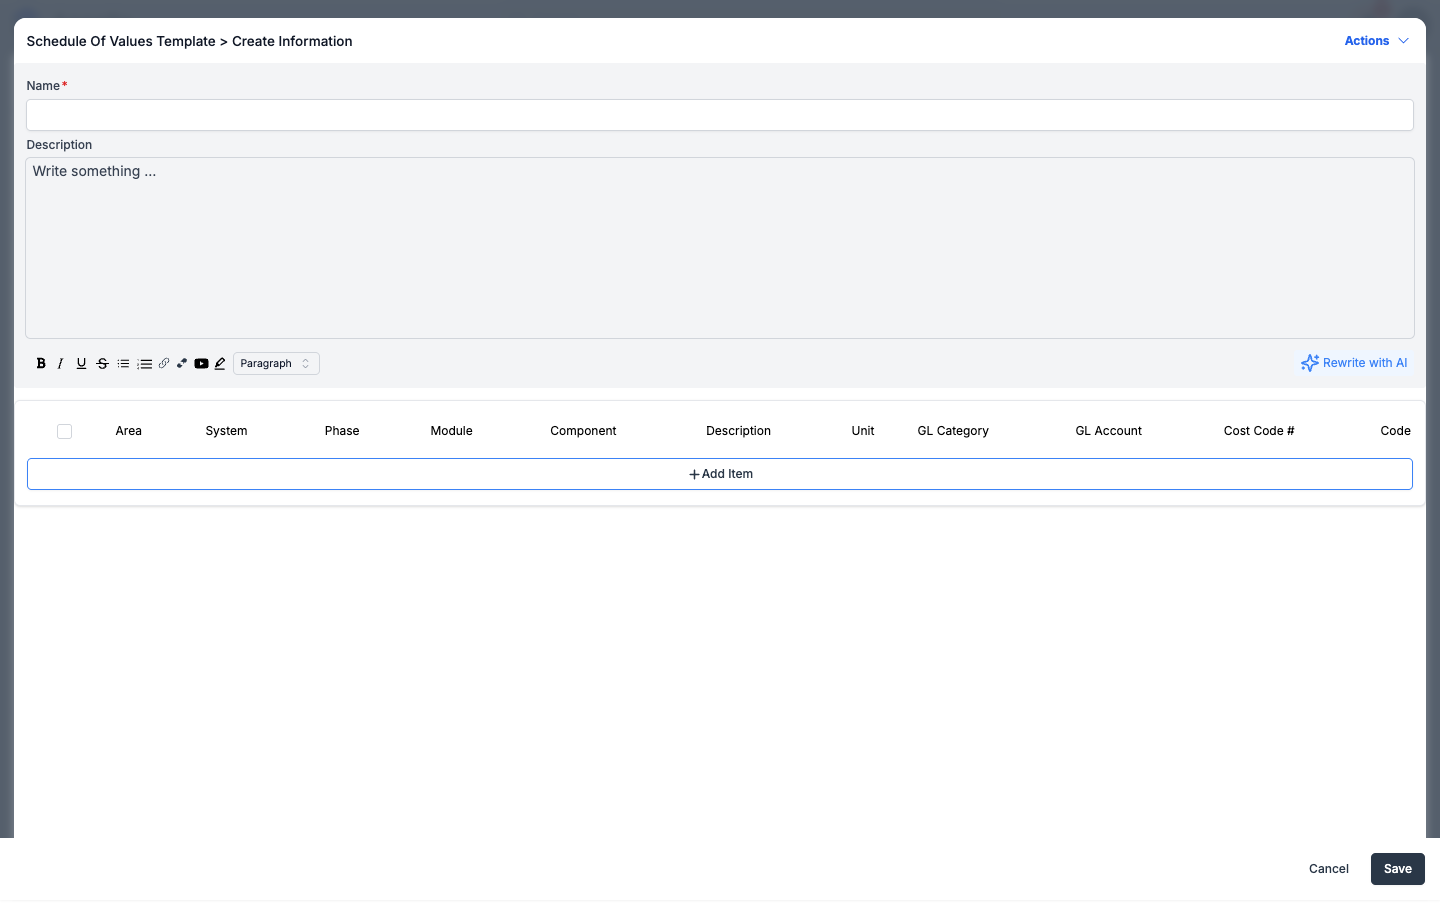
Every template line item carries the same fields as a job's Schedule of Values (Area, System,
Phase, Module, Component, Description, Unit, GL Category, GL Account, Cost Code #, Code). Once
built, a template is copied into a job via Import Template → Global Template on that job's
Schedule of Values screen (the apply_cost_code_template operation). For the full field
reference, the create workflow, and how templates get copied into a job, see
Cost Codes & Schedule of Values → SOV Templates.
This documentation only opens the create panel and cancels out — it does not click Save.
Download Templates
Settings → Download Templates | Sub-tabs: Projects, Jobs, Work Orders, Companies, Contacts, Equipment, RFIs
A download template controls which fields appear on the PDF generated when you select the Download button on a Project, Job, Work Order, Company, Contact, Equipment, or RFI record. Templates are scoped to one entity — one tab per type.
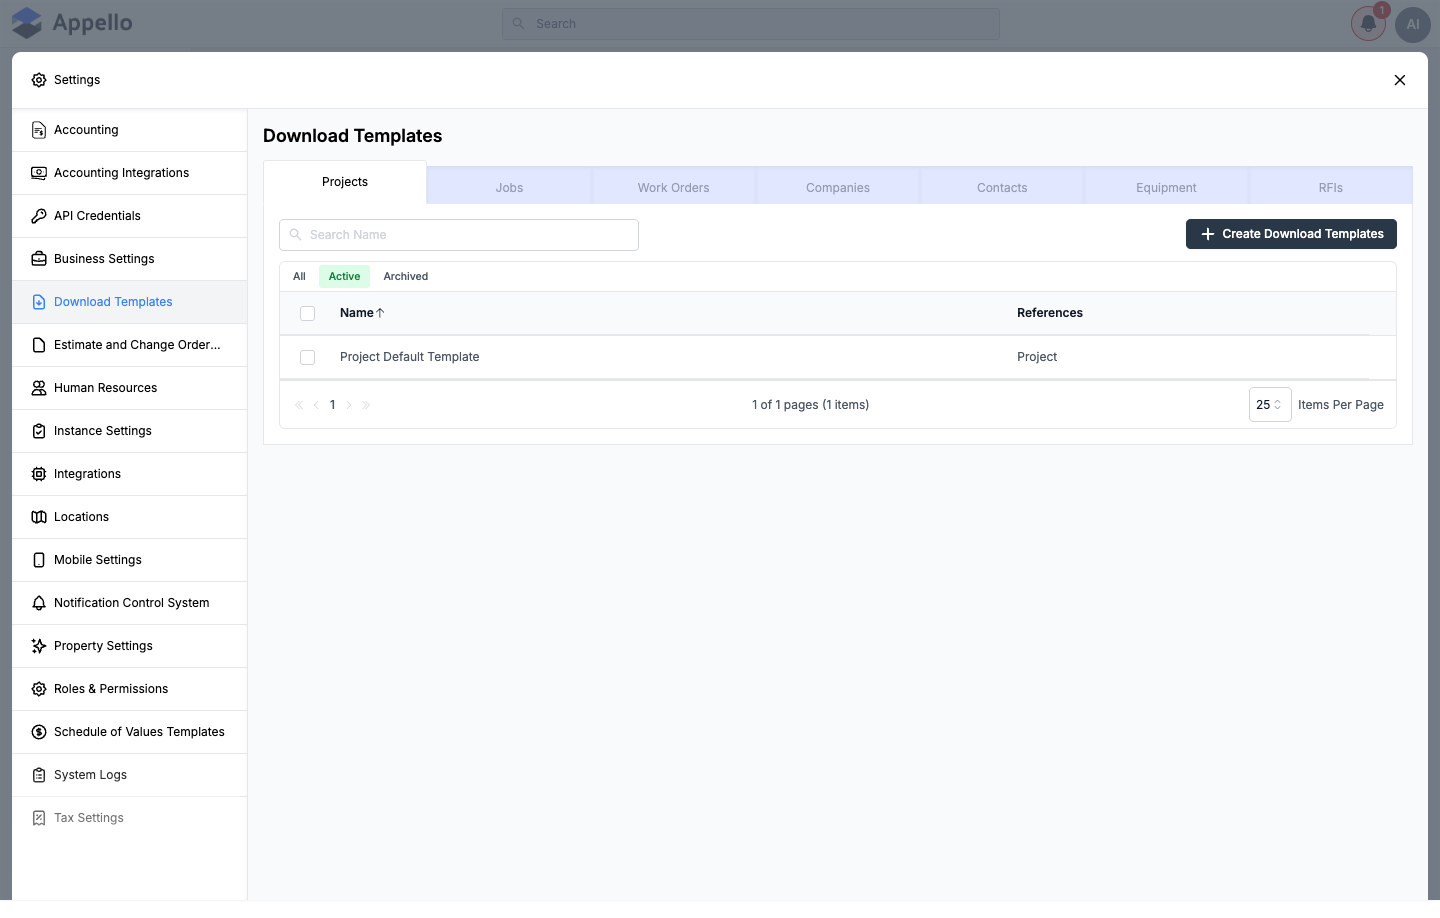
Sub-Tabs
| Sub-tab | Applies to (referenceModel / subModel) | Notes |
|---|---|---|
| Projects | Project | |
| Jobs | Job / ProjectJob | |
| Work Orders | Job / WorkOrder | |
| Companies | Company | |
| Contacts | Contact | |
| Equipment | EquipmentCategory (one template per category) | Templates are per Equipment Category, not one shared template for all equipment. Adds an Equipment Type filter alongside All/Active/Archived. |
| RFIs | RequestForInformation | The Description and Drawing Reference fields are always included and can't be turned off. |
Each tab's list shows Name and References (the entity/sub-type label) — except Equipment, which shows Name and Equipment Type instead:
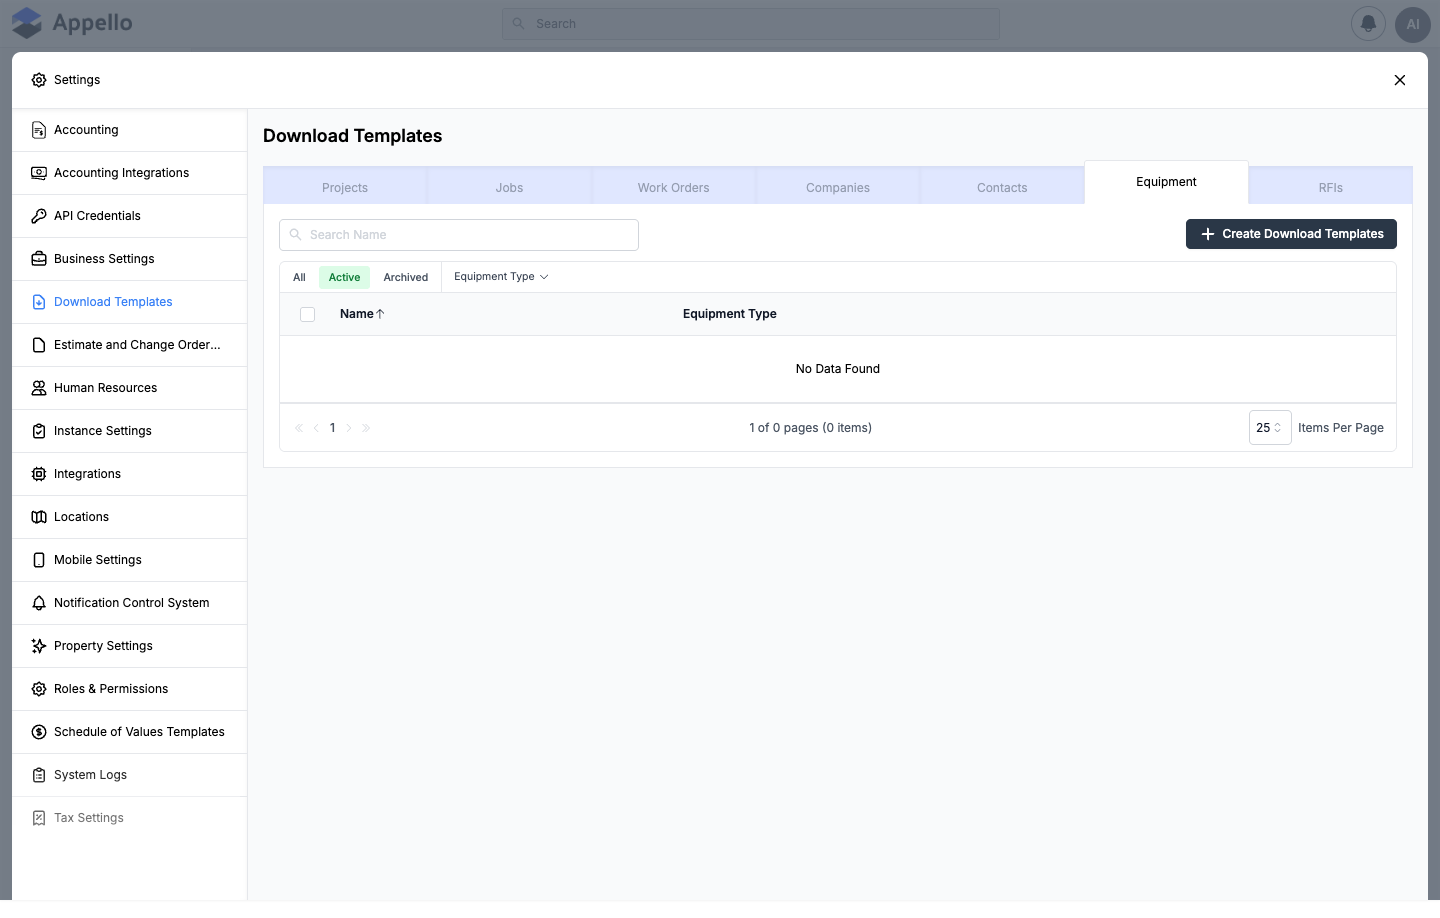
Actions: Create Download Templates, Search Name, filter (All/Active/Archived; Equipment adds an Equipment Type filter), and the standard bulk Archive/Delete/Restore row-checkbox actions — see Exports, Imports and Bulk Actions → Bulk actions for how that action bar behaves generally.
Creating a Download Template
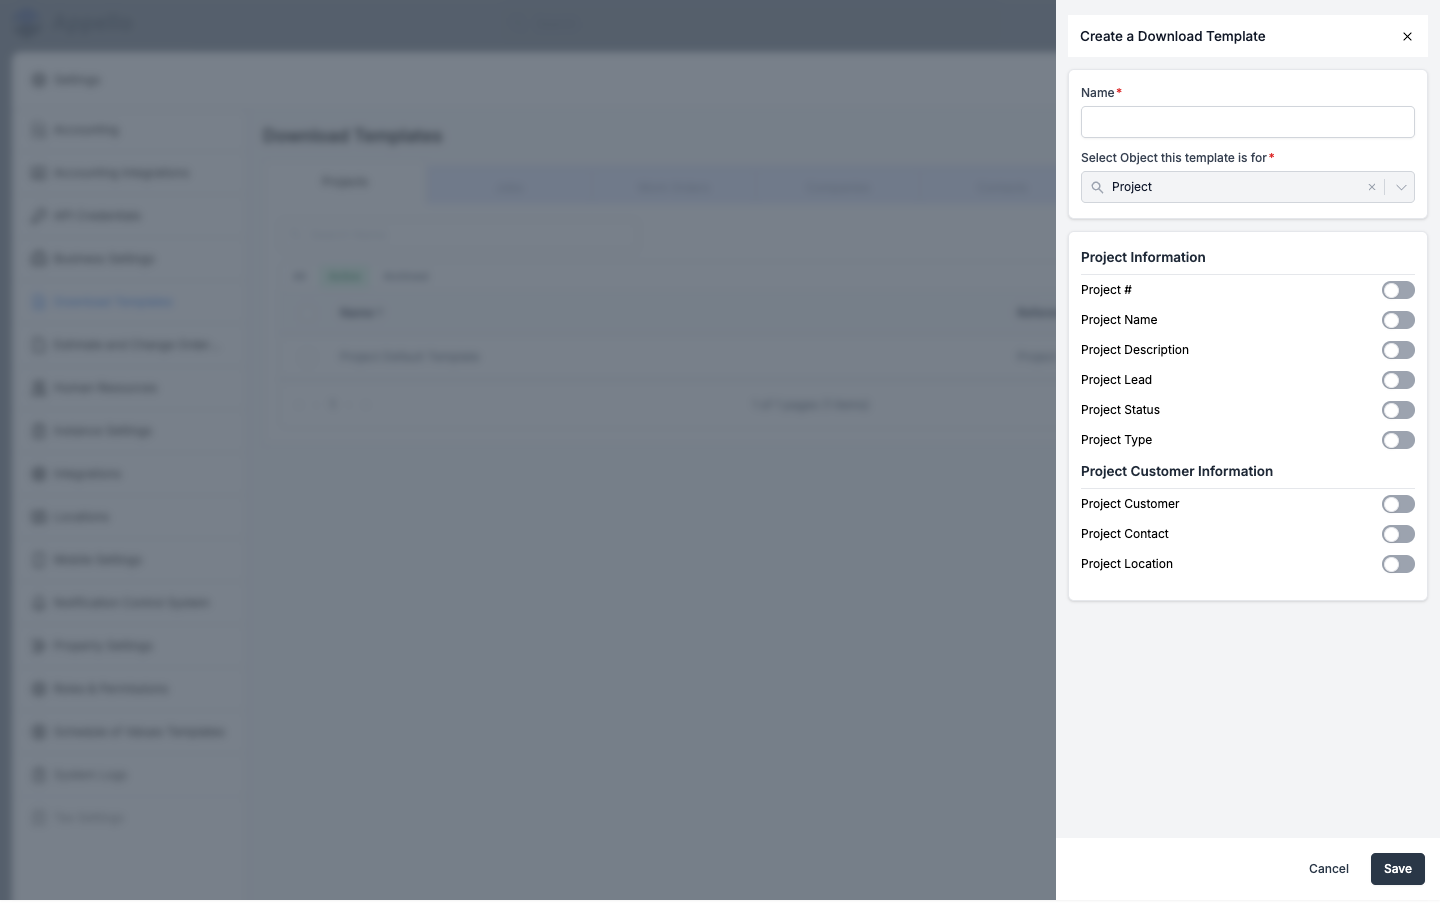
- From the sub-tab you want, select + Create Download Templates.
- Enter a Name.
- Select Object this template is for (labelled Select Equipment Type this template is for on the Equipment sub-tab) — pre-filled and locked to the sub-tab you opened this from.
- Toggle on the fields you want included on the PDF. Fields are grouped into sections that mirror the entity's document sections (for example, a Project template groups toggles under Project Information and Project Customer Information).
- Select Save.
| Form field | Required | Type | Effect |
|---|---|---|---|
| Name | Yes | Text | The template's display name. |
| Select Object this template is for / Select Equipment Type this template is for | Yes | Combobox (single-select) | The entity (or, on Equipment, the Equipment Category) this template applies to. Locked once you're inside a specific sub-tab; free-choice only from a generic create flow. |
| Per-field toggles | No | Toggle (one per attribute) | Whether that field appears on the generated PDF. Some fields (e.g. RFI's Description and Drawing Reference) are always-on and disabled. |
Some fields are always included and can't be turned off — for example, the RFI Download Template locks in Description and Drawing Reference.
This is a field-selection tool for the exported PDF, not a file upload or a free-form document editor — there is no place to upload a template file or write custom text here. This documentation only opens the create panel and cancels out — it does not click Save.
How it's used
Each of Projects, Jobs, Companies, Contacts, and Equipment has a Download button on its own detail page. Selecting it opens a small Select Template For Export picker listing your configured Download Templates for that record's type (Jobs lists only the Jobs sub-tab's templates; Equipment lists only templates for that record's Equipment Category); choosing one generates and downloads a PDF built from the fields that template has toggled on. Step-by-step, with screenshots, on each detail page: Project, Job, Company, Contact, and Equipment.
RFIs use their Export PDF button instead, where the RFI template is optional -- see RFIs → Exporting and downloading the RFI PDF.
The Work Orders sub-tab exists here, but the Download button on a work order's detail page does not use it: that button downloads a fixed-format Work Order PDF immediately, with no template picker. Templates created on the Work Orders sub-tab currently have no effect on that PDF.
This is a separate mechanism from the generic Export button covered in Exports, Imports and Bulk Actions — that page's CSV/PDF exports use a fixed, predefined column set per report type, not a configurable Download Template.
Archive/Restore
Selecting one or more rows' checkboxes replaces the column-header row with a bulk-action bar offering Archive (Active tab) or Delete / Restore (Archived tab) — the standard pattern documented in Exports, Imports and Bulk Actions → Bulk actions.
Permissions
From SettingsPanel.tsx:
| Gate | Controls |
|---|---|
DocumentTemplate: view | Whether the Estimate and Change Order Templates item appears in the Settings panel. |
DocumentTemplate: edit | Whether creating/editing folders and templates is enabled, or the "you don't have permission" banner (and a disabled create/edit menu) shows instead. |
CostCode: view | Whether the Schedule of Values Templates item appears in the Settings panel. |
CostCode: edit | Whether creating/editing SOV templates is enabled. |
ObjectDownloadTemplate: view | Whether the Download Templates item (and each of its sub-tabs) appears in the Settings panel. |
ObjectDownloadTemplate: edit | Whether creating/editing download templates is enabled. |
Individual actions on the Estimate and Change Order Templates action menu are further gated by
specific DocumentTemplate permissions — create (Duplicate), archive (Archive), delete
(Delete), and restore (Restore) each hide their menu item when the role lacks that permission.
Related Pages
- Cost Codes & Schedule of Values — Full SOV template and job SOV reference
- Estimate Report and Change Orders — where estimate/CO document templates are inserted into a letter and exported to PDF
- Exports, Imports and Bulk Actions — the generic list-level Export button and the row-checkbox bulk-action bar used by both template lists
- Business Settings — Invoice PDF download naming convention and merge tags
- Property Settings — the entity field/layout configuration that download-template field toggles are drawn from