Administrative map
Module: Map | Platform: Web
Visualize job sites, active worker positions, equipment, and union halls on one map, and play back a worker's movements for any day.
Navigation
Sidebar → Map
URL: /maps
Permission gate: the page will not load unless the signed-in user holds all five of the following permissions at once — not just any one of them:
- Jobs → View
- Equipment → View
- Union Halls → View
- Users → View
- Administrative Map → View
Within the page, each of the three tabs is separately gated on just its own permission — a user missing Users → View or Equipment → View (but who still passes the five above) will not see the Users or Equipment tab, respectively. See Permissions below.
Overview
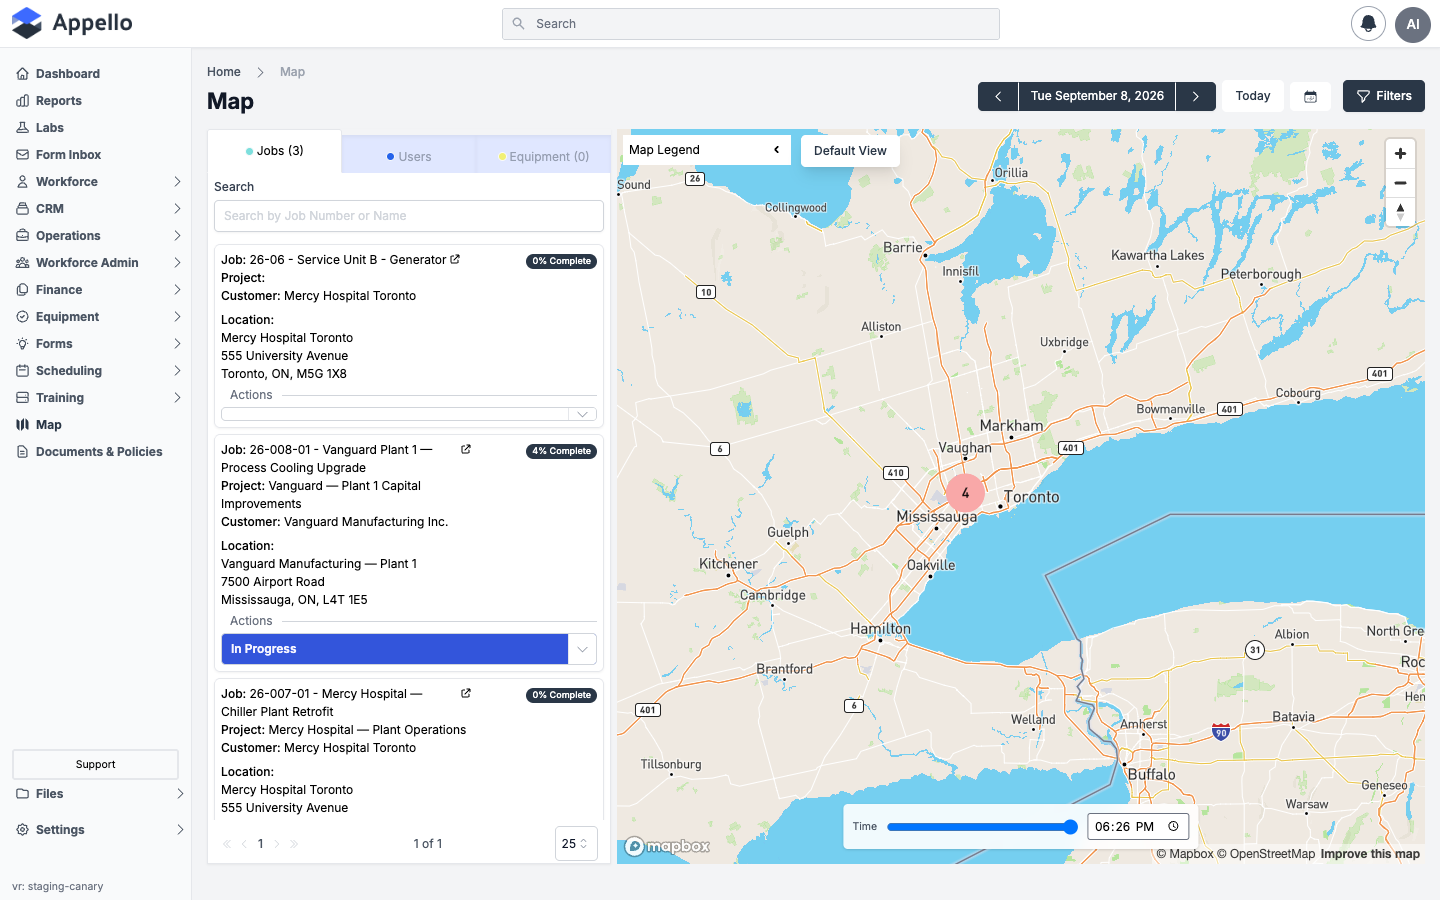
The Administrative Map plots job sites, union halls, tracked equipment, and (on the Users tab) field workers' clock-in sessions and GPS pings, all on one Mapbox canvas. Dispatchers and project managers use it to see where work and people are right now, filter down to a specific slice of jobs or equipment, and play back where a worker travelled on a given day.
Screenshots on this page are from the demo instance. The page has no "(BETA)" label in the current build — the sidebar entry and page heading both simply read "Map."
The three tabs
The left panel has three tabs. Each one shows a filtered list and controls what plots on the map canvas to its right.
| Tab | Pin colour on the map | What the tab list shows |
|---|---|---|
| Jobs | Teal #7DDFDD | A searchable, paginated card per job with a location: job number/name (links out), project, customer, address, % complete, and an inline job-status dropdown. |
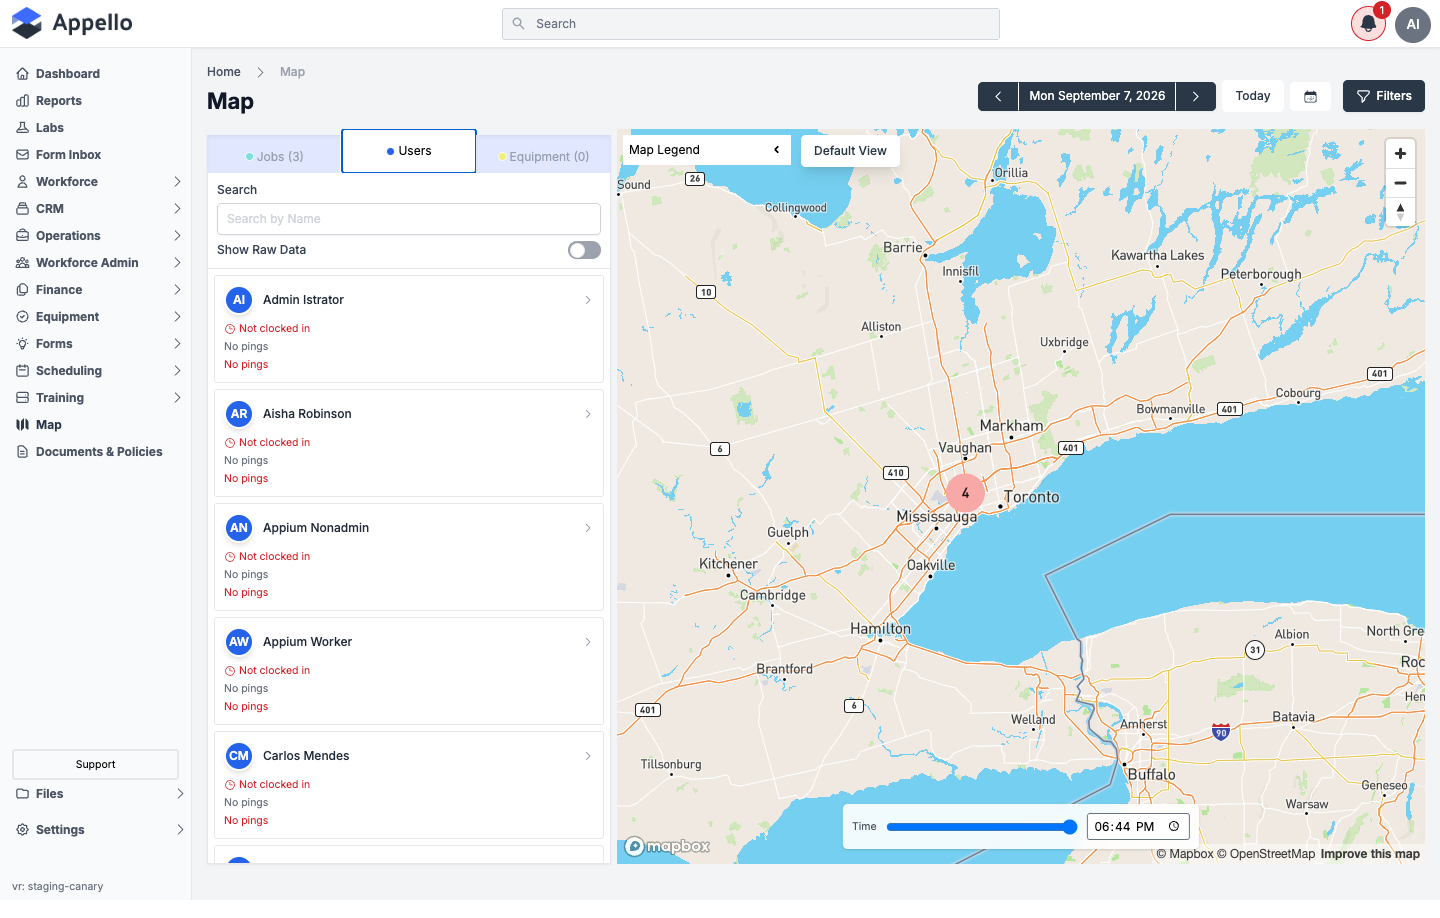
| Users | Blue #2563eb | A searchable list of users with their clock-in status for the selected day, a Show Raw Data toggle, and (once a user is selected) their clock-in/out sessions with Play/Pause route playback. |
| Equipment | Yellow #f1f075 | A searchable, paginated card per piece of equipment that currently has a last-known GPS position: name/CUID (links out), status badge, last/next inspection date, category. |
Switching tabs also changes which map layers are visible: the Jobs tab shows job, union-hall, and equipment pins together; the Equipment tab isolates equipment pins; the Users tab hides job and equipment pins and shows only the selected worker's route.
Map layers
| Layer | Data source | Pin colour / marker | Popup on click/hover |
|---|---|---|---|
| Job sites | Each job's address, or its project's when the job has none. A job needs a location to plot at all. | Single fixed job-site icon (all jobs use the same icon regardless of status). | Yes — see Clicking a job pin. |
| Union halls | The union hall's own address. | A library-building icon (fixed image), toggled by Show Union Halls. | No — union halls have no click/hover popup on the map canvas. Open the hall's own record from Union Hall Management instead. |
| Equipment | The equipment's last-known GPS position, recorded when the equipment is checked in or out of an assignment from the mobile app. Only equipment that has reported a position plots. | Yellow circle #f1f075. | No — there are no click/hover popups for equipment pins on the canvas; open the Equipment tab list instead, or the Equipment List's Last Location column. |
| Users / clock-ins | The recorded clock-in and clock-out positions for the discrete pins, plus the location pings (position, accuracy, motion type, timestamp) recorded in between for the trail. | See Legend and pin colours below. | Handled through the Users tab's own list and playback controls, not a map popup — see Viewing a worker's travel route for a day. |
The map's legend also carries a "Headquarters" pin type (an office-building icon), but no headquarters or company-location data is ever attached to it, so no such pins actually render. Likewise, a set of four status colours (red, orange, yellow, green) exists for job-site pins but isn't tied to any status logic — every job pin currently uses the same icon regardless of job status.
Layers not present on this map
- Travel zones are not a layer on the Administrative Map. They render on each union hall's own detail page instead — see Union Hall Management → the hall's detail page for the travel-pay zone map around a hall's origin point.
- Inventory locations do not plot on this map. An inventory location does carry an address, but the map never reads it — inventory locations are not a layer here.
Legend and pin colours
Click the chevron on the Map Legend box (top-left of the map canvas) to expand it. It documents four groups of colour-coding:
| Group | Item | Colour |
|---|---|---|
| Icons | Headquarters | Office-building icon (defined, but see the note above — never actually renders) |
| Icons | Union Hall | Library icon |
| Colour representation | Job (single pin) | #7DDFDD |
| Colour representation | Equipment (single pin) | #f1f075 |
| Colour representation | Mixture (a cluster containing more than one type) | #F9A8A8 |
| Ping motion type | On Foot (walking or running) | #eab308 |
| Ping motion type | Stationary | #14b8a6 |
| Ping motion type | Unknown | #9ca3af |
| Ping motion type | On Bicycle | #3b82f6 |
| Ping motion type | In Vehicle | #8b5cf6 |
| Ping status | Clock In | #16a34a |
| Ping status | Clock Out | #dc2626 |
The cluster bubbles (the circular badges with a count, shown when zoomed out) use a separate,
simpler rule: teal if every pin inside is a Job, yellow if every pin inside is Equipment, and pink
(#F9A8A8) for any mixed cluster.
Clicking a job pin
Hovering a job pin for about three-quarters of a second opens a popup card with:
- Job number and name
- % complete and the job's status badge
- Every user scheduled to that job on the currently-selected date, each with a position badge (or "No users scheduled")
- A link-out icon that opens the job's detail page (Overview tab) in a new tab
This popup is triggered by a mouse hover on the map canvas, not a click, and the canvas pins are drawn by Mapbox GL (not real DOM/text elements) — the crawl tool used to build this page can only drive clicks on real page text, so a screenshot of the hover popup itself could not be captured. Its contents above are described rather than shown. The equivalent information for every job with a location is visible without hovering, in the Jobs tab's card list shown in the Overview screenshot above.
Union hall and equipment pins have no click/hover popup on the canvas itself — see the Map layers table above for where to find that information instead.
Search
There is no address or geocode search bar on the Administrative Map — confirmed absent from source. Each tab instead has its own name-based search box that filters that tab's list (and, for Jobs and Equipment, the pins that plot):
| Tab | Search box placeholder | Matches on |
|---|---|---|
| Jobs | "Search by Job Number or Name" | Job number or job name |
| Users | "Search by Name" | Worker name |
| Equipment | "Search by Equipment CUID or name" | Equipment CUID or equipment name |
The Filters flyout
Click Filters (top-right of the page) to open the flyout. It has two sections layered on top of the per-tab searches above: a set of visual on/off toggles, and facet filters for jobs and equipment.
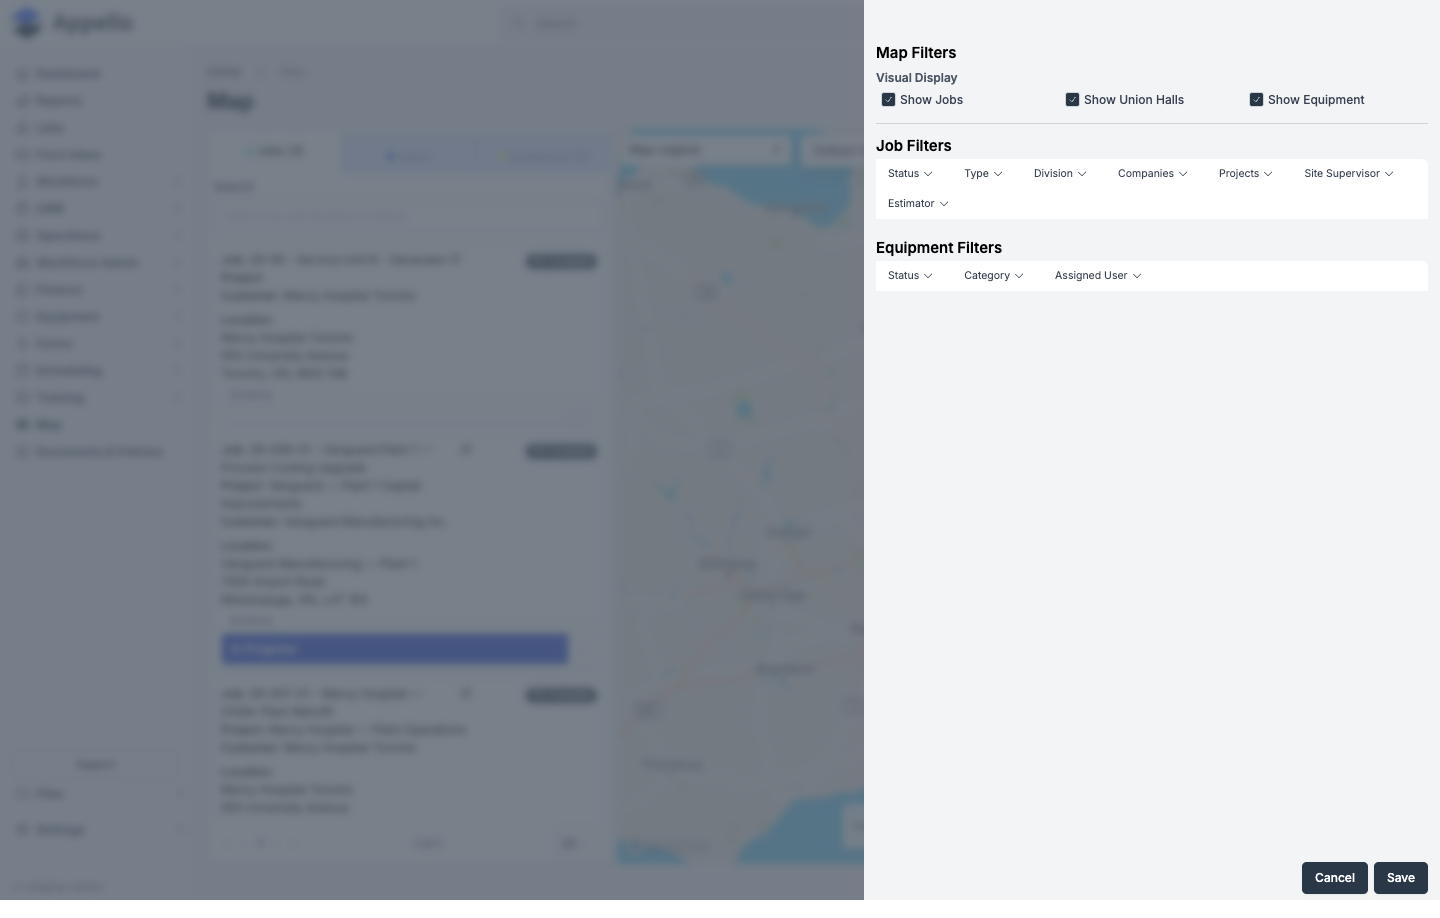
| Section | Filter | What it does |
|---|---|---|
| Visual Display | Show Jobs | Show/hide the job-site layer. |
| Visual Display | Show Union Halls | Show/hide the union-hall layer. |
| Visual Display | Show Equipment | Show/hide the equipment layer. |
| Job Filters | Status | Restrict job pins/cards to one or more job statuses. |
| Job Filters | Type | Restrict to one or more job types. |
| Job Filters | Division | Restrict to one or more divisions. |
| Job Filters | Companies | Restrict to one or more customer companies. |
| Job Filters | Projects | Restrict to one or more projects. |
| Job Filters | Site Supervisor | Restrict to one or more site supervisors. |
| Job Filters | Estimator | Restrict to one or more job leads/estimators. |
| Equipment Filters | Status | Restrict equipment pins/cards to one or more equipment statuses. |
| Equipment Filters | Category | Restrict to one or more equipment categories. |
| Equipment Filters | Assigned User | Restrict to equipment currently assigned to one or more users. |
Selections persist in the browser's local storage, so the map reopens with the same filters next time. There is no date filter in this flyout — the date is controlled separately by the date navigator described below, and there is no department or user-group filter (department/user-group are not offered as filters here).
Map controls
| Control | Behaviour |
|---|---|
Zoom in / Zoom out (+/− buttons, top-right of the map) | Standard Mapbox zoom. |
| Reset bearing to north (compass button) | Re-levels the map if it has been rotated. |
| Default View button | Zooms back out to the bounds captured when the map first loaded, showing every plotted pin. |
| Pan / scroll-zoom | Standard mouse/trackpad map navigation. |
The map is fixed to a single street-map style — there is no satellite or terrain toggle, no fullscreen control, and no "locate me" control.
There is also no export or print feature on this page.
Clustering
Nearby pins collapse into a numbered cluster bubble once you zoom out (cluster radius 80px, active up to zoom level 23 — i.e. clustering is active at almost every zoom level until pins are far enough apart). Clicking a cluster eases the map in to the zoom level at which that cluster's pins separate. See Legend and pin colours above for the cluster colour rule.
Refresh interval
Job, equipment, and union-hall data is fetched once when the page loads and again whenever you change a filter, the date, or the pagination — pin data does not refresh on its own. The one thing that does update by itself is the Time slider under the map: while the date navigator is set to today and no specific pin/user is locked in, the slider's "now" position advances automatically every 60 seconds.
The date navigator
The bar above the map (< [date] >, Today, and a calendar-picker button) controls which day the
Users tab plays back and which day's schedule the job popup's "scheduled users" list reflects.
It defaults to today.
Viewing a worker's travel route for a day
The Users tab plays back a single worker's movements — their clock-in/out sessions and the GPS pings recorded between them — for whichever day is selected in the date navigator.
Steps
-
From
/maps, click the Users tab. -
Use the date navigator to pick the day you want to review. It defaults to today.
-
Click a worker's row in the list, or use Search by Name to find them first.
-
Once a worker is selected, their clock-in/out sessions for the day appear underneath their row. Each session has a Play / Pause button that animates the worker's path across the map using the Time slider at the bottom of the map.
-
Click a ping in the session list to jump the map, and the Time slider, straight to that point.
-
Toggle Show Raw Data to see every recorded ping instead of the cleaned-up path (which filters out GPS aberrations, such as bounce at the edge of a geofence).
On the demo instance used for the screenshot above, no worker had any clock-in or GPS ping data for the selected day, so every row reads "Not clocked in" with no pings — that is an empty state, not a bug. The Play/Pause and Time-slider playback behavior is described rather than shown from a live route.
A worker only has a ping trail to play back if Persistent Background Tracking is enabled for your instance and the worker was clocked in with location permission granted.
Continuous location tracking
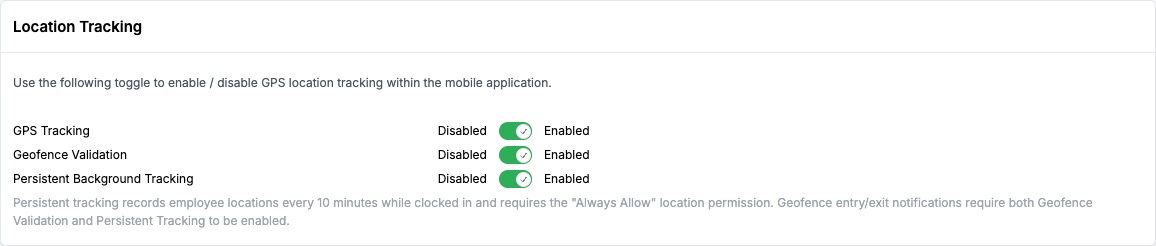
Whether the map shows any worker location data at all — and how continuously — is controlled by three toggles on your instance, not by the map page itself.
Navigation: Settings → Instance Settings → Location Tracking card
| Setting | What it turns on |
|---|---|
| GPS Tracking | The master switch for location tracking in the mobile app. Turning it off also turns off Geofence Validation and Persistent Background Tracking. |
| Geofence Validation | Enforces a job's geofence radius against a worker's clock-in/clock-out location, and enables the job-level geofence entry/exit notifications described in Job Settings tab. Requires GPS Tracking. |
| Persistent Background Tracking | Records a worker's location every 10 minutes while they are clocked in, even if the app is backgrounded — this is what produces the trail of pings used for worker travel route playback. Requires GPS Tracking and the device's "Always Allow" location permission. |
For the mobile side of clocking in (and the permission prompt a worker sees), see Schedule, Directions and Clock In and the Clock In / Out Report.
What workers see on mobile
This subsection describes the mobile app rather than showing a mobile screenshot — the crawl tool used to build this page only drives the desktop web app.
- With GPS Tracking off, the mobile app does not request or record device location at all.
- With it on, the app records a position at clock-in and clock-out (used for geofence validation) even if Persistent Background Tracking is off.
- With Persistent Background Tracking also on, the app additionally requests the "Always Allow" background location permission and keeps recording a position every 10 minutes while the worker stays clocked in, whether or not the app is in the foreground.
Privacy notes
- Discrete clock-in / clock-out positions are recorded whenever GPS Tracking is enabled, regardless of the Persistent Background Tracking setting.
- The continuous trail of pings between clock-in and clock-out is only recorded when Persistent Background Tracking is enabled, and only while a worker is clocked in — it does not record a worker's location while they are off the clock.
- Turning GPS Tracking off for the instance stops new location data from being captured; it does not retroactively remove pings already recorded.
Equipment location on the map and in lists
Equipment location on the Administrative Map, and on equipment lists and detail tabs elsewhere in Appello, both come from the same place: the equipment's most recent recorded position (captured when the equipment is checked in or out of an assignment from the mobile app).
On the map
-
From
/maps, click the Equipment tab. The number in parentheses on the tab is how many equipment records currently have a last-known location. -
Only equipment with a recorded location plots as a pin on the map; equipment that has never reported one does not appear.
-
Use Filters → Equipment Filters to narrow the pins by Status, Category, or Assigned User (see The Filters flyout above).
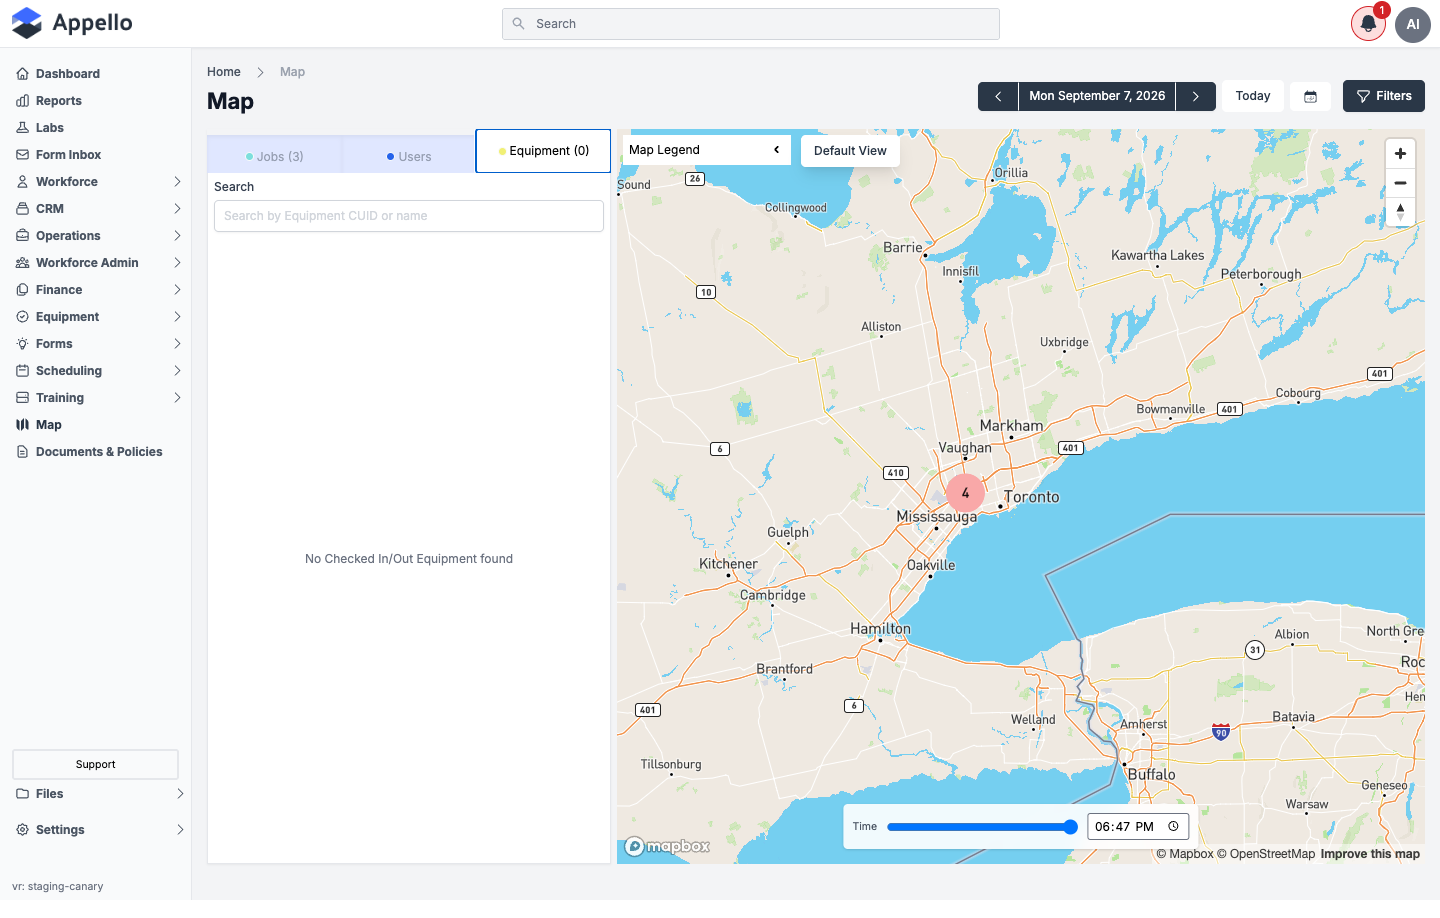
The demo instance has no equipment with a last-known GPS position, so the Equipment tab and its map layer are empty above ("Equipment (0)").
On equipment lists and detail tabs
Outside the map, the same last-known location is exposed as two columns wherever an equipment list appears — the main Equipment List, and the Assigned Equipment tabs on a company, job, or user record:
| Column | Description |
|---|---|
| Last Located | The date and time equipment last reported a GPS position, with a relative time (e.g. "2 hours ago"). |
| Last Location | A View Map link that opens the last-known coordinates in Google Maps in a new tab. |
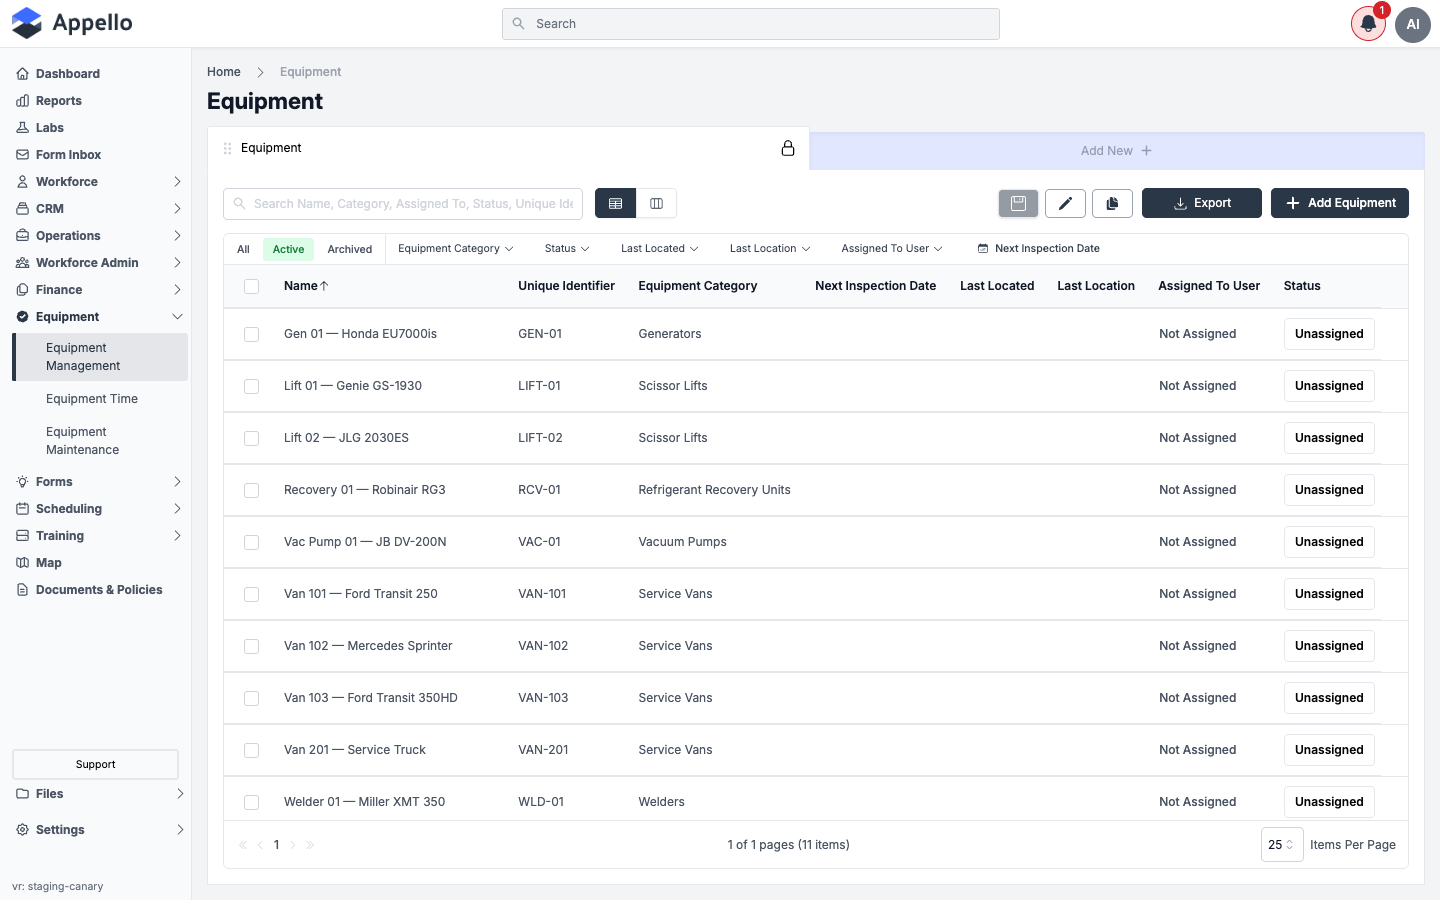
On the demo instance, no equipment has ever reported a location, so both columns are blank for every row. With data present, Last Location renders as a "View Map" link rather than an inline map.
Worker GPS tracking on the map
The Users tab is also how you check where field workers are right now, not just play back their day:
- Each worker's row shows their current clock-in status and whether they have any pings recorded for the selected day.
- Selecting a worker centers the map on their most recent position for the selected date and time — the Time slider defaults to the current time when the date navigator is set to today.
- Clock-in and clock-out always plot as discrete pins, taken directly from the check-in record's own coordinates, even if Persistent Background Tracking is off and no ping trail exists.
- Filters available on this tab: Search by Name narrows the worker list; the date navigator controls which day is shown. There is no separate job filter for the Users tab itself, but each session is labeled with the job it was recorded against.
Permissions
| Gate | Requires |
|---|---|
| Loading the map at all | Jobs → View and Equipment → View and Union Halls → View and Users → View and Administrative Map → View — all five are required, not just one. |
| Jobs tab visible | Jobs → View |
| Users tab visible | Users → View |
| Equipment tab visible | Equipment → View |
| Breadcrumb includes "Map" (vs. just "Home") | Jobs → View |
How the map connects to other features
| Feature | Relationship |
|---|---|
| Jobs List | Each job-site pin and Jobs-tab card links directly to the job's detail page. See Jobs List. |
| Projects | Each job's project name shows in its Jobs-tab card. |
| Equipment List | Equipment pins and the Equipment tab reflect the same last-known location shown in the Equipment List's Last Located/Last Location columns. |
| Union Halls | Union hall pins mirror the halls in Union Hall Management; travel-zone maps live on each hall's own detail page, not here. |
| Timesheets / Clock In-Out | Worker pins and route playback reflect the same clock-in/out records shown in the Clock In / Out Report. |
| Mobile app | Job popups, worker pins, and ping trails all depend on data captured through Schedule, Directions and Clock In on mobile. |
| Instance Settings | The Location Tracking card controls whether any worker GPS data exists to show. |