Requests for Information (RFIs)
A Request for Information (RFI) is a formal question your team sends to a job's customer, architect, or general contractor to resolve something before work can proceed -- a missing spec, a conflicting drawing detail, a scope clarification. In Appello, an RFI is a tracked record: it has its own auto-generated number, an optional reference to a specific area of a drawing, file attachments, a status, and -- once you send it -- a record of the recipient's response.
This guide covers creating an RFI, attaching drawings and files, sending it to an external recipient, how that recipient responds without needing an Appello account, tracking status, exporting the RFI as a PDF, and closing it out.
Where RFIs live
RFIs are always tied to a job, but you can create, view, and manage them from either of two places:
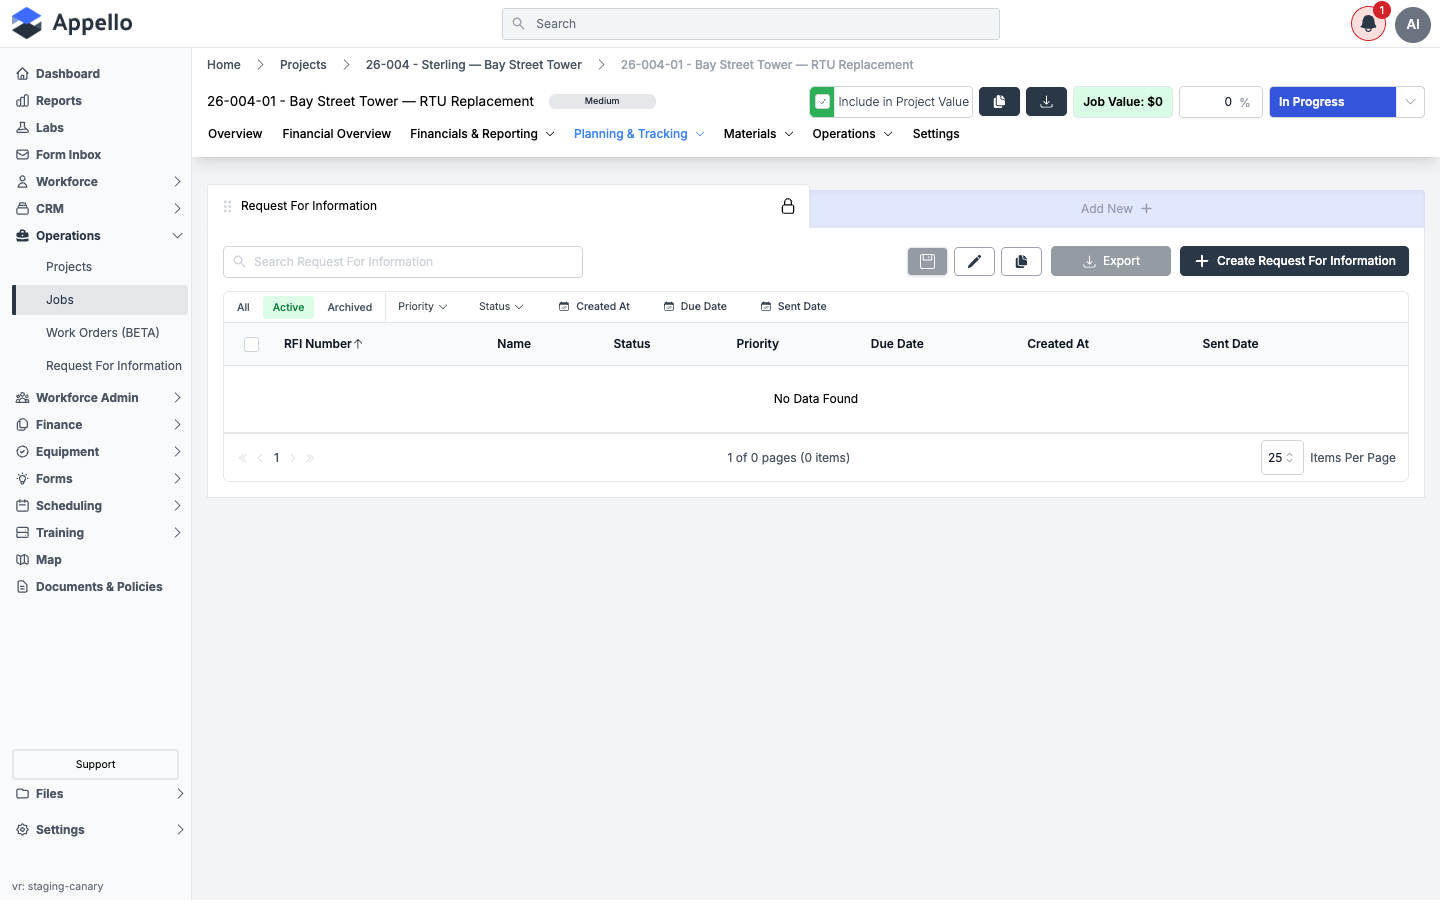
- The RFIs tab on a job's detail page, under the Planning & Tracking group of tabs -- scoped to that one job.
- The company-wide Request For Information list at Operations → Request For Information
(
/request-for-information), showing RFIs across every job at once.
Both are the exact same list and the exact same create form -- the job-scoped tab simply pre-fills and locks the Job field. Everything in this guide (columns, filters, create form, status, sending, exporting) applies equally to both.
Who can see it, and what they see
Request For Information → View gates the page -- without it, Request For Information does not appear in the Operations sidebar menu, and the job-level RFIs tab is hidden too. The wider permission set for RFIs is View, Create, Edit, Archive, Delete, Restore, and Assign -- each named for the action it gates on the list and detail page below. (Assign is part of the same permission group; no control keyed specifically on it was found while writing this guide.)
The Request For Information list (all jobs)
Click path: Operations → Request For Information. URL: /request-for-information.
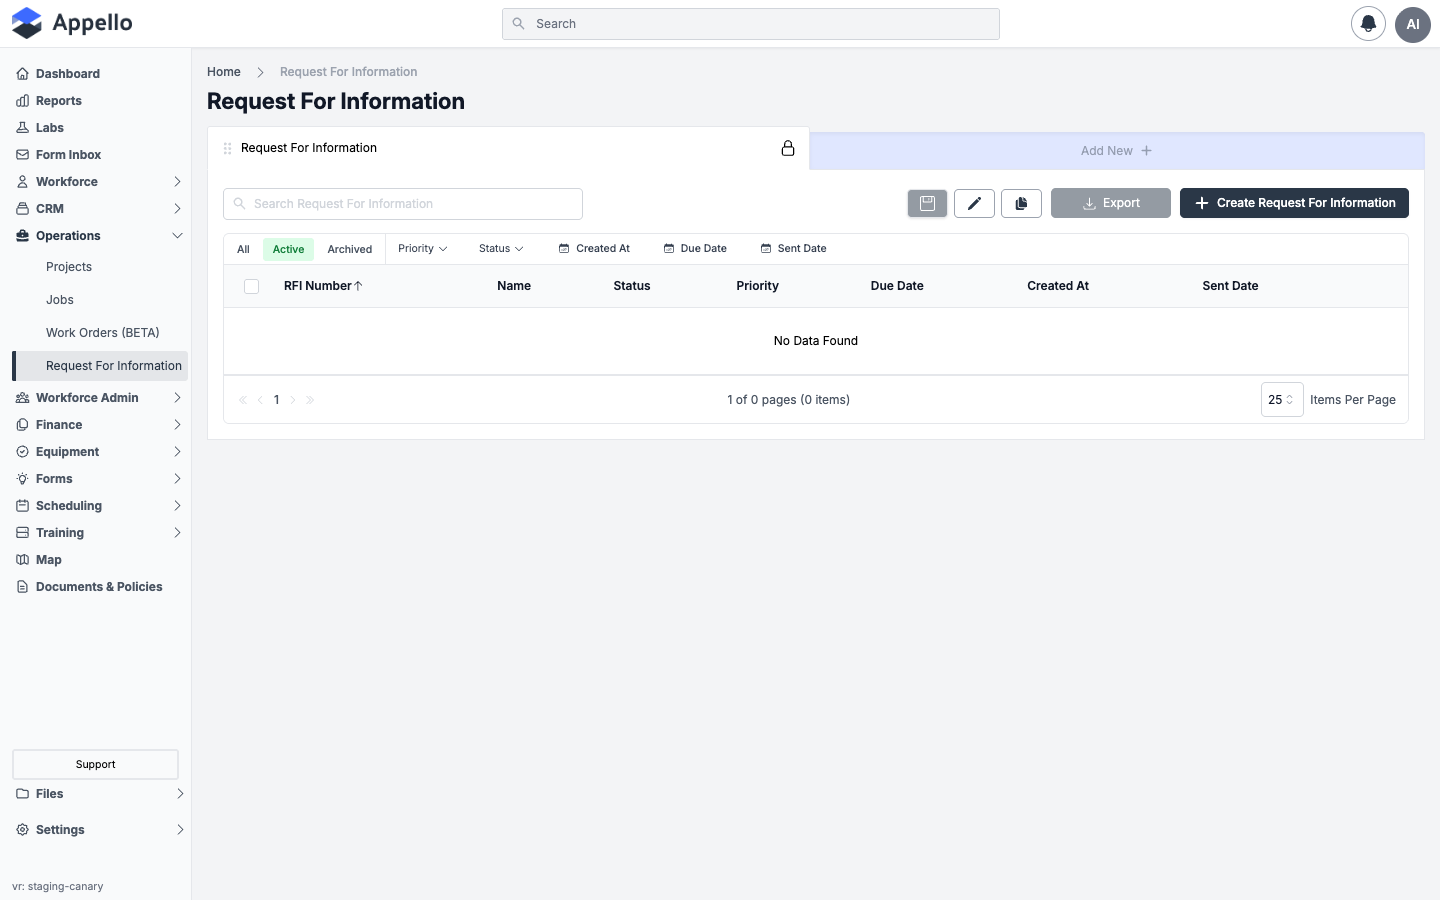
The list opens on a locked, default view named Request For Information (the lock icon means this system view can't be renamed or deleted) -- click Add New next to it to save an additional custom view with its own columns, filters, and sort as a new tab. Three icons next to the search box act on whichever view tab is currently open: Save (enabled only once you've changed columns, filters, or sort on the current view and want to persist them), Edit (the pencil -- rename the view or change its column set), and Duplicate (the copy icon -- clone the current view as a new tab).
Columns
| Column | Description |
|---|---|
| RFI Number | The RFI's auto-generated (or manually overridden) number. Sortable. |
| Name | The RFI's subject line. |
| Status | The configured RFI status, as a coloured pill. Inline-editable from the list. |
| Priority | The configured RFI priority, if set. |
| Due Date | The date a response is needed by. Sortable. |
| Created At | When the RFI record was created. Sortable; the list's default sort column (descending, newest first). |
| Sent Date | When the RFI was last emailed to a recipient, if ever. Sortable. |
The job-scoped view (opened from a job's own RFIs tab) also has a Project filter available, letting you narrow by the job's parent project.
Search, filters, and sort
| Control | Behavior |
|---|---|
| Search | Free-text search across the RFI record, via the Search Request For Information box. |
| Priority | Searchable multi-select checklist of the priority values in use. |
| Status | Searchable multi-select checklist of the statuses in use, plus an Empty option. |
| Created At | Date-range filter. |
| Due Date | Date-range filter. |
| Sent Date | Date-range filter. |
| Sort | Click RFI Number, Due Date, Created At, or Sent Date to sort by it; click again to reverse. |
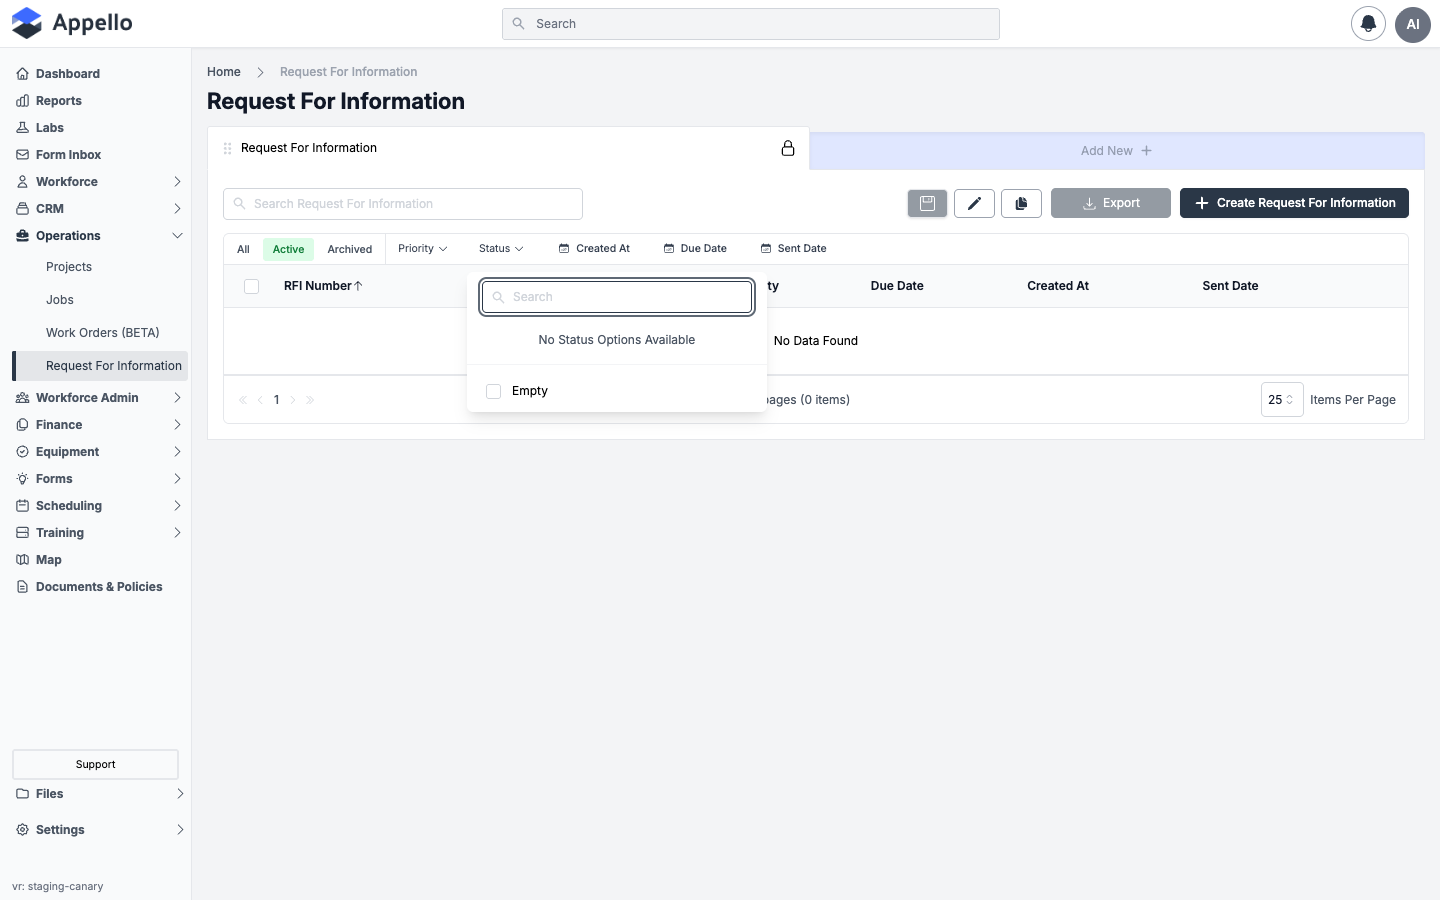
The screenshot above reads "No Status Options Available" because this filter only lists statuses currently in use on existing records, not your instance's full configured status list (see Tracking status below for where that full list lives) -- the demo instance used for this guide has no RFIs.
Quick tabs: All, Active, Archived
- Active -- the default tab. RFIs that haven't been archived.
- Archived -- only archived RFIs.
- All -- active and archived RFIs together.
Export
Click Export to download a CSV of the current view, respecting whatever filters, search text, and sort are currently applied. The button is disabled when the current view has no rows -- as on the empty demo instance shown above.
Bulk actions
Check the box on one or more rows to reveal a bulk-action bar. Which action appears depends on the active tab:
| Tab | Action | What it does | Who can do it |
|---|---|---|---|
| Active | Archive | Removes the selected RFIs from the Active view. | Requires Request For Information → Archive. |
| Archived | Restore | Moves the selected RFIs back to the Active view. | Requires Request For Information → Restore. |
| Archived | Delete | Permanently deletes the selected RFIs. | Requires Request For Information → Delete. |
As with other list views in Appello, row checkboxes and the bulk-action bar are not available on the All tab -- only on Active and Archived. None of these bulk actions were run while writing this guide, since the demo instance was treated as read-only.
Creating an RFI
-
Click Create Request For Information -- from a job's RFIs tab, or from the company-wide Request For Information list.
-
Fill in the form:
Field Required Type Effect Name Yes Text The subject of the RFI. Shown in list views and in the detail-page title alongside the RFI Number. Description No Rich text The question itself. Supports bold/italic/underline/strikethrough, lists, links, embeds, and highlighting. RFI Number Auto Text (computed) Reads "Select a job first" until a Job is chosen, then auto-generates the next number in sequence for that job. Toggle Manual Override to type a custom number instead -- inline editing of this field elsewhere (e.g. the list) is disabled since it's normally computed. Job Yes Lookup Pre-filled and locked when you create the RFI from a job's RFIs tab; a searchable picker when created from the company-wide list. Status Auto Select Defaults to your instance's configured default RFI status (Draft out of the box). See Tracking status. Assigned To Auto Select Defaults to you, the user creating the RFI. The internal user notified when a response comes in -- see Tracking status. Priority No Select One of your instance's configured RFI priority values. Due Date No Date The date a response is needed by. Associate Drawing Reference No Button Opens the drawing-reference picker -- see Attaching a drawing reference below. Disabled until Job has a value. -
Click Save.
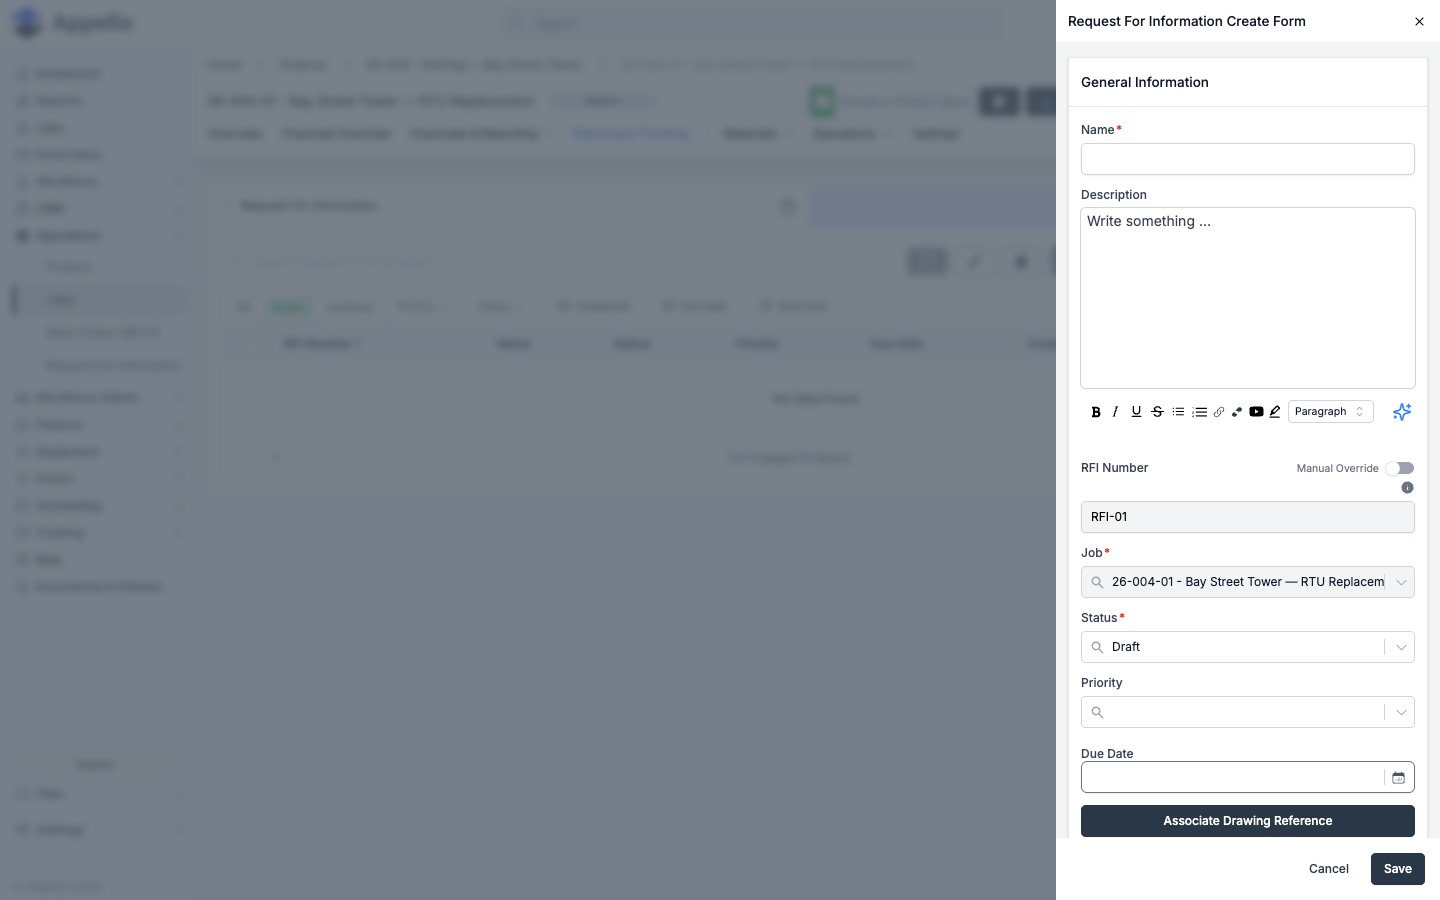
When you create the RFI from a job's RFIs tab, the RFI Number auto-generates immediately (for
example RFI-01) as soon as the Job field has a value -- you don't need to save first to see it.
From the company-wide list, the same form opens with Job empty and RFI Number reading
"Select a job first" until you pick one:
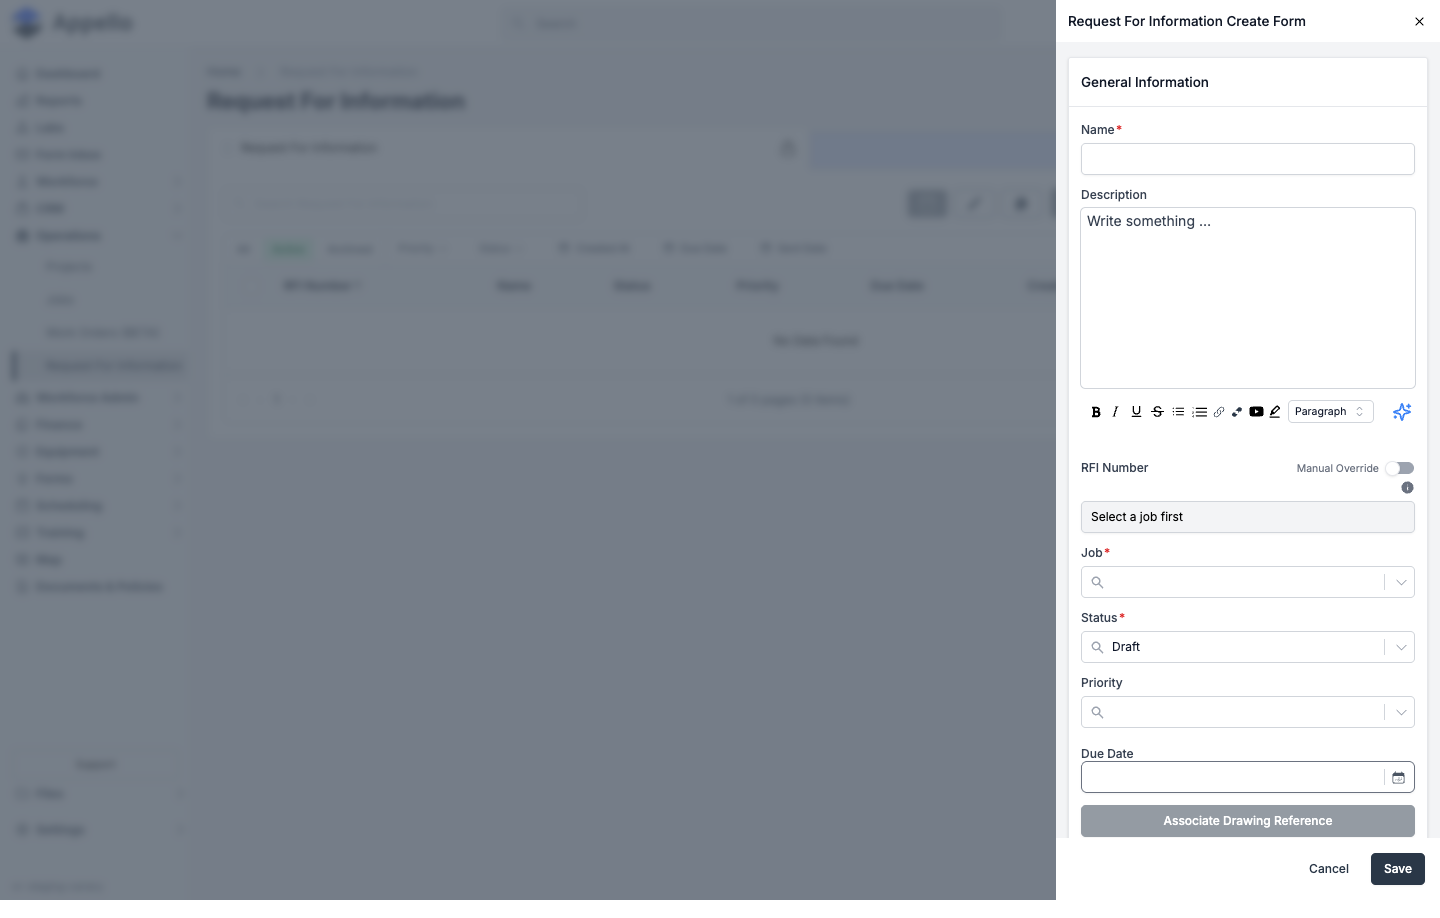
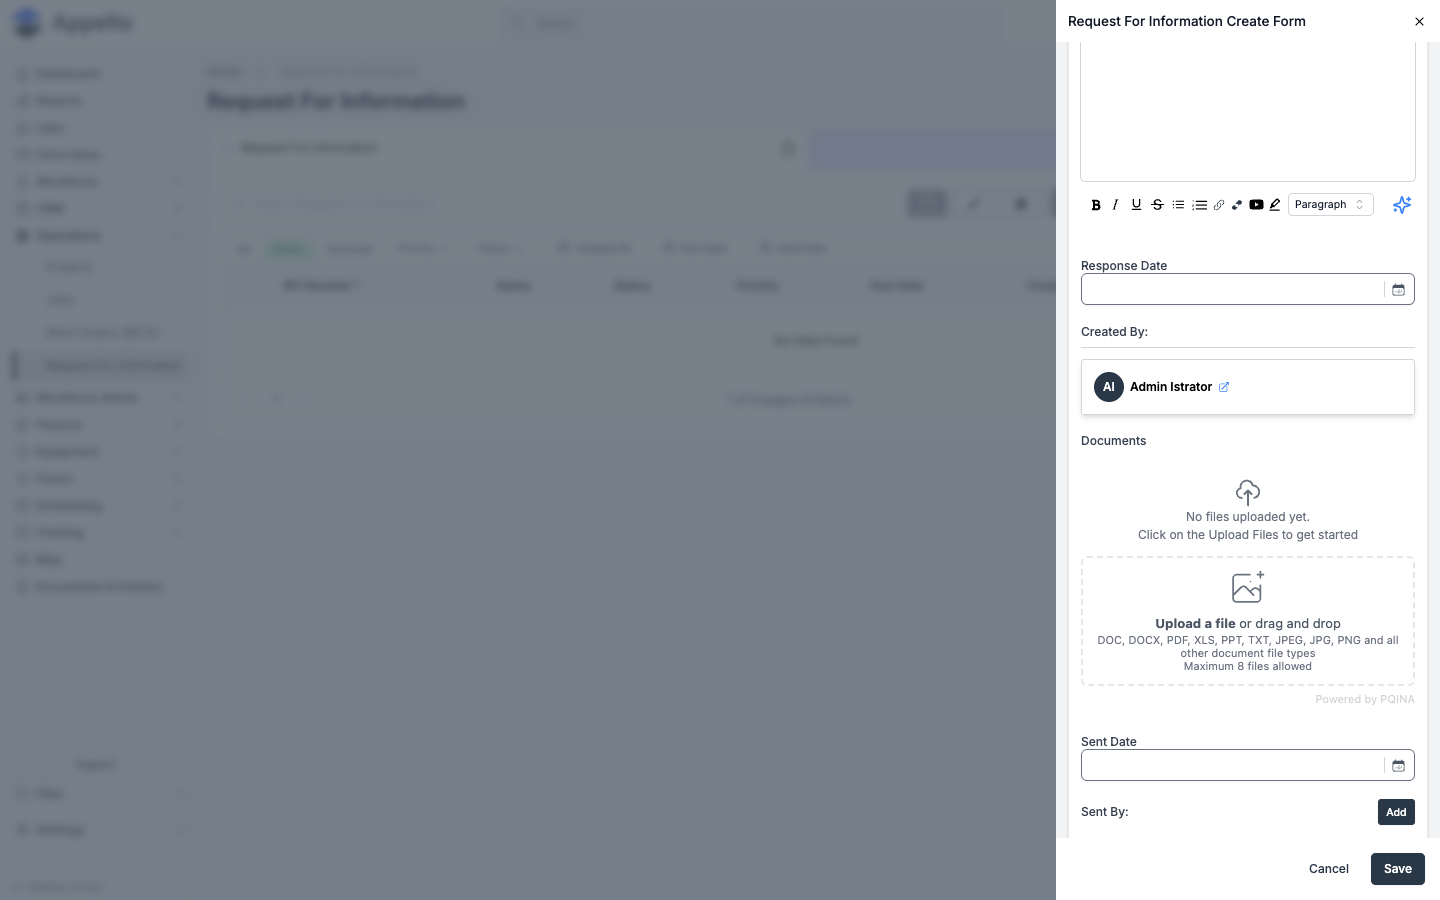
The create form also includes a Documents section below the fields shown above (see Attaching files), plus Response, Response Date, Created By, Sent Date, and Sent By fields that are populated automatically as the RFI moves through its lifecycle -- emailing it fills in Sent Date/Sent By, and a recorded response fills in Response/Response Date. These aren't meant to be filled in by hand when first creating an RFI.
You can also create an RFI directly from inside the Drawing Viewer: select an area on a drawing page and choose to create a new RFI from that selection. The RFI is created already linked to that drawing area -- see Attaching a drawing reference below.
Attaching drawings, drawing references, and files
Attaching a drawing reference
An RFI can reference a specific highlighted area of a specific page of a drawing, so the recipient sees exactly what you're asking about.
- On the RFI form, click Associate Drawing Reference. This button is disabled until a Job has been selected on the form.
- A panel titled Associate Drawing Reference opens, listing the PDFs already on that job so you can pick one to annotate, or lets you upload a new PDF on the spot if none exist yet.
- The Drawing Viewer opens on that PDF. Select the page and draw a box around the area in question, then attach it to the RFI.
- The RFI form now shows the drawing name, page number, and a thumbnail of the selected area.
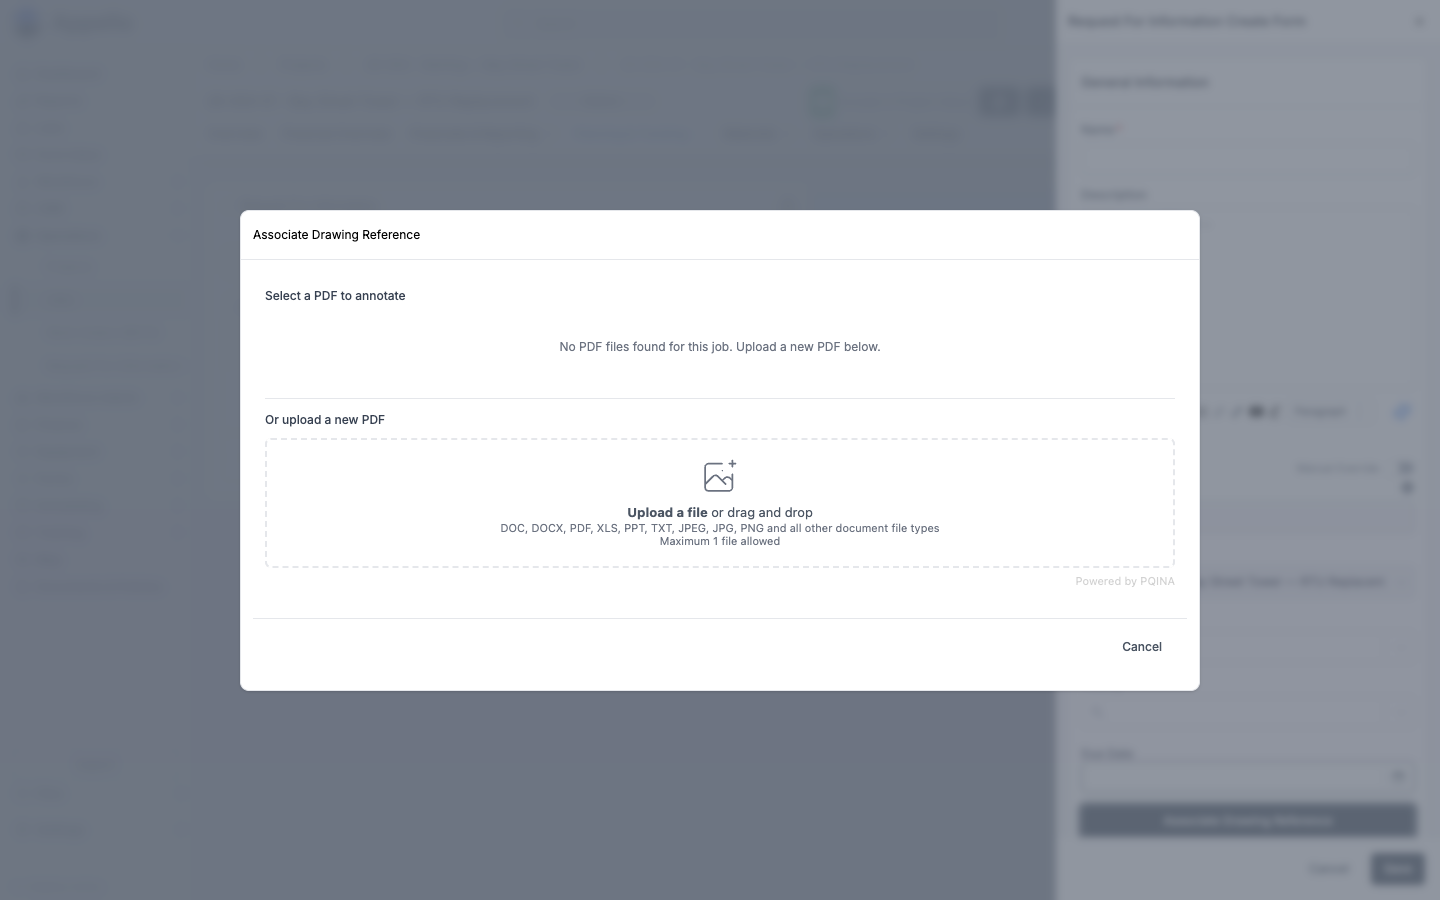
The screenshot above shows the picker step of this flow. The instance used to write this guide had no PDF files or existing RFIs available to carry the flow further, so the resulting Drawing Viewer annotation screen and the finished "Drawing Reference" field (thumbnail plus View in Drawing Viewer button) described in steps 3-4 could not be captured live, so those steps are described in writing rather than shown.
From the RFI, you can:
- Click View in Drawing Viewer to reopen the full drawing at that page and area.
- Click Remove Reference to detach it (you'll be asked to confirm). Removing a reference on an existing RFI takes effect only after you save the form -- if you cancel out of the form instead, the original reference is left untouched.
An RFI can only have one drawing area reference at a time; associating a new one replaces the previous one.
The Drawing Viewer opened from the RFI form is the same PDF markup tool that Labs → Drawing Viewer offers as a standalone preview page -- see Labs → Drawing Viewer for the full toolset (shapes, freehand, cloud markup, text/callouts, pin markers, photo attachments, zoom/rotate/undo, and PDF export).
Attaching files
Separately from the drawing reference, the RFI form has its own Documents section (below the General Information fields) where you can upload general files -- images, PDFs, and other document types -- using Appello's standard uploader. These attachments are included when you export or email the RFI.
The RFI detail page
Click path: open any RFI row from either list above. URL: /request-for-information/[id].
The detail page header shows the RFI Number and Name as its title, breadcrumbs back to the company-wide list, and up to four action buttons:
| Button | What it does |
|---|---|
| Export PDF | Opens the export settings panel and downloads the RFI as a PDF -- see Exporting and downloading the RFI PDF. |
| Email RFI | Opens the email-send modal -- see Sending an RFI to an external party below. |
| Create Change Order | Shown only when the RFI is linked to a job and doesn't already have a Change Order, and you have Change Orders → Create. See Closing an RFI. |
| View Change Order | Replaces Create Change Order once one has been created from this RFI; links straight to it. |
Below the header, two tabs -- Overview and Settings -- both gated by Request For Information → View.
Overview tab
Shows every field from the create form as read-only rows, plus the fields that populate as the RFI moves through its lifecycle (Response, Response Date, Created By, Sent Date, Sent By). Click Edit to reopen the same flyout form used to create the RFI, with Job locked once set. Two rows render with custom widgets instead of plain text:
- Drawing Reference -- the reference text plus, if a drawing area is attached, a thumbnail of the selected area and a View in Drawing Viewer button (see Attaching a drawing reference above).
- Response -- the recorded response rendered as Markdown, a "Responded by
{name}" attribution line (the external responder's name/email, or the internal user's name if the response was recorded internally), and a thumbnail grid of any files the responder attached.
No RFI existed on the demo instance used to write this guide, so the Overview tab itself could not be captured live. The field list and the two custom widgets above are described in writing instead.
Settings tab
The generic settings panel shared by every record type in Appello (Company, Contact, Project, Job, and others) -- it surfaces any custom properties configured for Request For Information under Settings → Property Settings. Request For Information does not appear to be offered as a custom-property record type, so on a typical instance this tab likely reads "No settings available", the same empty state documented for other record types (see Company Detail Page for a screenshot of that empty state on another record type).
No RFI existed on the demo instance, so this tab could not be captured live for an RFI specifically.
Sending an RFI to an external party
Once an RFI is ready, send it to the customer, architect, or contractor who needs to answer it.
- Open the RFI and click Email RFI.
- Add one or more recipients (type an email address, or pick from existing contacts).
- Optionally add a Message (a free-text note included in the email body), choose a Download Template (it controls which fields appear in the PDF version of the RFI; if you don't pick one, only the default fields are included), and check Include attached files if you want images and PDFs embedded in the document (other file types are sent alongside as a ZIP).
- Use the Edit / Preview toggle to preview the exact subject and body before sending.
- Click Send Email.
| Field | Required | Type | Effect |
|---|---|---|---|
| Recipients | Yes | Email list | One or more email addresses; type a new one or pick from contacts. At least one is required to enable Send Email. |
| Message | No | Textarea | A note included in the email body, in addition to the standard template copy. |
| Download Template | No | Select | Which configured Download Template fields are included in the attached PDF. |
| Include attached files | No | Checkbox | Embeds the RFI's images/PDFs in the document; other file types are sent as a separate ZIP. |
| Edit / Preview toggle | -- | Radio | Switches between the editable form and a live preview of the exact subject/body that will send. |
No RFI existed on the instance used to write this guide, so the Email RFI modal (opened from an existing RFI's detail page) could not be captured live -- the demo instance was treated as read-only, and sending would have required an actual RFI to send. The fields above are described in writing instead.
The email contains a secure link, scoped to that recipient's email address, that lets them view the RFI and respond -- without needing to sign in to Appello. Appello's own copy in the send dialog states that this link expires in 30 days. Sending also stamps Sent Date, Sent By, and the recipient list onto the RFI, and -- if your instance has a Sent status configured (see Tracking status) -- automatically moves the RFI's Status to it.
If a recipient's link has expired by the time they click it, they land on a Link Expired page. Entering their email address there sends them a fresh link, as long as it matches the email address the RFI was originally sent to.
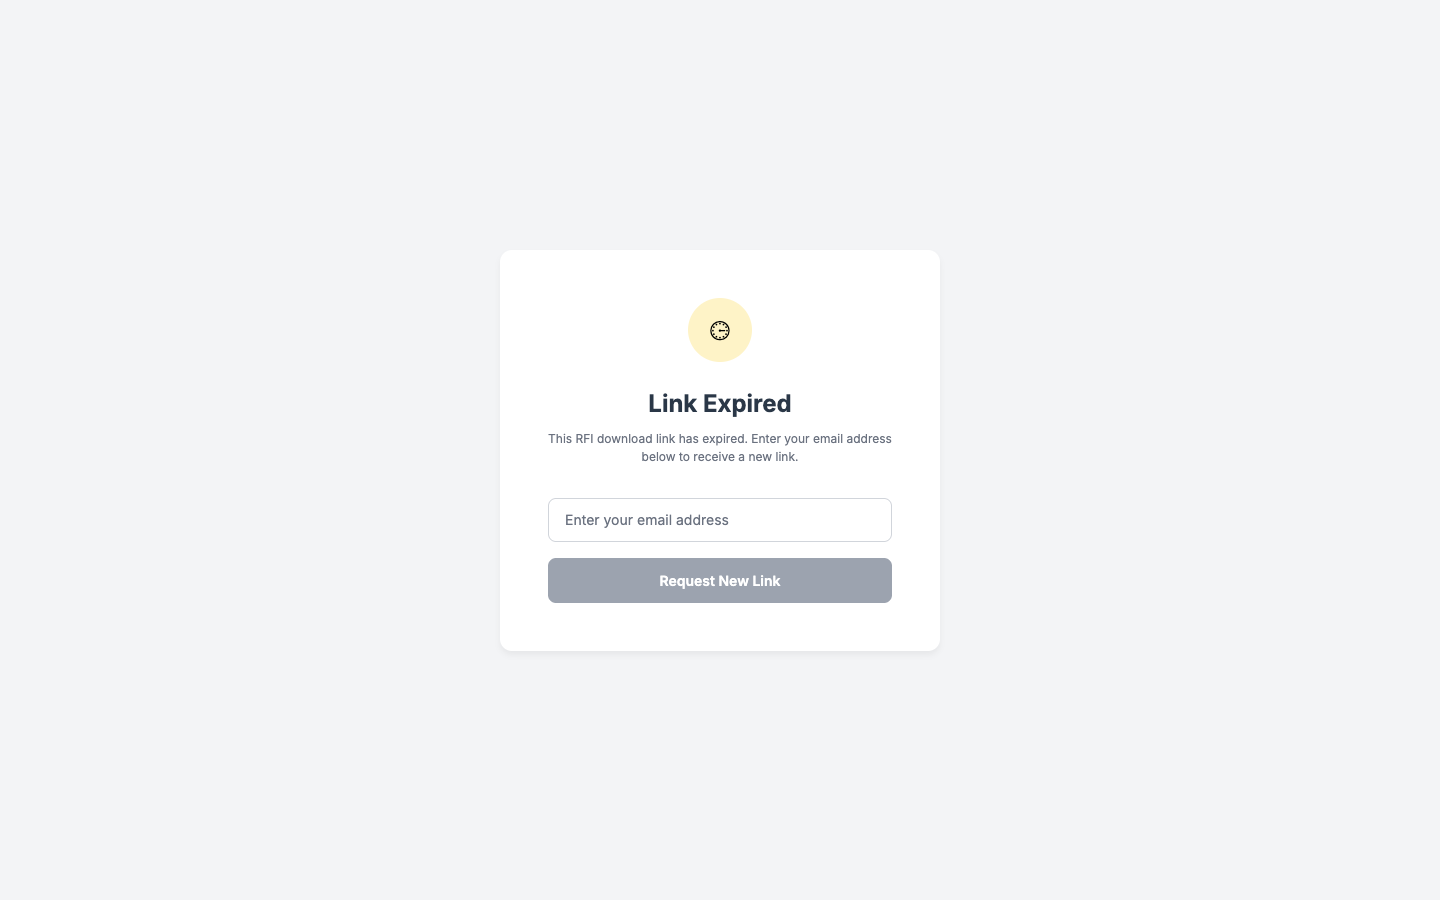
Both links -- the PDF download link and the separate view-and-respond link used to open the RFI Portal -- are scoped to that recipient and share the same 30-day expiry, created together when you send the RFI. Only the PDF download link offers the self-service, email-verified refresh described above. If the view-and-respond link expires, the recipient instead lands on a generic "This link has expired" page and is directed to email your company to request a new one, rather than being able to refresh it themselves.
How the recipient responds (no Appello account needed)
This section covers the anonymous, no-login response page reached from the emailed link. The full
walkthrough of that page -- with its own screenshots -- now lives at
Email Links and Public Pages → RFI response.
If your recipient is instead an invited Guest with their own Appello sign-in, they browse RFIs
through the Guest Portal instead,
at /guest/jobs/[id]/rfis/[rfiId] -- a logged-in, read-only view of the same record, filtered to
whichever status your instance marks as the Customer Portal Status (see
Tracking status below).
Clicking the link in the email opens the RFI Portal -- a public page that requires no login.
The recipient first sees a read-only copy of the RFI: your company's logo and name, a "secure link" indicator, the RFI number and job, who it's from and who it was sent to, the sent date and due date, the subject, the question/description, the drawing reference (if one was attached -- click to expand it), and any attached files (images open in a lightbox, PDFs open in a new tab).
The RFI Portal is only reachable through the recipient-scoped link from an actual sent RFI. The instance used to write this guide had no RFIs to send, so this guide can't include a screenshot of the read-only RFI view described above.
If no response has been recorded yet, a response form appears below it:
- Response -- a text box for their answer (rich text is rendered as Markdown when displayed back to your team). Responses are capped at 8,600 characters.
- Attach a file or screenshot -- up to 5 files, 10MB combined. Only PNG, JPEG, WebP images and PDFs are accepted.
- Your Name -- required, so your team knows who answered.
- Email -- shown read-only; it's the address the RFI was sent to.
They click Submit Response. Once submitted, the page shows a confirmation ("Your response has been recorded and sent. You can close this page.") and the recipient can close the tab.
If the recipient opens the link again after responding, the RFI Portal shows their recorded response (read-only) instead of the form.
For the same reason noted above (no sent RFI on the instance used to write this guide), the response form itself -- and the attachment/name/email fields on it -- could not be captured live either, so they are described in writing instead.
Tracking status
Every RFI has a Status, drawn from a list of statuses your instance configures. You can change an RFI's status inline from the RFIs list, or by editing the RFI directly. The Status column and filter are shown in Columns and Search, filters, and sort above.
Out of the box, a new instance ships with six RFI statuses, each with its own color and its own position in the list (the order they appear in status pickers):
| # | Status | Color | Notes |
|---|---|---|---|
| 0 | Draft | Grey | The default status for a newly created RFI. |
| 1 | Sent | Blue | Added after the other five, inserted between Draft and Submitted. Not offered as an option in the RFI Status settings card described below -- it's set only by sending the RFI. |
| 2 | Submitted | Blue | Your instance's default Customer Portal Status (see below). |
| 3 | Under Review | Dark yellow | |
| 4 | Responded | Green | Your instance's default Responded Status (see below). |
| 5 | Closed | Grey |
Admins can add, remove, rename, recolor, or reorder these from Settings → Property Settings, the same way they manage other configurable status lists in Appello.
The RFI Status settings card
Settings → Instance Settings has a dedicated RFI Status card with three dropdowns that wire these statuses into the workflow:
| Setting | Options | Effect |
|---|---|---|
| Default RFI Status | Any configured RFI status | The status a new RFI starts at. Ships pointed at Draft. |
| Customer Portal Status | None (show all), or any configured RFI status | Filters what an invited Guest sees in their Guest Portal RFI list -- RFIs below that status stay hidden from customers. Ships pointed at Submitted. |
| Responded Status | None (no auto-transition), or any configured RFI status | The status an RFI auto-transitions to the first time a response is recorded (see below). Ships pointed at Responded. |
There is no equivalent dropdown for the Sent status in this settings card. Every instance moves a sent RFI to the built-in Sent status, and that cannot be changed from Settings.
Automatic status transitions
- Sending the RFI (see Sending an RFI to an external party) moves Status to your instance's Sent status, if one is configured.
- A response being recorded for the first time -- whether submitted externally through the RFI Portal, or entered internally on the Overview tab -- moves Status to your instance's Responded Status, if one is configured, and sends an RFI Response Submitted notification to the user in the RFI's Assigned To field.
- Withdrawing a recorded response (clearing the response text on an internal edit) erases the response and its attachments; if the status was still sitting at the auto-set Responded Status value, it's reverted back to the Sent status, so the RFI resurfaces as awaiting a response. An explicit status choice made in that same save is respected instead.
Separately from all of the above, the RFI's detail view and the RFI Portal itself show a simple Awaiting response / Responded indicator based only on whether a response has been recorded -- this is a display-only computed value, distinct from the configurable Status field.
No RFI existed on the demo instance to trigger these transitions live, so the notification text and the status changes above are described in writing rather than shown.
Exporting and downloading the RFI PDF
From the RFI detail page, click Export PDF.
- Optionally choose a Download Template to control which fields are included (if none is selected, only default fields appear).
- Optionally check Include attached files to embed images and PDFs in the exported document (other file types are delivered as a separate ZIP alongside the PDF).
- Click Export.
Export PDF is an action on an existing RFI's detail page. The instance used to write this guide had no RFIs, so the settings panel (template selector and "Include attached files" checkbox) could not be captured live, and is described in writing instead.
The exported PDF includes: your company's letterhead; the RFI number, subject, and job; who it's addressed to (the job's customer company and primary contact) and who sent it; any configured template fields; the description/question; the drawing reference thumbnail (if attached); the recorded response (with who responded, when, and their attachments); and finally, each general attachment on its own page, producing one consolidated document.
This is the same PDF a recipient can generate for themselves from the emailed link, without needing to open the RFI Portal.
Closing an RFI
There is no single dedicated "Close" action separate from changing its status. In practice, an RFI is considered resolved once it has a recorded response and its Status is moved to whatever your instance uses to represent "done" (for example, a "Closed" or "Answered" status) -- the same status field described in Tracking status above.
If an RFI's answer results in a scope or cost change, you can turn it directly into a Change Order from the RFI detail page:
- If the RFI is linked to a job and doesn't already have one, a Create Change Order button appears. Clicking it creates a new Change Order pre-filled with a reference back to the RFI, and takes you to that Change Order on the job.
- Once a Change Order has been created from the RFI, the button becomes View Change Order, linking straight to it.
This button lives in the header of an existing RFI's detail page, alongside Export PDF and Email RFI -- see The RFI detail page above. The instance used to write this guide had no RFIs, so that header could not be captured live and is described in writing instead.
When an RFI is no longer needed at all (for example, it was created in error), you can select it from the RFI list and use the list's Archive or Delete bulk action, the same way you would for other records in Appello.
Out of the box, this final status is named Closed -- it's one of the six default statuses your instance ships with (see Tracking status above), though like the others it can be renamed or replaced from Property Settings.
Related pages
- Guest Portal → RFI detail -- the logged-in customer view of an RFI.
- Email Links and Public Pages → RFI response -- the anonymous, no-login response page reached from the emailed link.
- Labs → Drawing Viewer -- the standalone version of the PDF markup tool used for drawing references.
- Instance Settings -- where the RFI Status card lives.
- Templates -- Download Templates, used for both Export PDF and Email RFI.
- Job Detail Page -- the job-scoped RFIs tab lives here.
- Roles & Permissions -- where the Request For Information permissions are granted.