Estimate report
Module: CRM | Platform: Web
Reporting view for estimates (pipeline value, status, and related job linkage).
Navigation
Sidebar → CRM → Estimates
URL: /overview/estimate-report
Permission gate: the route requires Estimate → View. Without it, the page (and
its sibling Change Order Report at /overview/change-order-report, which is gated
by the same Estimate → View permission) is not reachable.
Overview
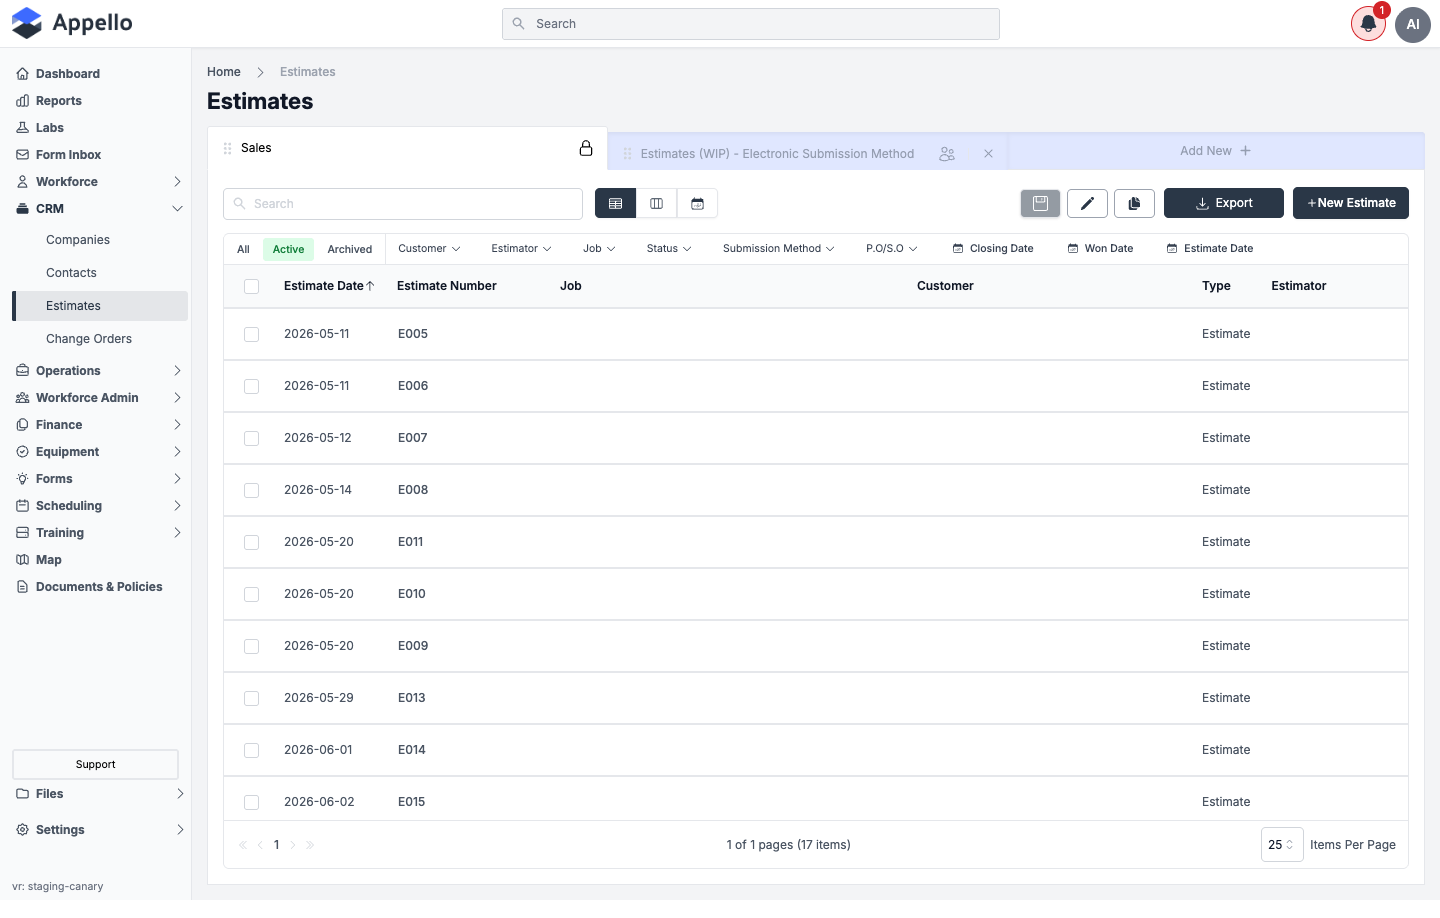
The Estimate Report is the list view behind the Estimates sidebar item -- it shows every
estimate across your organization in one sortable, filterable table. Use it to track pipeline
value, find estimates that need follow-up, and open any estimate's full editor. Change Orders
share this exact same list component at a separate route (/overview/change-order-report); the
two are otherwise identical except for which record type they show.
Estimates list
Columns
The columns below come from the estimate/change-order record's own fields plus a handful of computed columns (P.O./S.O., Job Value, Grand Total). Which of these are visible and their order can be customized per saved view; the set below is what shows on a default, unmodified view.
| Column | Description |
|---|---|
| Estimate Date | The date entered on the record. Default sort column, newest first. |
| Estimate Number | The editable prefix + number (for example E005). If the record was renumbered, the original system-assigned number shows in parentheses next to it (for example 26-004-02-E001 (E020)). |
| Job | The linked job's full job number and name. Clicking this cell (not the row) navigates straight to the job's Overview tab instead of opening the estimate editor. |
| Customer | The linked company. |
| Type | Estimate or Change Order. Fixed on this page (see the note above); the underlying filter for it is disabled here. |
| Estimator | The user assigned as estimator. |
| Status | The record's current status -- see statuses below. |
| Submission Method | How the estimate is delivered (for example In Person, Electronic). |
| P.O./S.O. | A purchase order number linked to this record, if any (computed from the Purchase Orders module). |
| Grand Total | The computed sell price: the itemized line-item total for an Itemized record, or the Bid amount for a Bid First/lump-sum record. |
| Bid Amount ($) | The Bid field entered directly on the record. |
| Subsidy | The Subsidy dollar amount added to the bid. |
| Job Value | Bid + Subsidy, but only summed in when Include in Job Value is turned on for the record. |
| Closing Date | The estimate's expected or actual closing date. |
| Won Date | The date the record was marked with your instance's won status. |
| Name | The free-text Estimate Name field (labelled "Name" in the column header). |
Quick tabs
Three quick tabs sit above the filter row: All, Active (default), and Archived.
Filters
A dropdown filter renders for every filterable column: Customer, Estimator, Job,
Status, Submission Method, P.O./S.O., Closing Date, Won Date, and
Estimate Date. The Type filter exists in the underlying component but is turned off on
this page, since the page is hard-scoped to type: Estimate already.
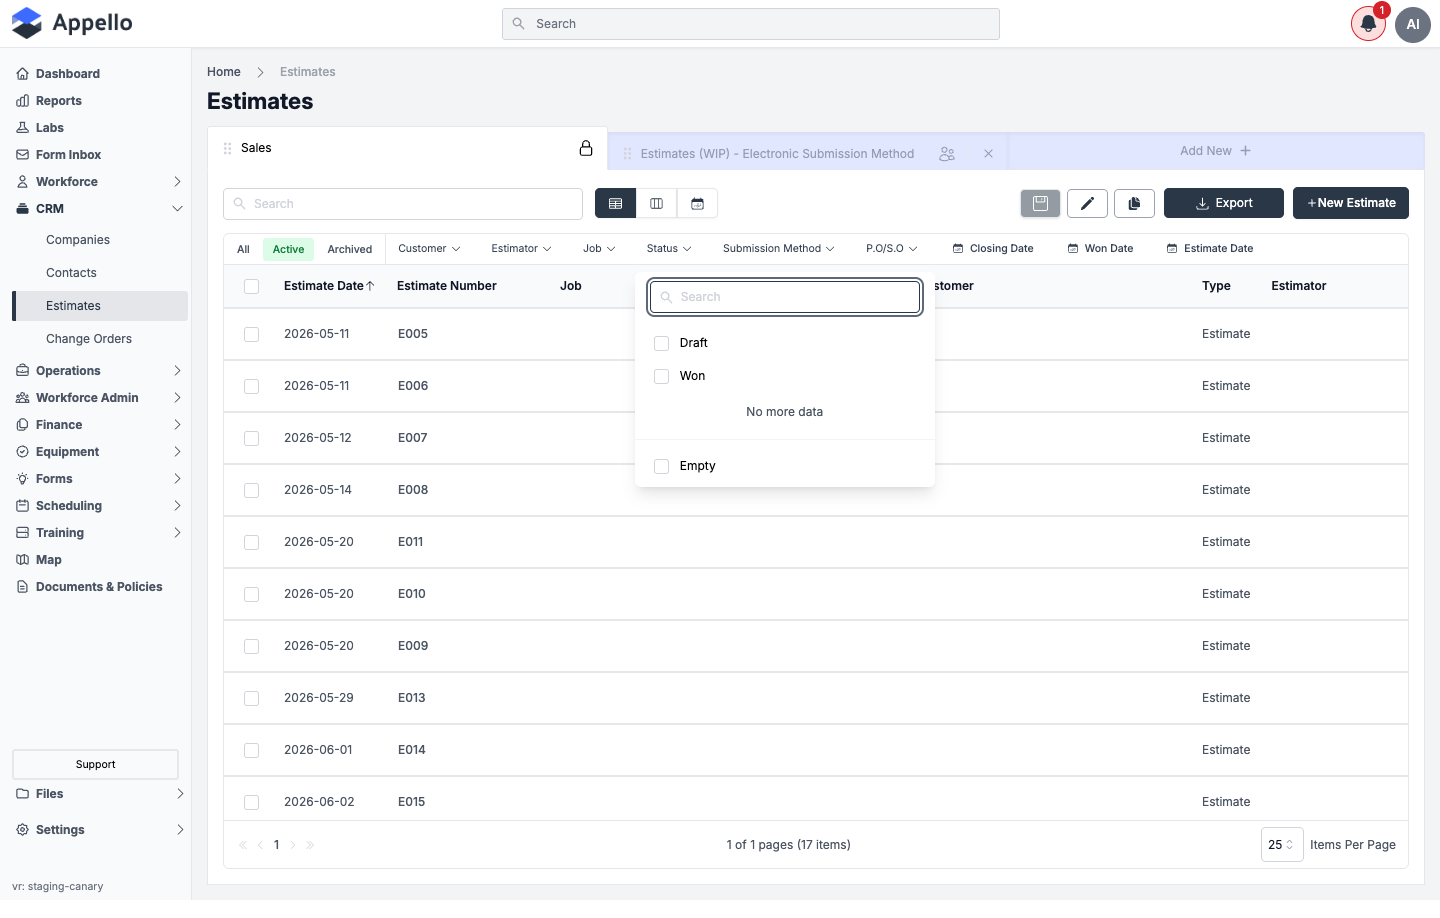
Each filter's dropdown lists only the values actually present on records right now (a live facet count against the current data), not every status your instance has ever configured -- on the canary instance used for this capture, only Draft and Won estimates exist, plus an Empty option for records with no value set on that field.
Search, sort, and export
-
Search -- a single search box above the table. Sourced from the page's own filter configuration, the fields it searches are
userName,emailAddress,tradeLevel, andphone-- user-record fields, not estimate fields like the estimate number or name.noteThis looks like it may be a leftover default rather than an estimate-specific search configuration, since none of those four fields appear anywhere in the Estimate Report's own columns. This documentation could not confirm live search behavior against an estimate number or name, since the crawl tooling used for these captures has no text-input step -- treat search as most reliable for finding an estimate by its estimator's name, email, or phone number until confirmed otherwise.
-
Sort -- click a column header to sort by it; an arrow shows the active sort column and direction (defaults to Estimate Date, descending).
-
Export -- the Export button in the top-right generates a file download of the current view's data. This documentation did not trigger an actual download while capturing these screenshots, to stay within the read-only rule for the canary instance.
Estimate and change order statuses
Statuses are not a fixed enum -- they are PropertyValue records your instance configures under
its business settings, so the exact list of status names (beyond the three special ones below)
varies per instance. On the canary instance used for this documentation, only Draft and
Won exist:
| Status badge (confirmed in canary) | Appearance |
|---|---|
| Draft | Dark/neutral badge |
| Won | Green badge |
Three status slots carry special, wired-in behavior, configured under your instance's business
settings as estimateChangeOrderInitialStatusId, estimateChangeOrderWonStatusId, and
estimateChangeOrderLostStatusId:
| Special status | What it drives |
|---|---|
| Initial status | The status every newly created estimate or change order starts at (Draft, by default). |
| Won status | Changing Status to this value and saving triggers the job-linking wizard (if no job is linked yet) and, for change orders, the progress-report-regeneration check described below. |
| Lost status | A configurable status your instance can set aside for lost estimates. |
This documentation could not confirm what, if anything, fires specifically when an estimate or
change order is moved to the Lost status beyond the status label itself changing -- the
canary instance used for these captures has no Lost status configured, and the application source
only wires special behavior to the Initial and Won slots (estimateChangeOrderInitialStatusId and
estimateChangeOrderWonStatusId); no estimateChangeOrderLostStatusId-specific side effect was
found in the code paths this documentation reviewed.
Any other status in the list -- everything besides Initial/Won/Lost -- is an ordinary label your team can use to track where a record sits before it's won or lost; changing between them just updates the Status field with no other side effect.
Creating an estimate
- Navigate to CRM → Estimates and click Create Estimate.
- Select or create a Customer record.
- Enter the scope of work, line items, and quantities.
- Apply markup or discount percentages as needed.
- Set the tax rate (pulls from Tax Settings).
- Add optional terms and conditions or notes.
- Save as Draft or send directly to the customer.
The sections below go deeper on the creation flow -- picking a creation type, building out the takeoff, and generating the quote letter -- and on what happens once an estimate is won.
The same estimate editor also opens from a Job's Estimates and Change Orders tab and from a Company record, not only from the Estimate Report. Whichever entry point you use, the panel and steps below are identical.
Choosing an estimate creation type
Clicking New Estimate on the Estimate Report opens a menu with three creation types. All three land in the same editor panel (Worksheet, Letter, Files tabs) -- the type only changes what the Worksheet tab starts with.
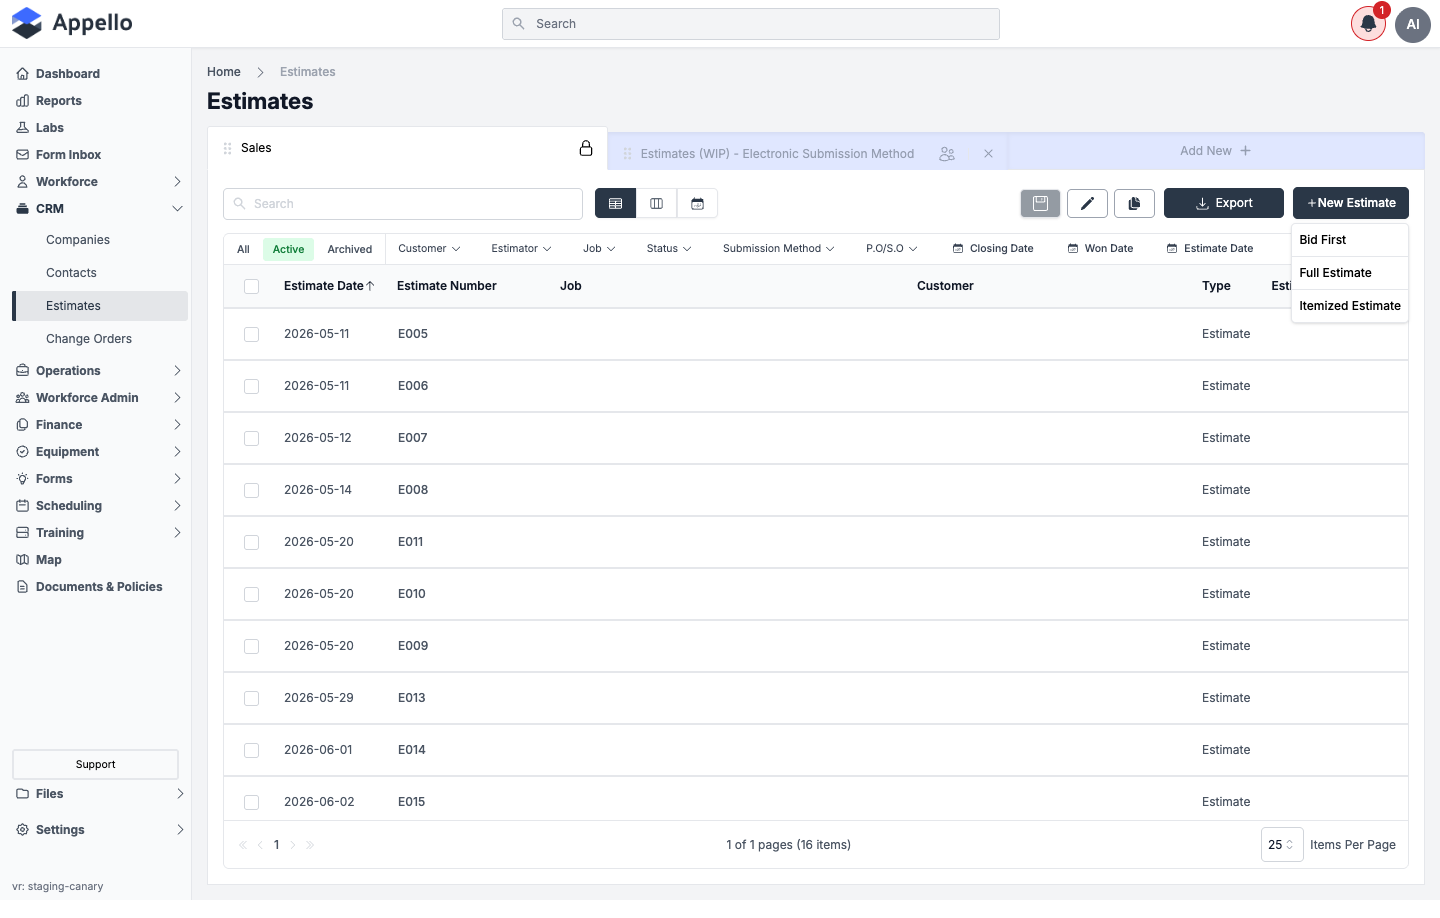
| Type | What it starts with |
|---|---|
| Bid First | A single Bid dollar amount plus Overhead % and Markup % fields -- a quick lump-sum quote with no line-item detail. |
| Full Estimate | An empty Worksheet with + Section and + Add Item controls, ready for an itemized takeoff. |
| Itemized Estimate | The same empty itemized Worksheet as Full Estimate. |
This documentation could not confirm a functional difference between Full Estimate and Itemized Estimate beyond the menu label -- both opened into the same empty Worksheet in the canary instance used for this capture. If your instance behaves differently, treat this as a starting point rather than the final word.
A Bid First estimate isn't locked into lump-sum forever: a Convert Estimate to Full Breakdown button appears on the Worksheet tab until you turn on line items, at which point the estimate switches to the itemized layout described below.
The Files tab only renders once the estimate has been saved at least once (so it has an id to attach files against) and your role has Asset → View permission -- on the canary role used for these captures it did not appear, so only Worksheet and Letter could be confirmed with a screenshot. Based on the source, it's a standard file-attachment list scoped to this record.
Building the takeoff: sections, line items, and pricing
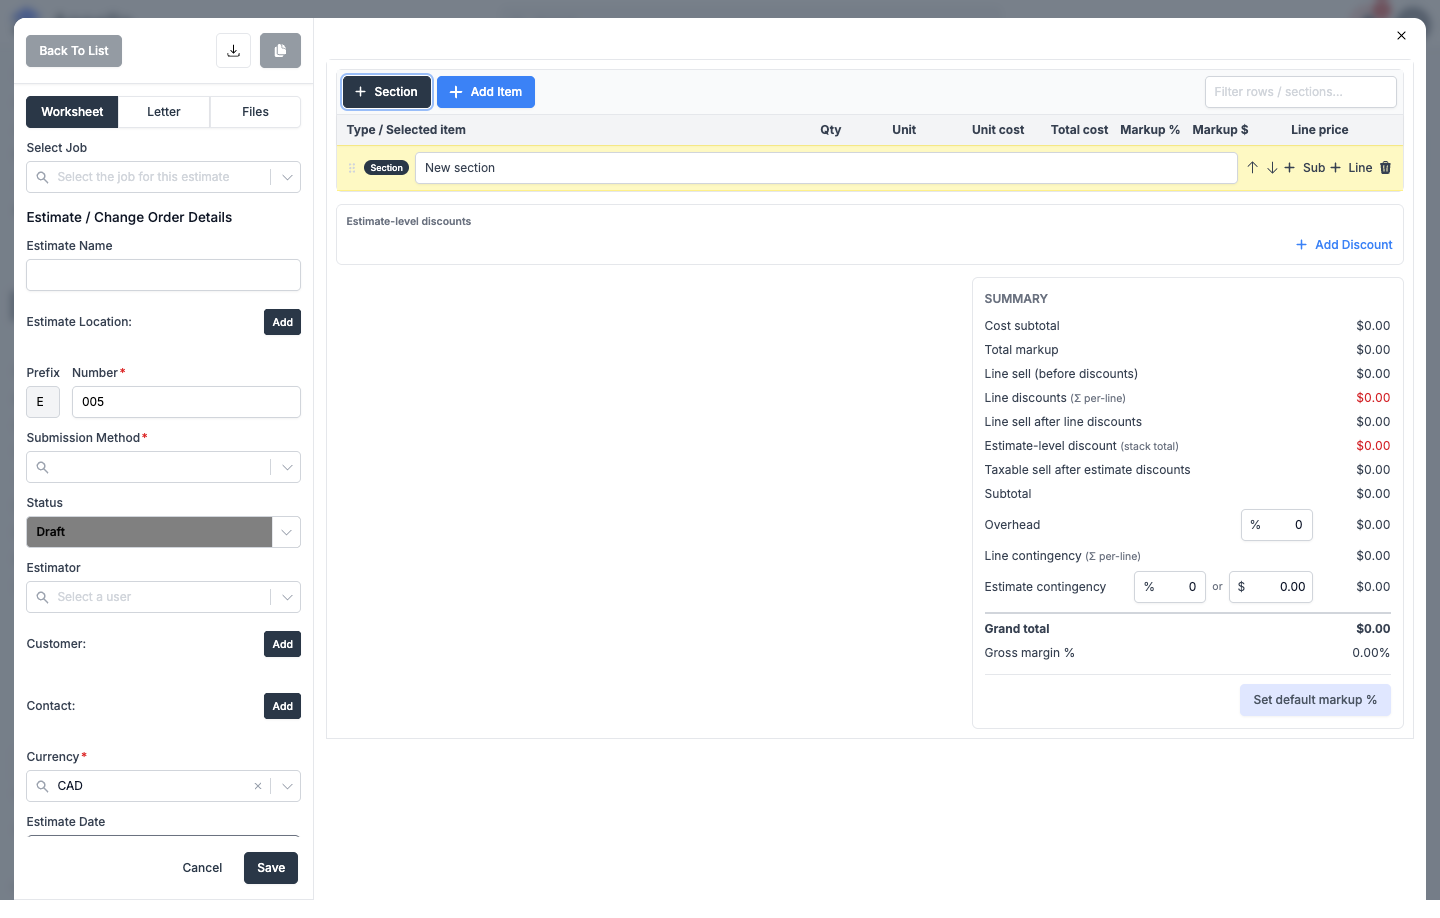
The Worksheet tab is where the takeoff and pricing happen. For an itemized (Full Estimate / Itemized Estimate) record, it starts empty:
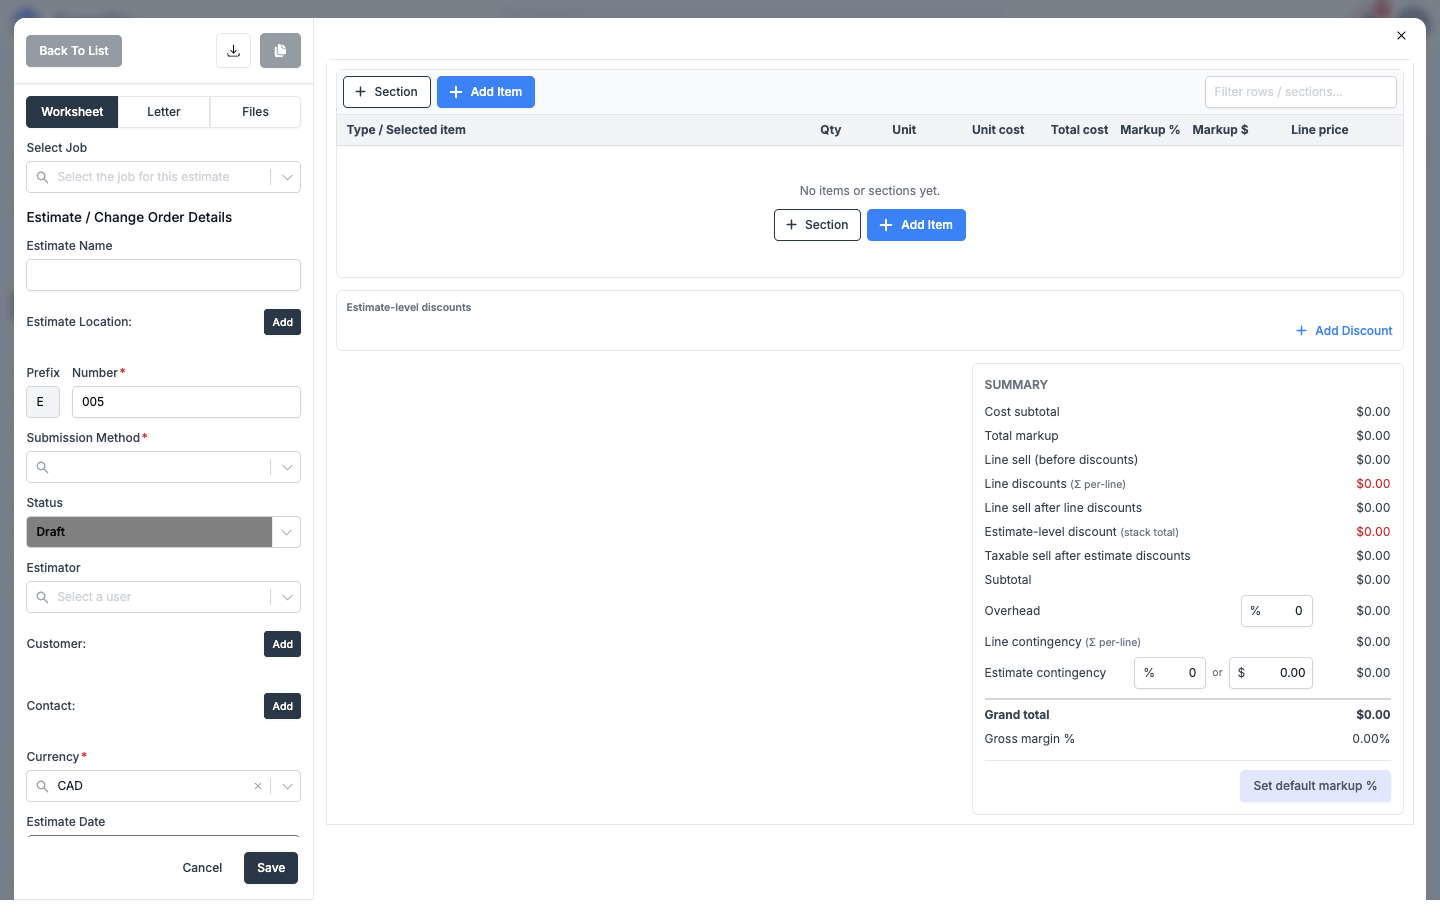
Estimate / Change Order Details
Above the takeoff table, fill in the estimate's own details:
| Field | Required | Notes |
|---|---|---|
| Select Job | No | Links the estimate to a job. Leave blank for a pre-sale estimate. |
| Estimate Name | No | Free-text label for the estimate. |
| Estimate Location | No | Set via the Add button. |
| Prefix / Number | Yes | Auto-generated (for example E/005); the number is editable. |
| Submission Method | Yes | How the estimate will be delivered (for example In Person). |
| Include in Job Value | No | Toggle -- rolls this estimate's value into the linked job's totals. |
| Status | Yes | Defaults to Draft. See How estimate status changes drive workflow below. |
| Estimator | No | Select a user. |
| Customer | Yes | Set via the Add button. |
| Contact | No | Set via the Add button. |
| Currency | Yes | Defaults to your instance's default currency. |
| Estimate Date | No | Defaults to today for a new record. |
Sections
Click + Section to add a section row to the takeoff table. Each section can be:
- Renamed inline (defaults to "New section").
- Reordered with the up/down arrows.
- Nested with + Sub (subsections), up to the estimate's configured depth limit.
- Given a line item directly with + Line.
- Removed with the trash icon -- deleting a section with children prompts you to confirm, since it removes them too.
Line items
Click + Add Item (top of the table) or + Line (on a section) to add a line item. Each line item first asks you to Pick type:
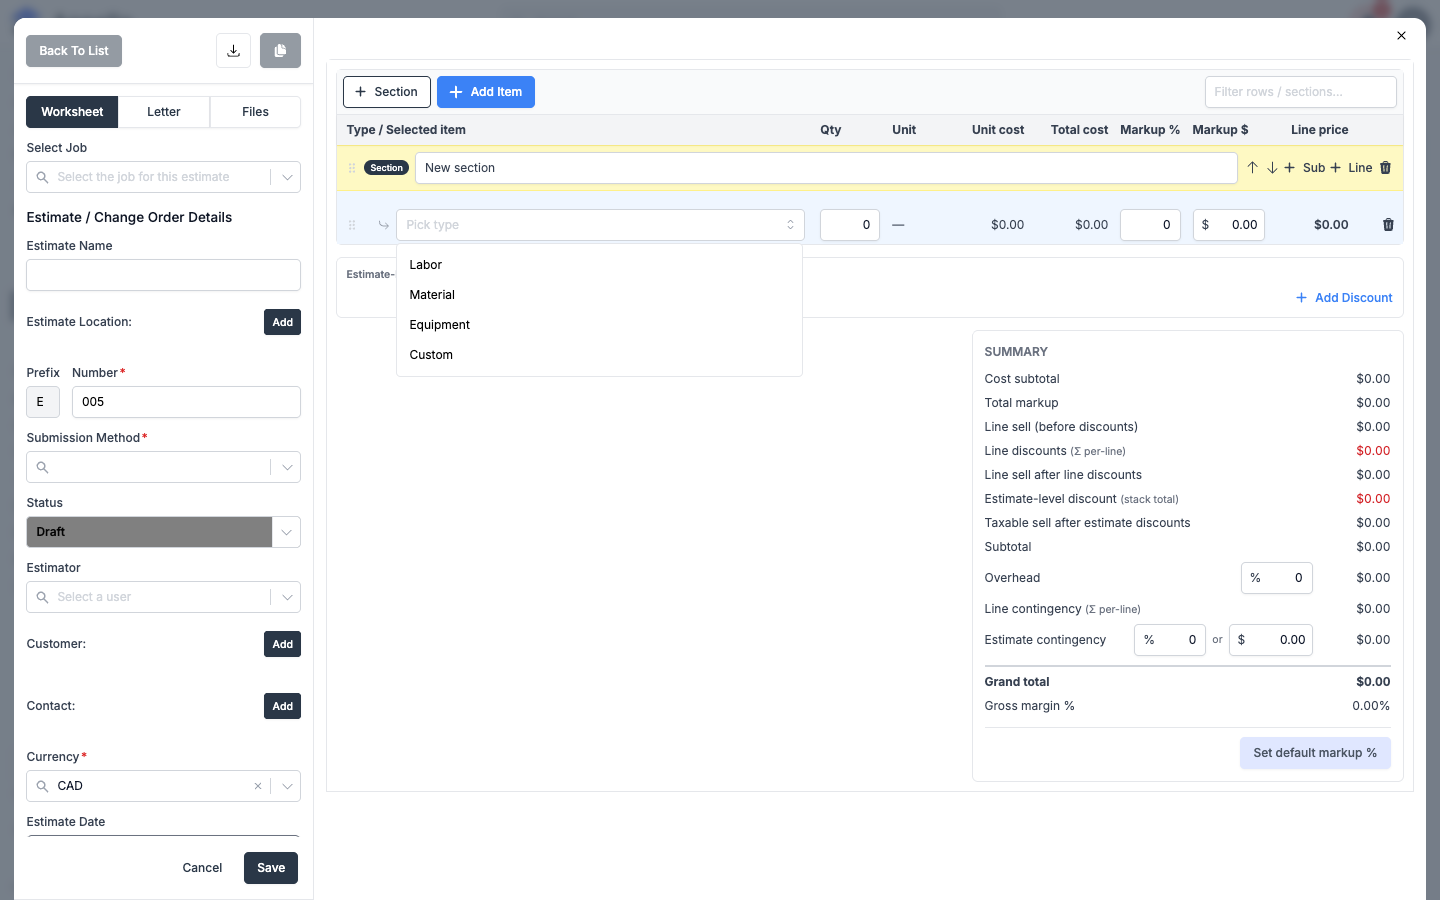
| Type | What it picks from |
|---|---|
| Labor | A labor rate/trade selector. |
| Material | A search combobox against your material catalog. |
| Equipment | An equipment selector. |
| Custom | A free-entry line, optionally tied to an account item. |
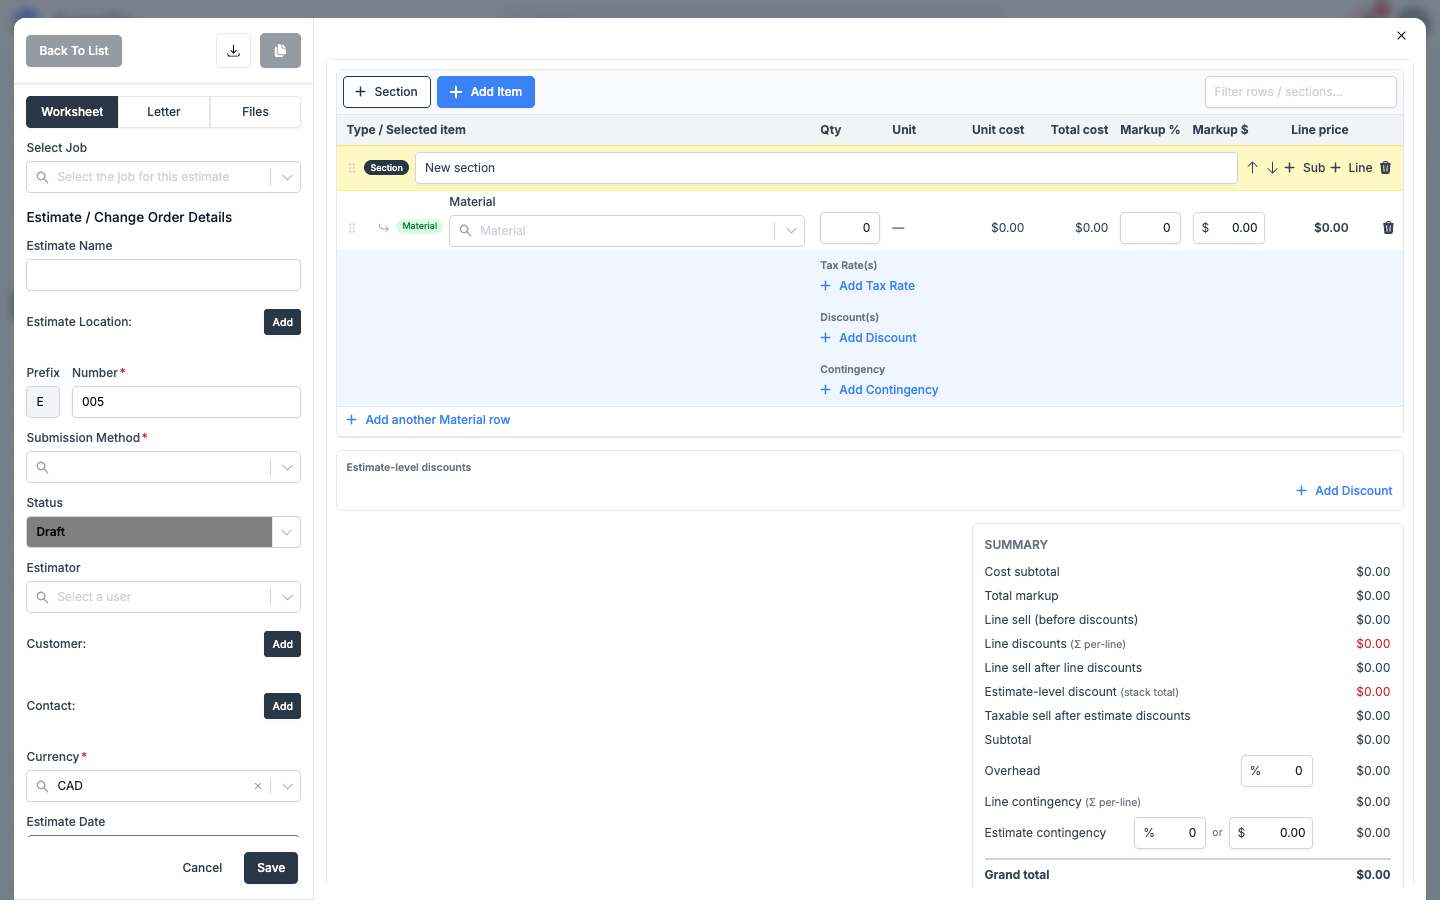
Whichever type you pick, the row exposes the same pricing columns -- Qty, Unit, Unit cost, Total cost, Markup %, Markup $, and Line price -- plus three per-line links: Add Tax Rate, Add Discount, and Add Contingency. A + Add another [Type] row link lets you keep adding rows of the same type without reopening the type picker.
Taxes and discounts per line
Clicking Add Tax Rate on a line opens a tax-rate combobox directly under that line (defaults to a 0% rate on this canary instance) plus an + Add Another Tax Rate link for a second compounding or additional rate, each removable with the trash icon next to it:
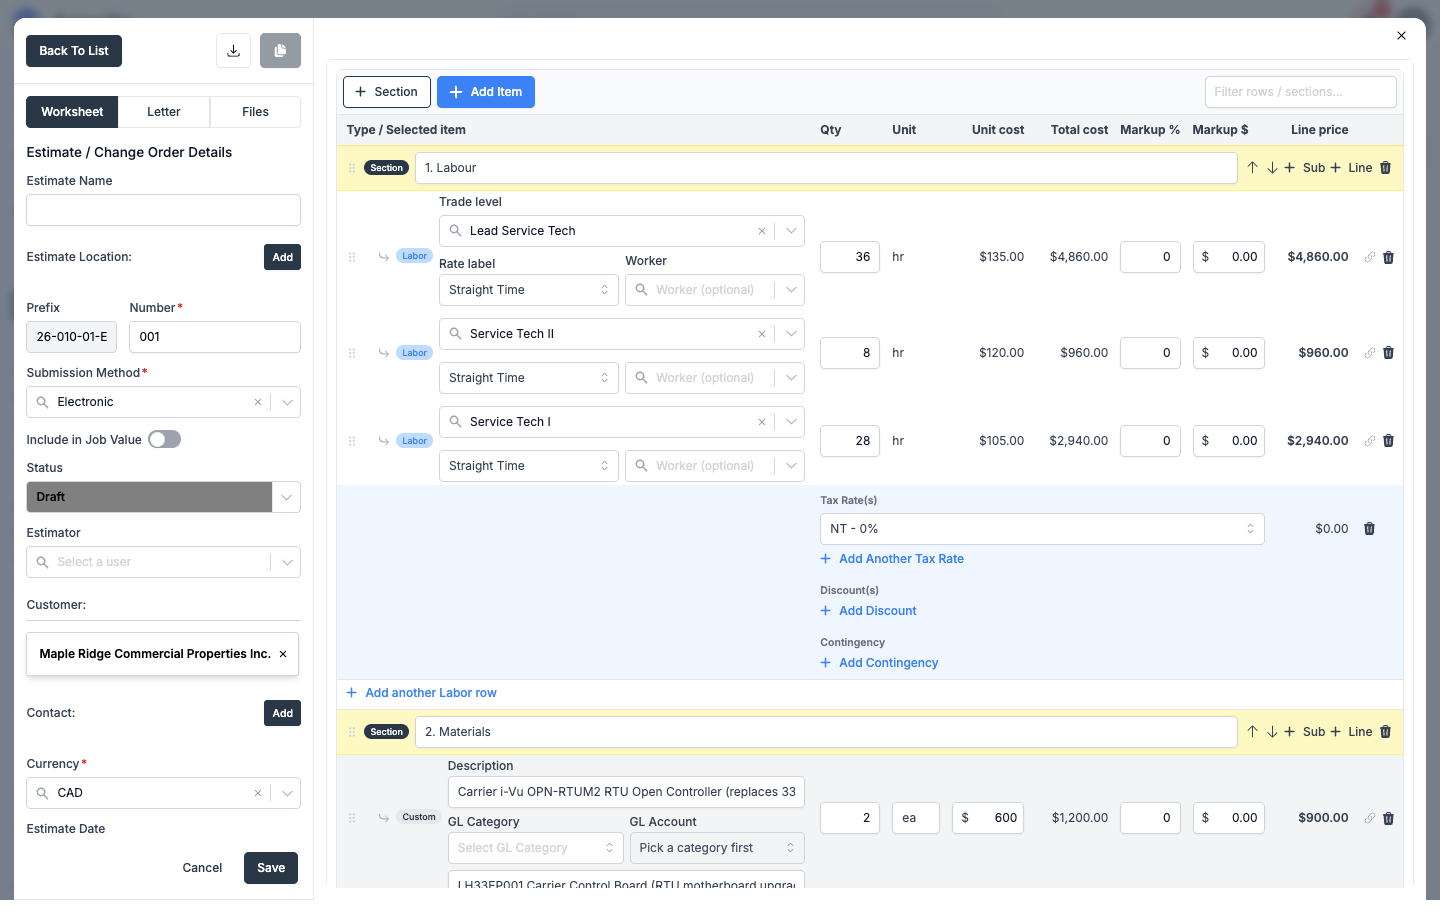
Clicking Add Discount on a line instead opens a discount row with a free-text Discount name, a %/$ type toggle, a value field, and a computed dollar amount, plus its own + Add Another Discount link for stacking more than one discount on the same line:
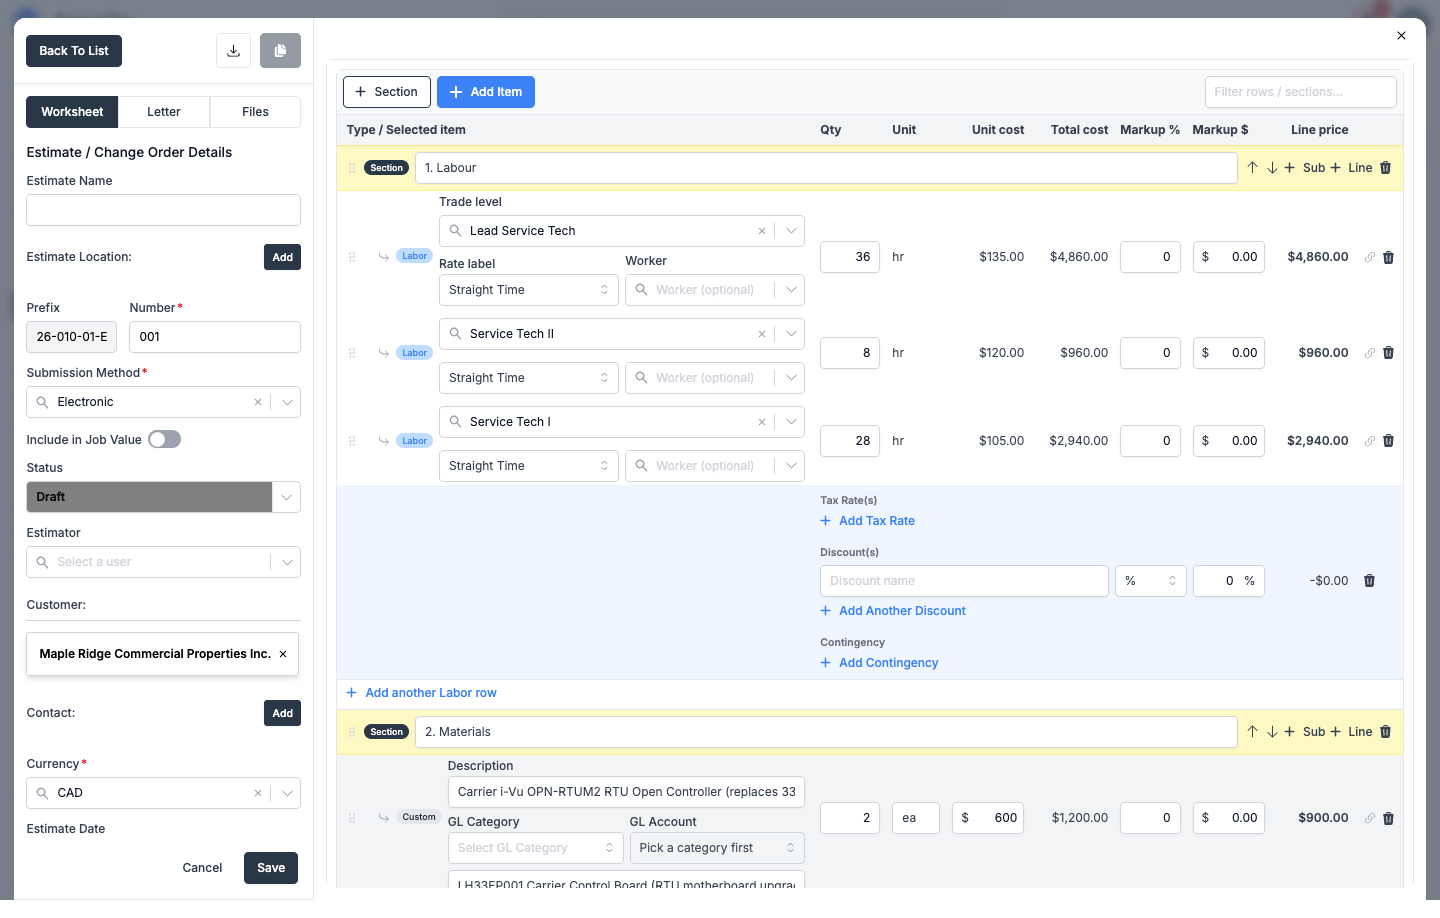
Add Contingency works the same way as a per-line percentage or dollar amount, rolled up into the Line contingency (Σ per-line) row on the summary panel described below.
Markup shortcuts: set a default and apply to all lines
The Set default markup % button on the summary panel (only shown while a section is in edit mode) opens a small modal rather than editing a line directly:
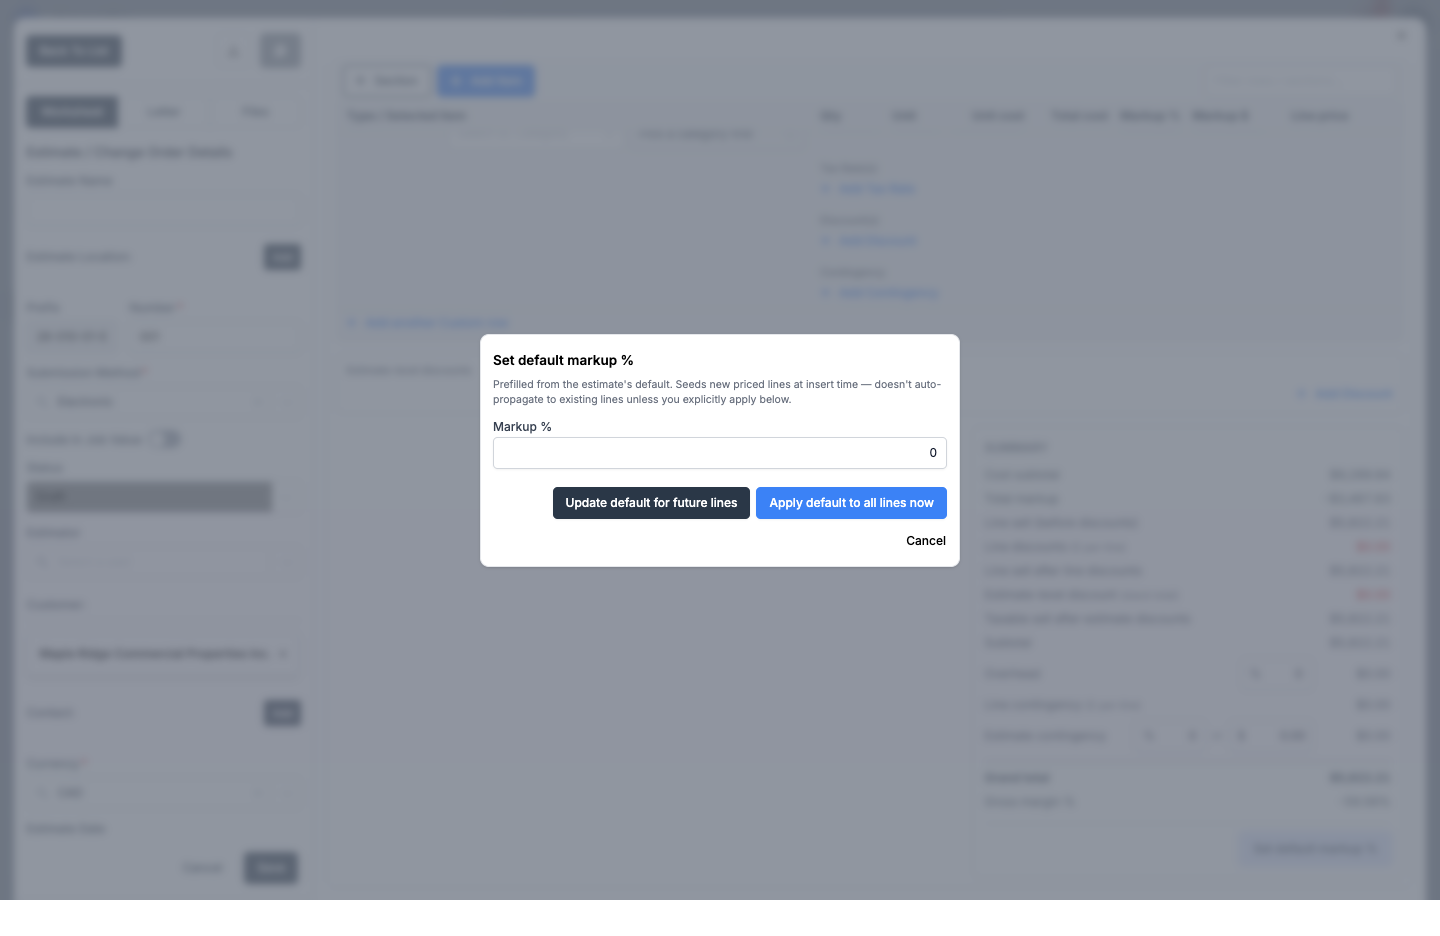
| Control | Effect |
|---|---|
| Markup % field | Prefilled from the estimate's current default markup. Editable before choosing an action below. |
| Update default for future lines | Saves the value as the estimate's default markup -- it seeds new priced lines added from this point on, but does not touch any line that already exists. |
| Apply default to all lines now | Opens a second, destructive confirmation (below) before overwriting every existing priced line's markup. |
| Cancel | Closes the modal without changing anything. |
Choosing Apply default to all lines now opens ConfirmApplyMarkupModal, a hard stop before an irreversible bulk overwrite:
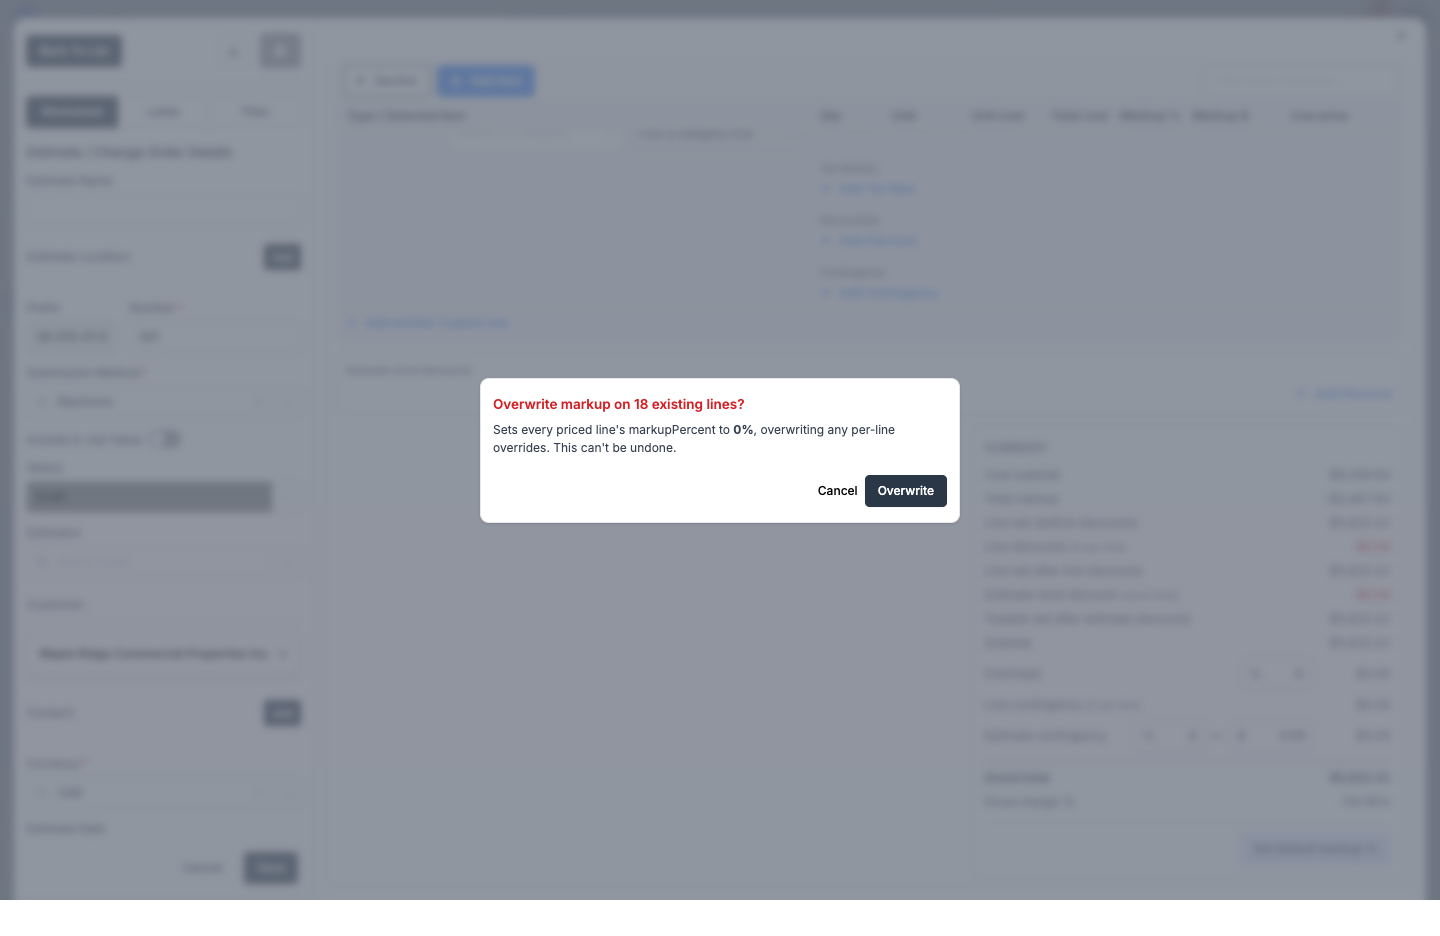
The dialog states the exact line count and target percentage ("Sets every priced line's markupPercent to 0%, overwriting any per-line overrides. This can't be undone.") and requires an explicit Overwrite click; Cancel returns you to the Set default markup % modal with your entered value preserved. This documentation opened both modals on a live canary estimate and canceled out without confirming, per the read-only rule for this instance.
Discounts, overhead, and the summary panel
Below the takeoff table, Estimate-level discounts apply across the whole estimate (separate from the per-line discounts described above) via + Add Discount.
The Summary panel on the right recalculates live as you build the takeoff:
| Line | Meaning |
|---|---|
| Cost subtotal | Sum of line item unit costs before markup. |
| Total markup | Sum of per-line markup dollars. |
| Line sell (before discounts) | Cost subtotal plus total markup. |
| Line discounts (Σ per-line) | Sum of discounts applied on individual lines. |
| Line sell after line discounts | Line sell minus line discounts. |
| Estimate-level discount (stack total) | Sum of estimate-level discounts. |
| Taxable sell after estimate discounts | Sell value tax is calculated against. |
| Subtotal | Running subtotal before overhead and contingency. |
| Overhead | Percentage (or dollar) markup applied on top of the subtotal. |
| Line contingency (Σ per-line) | Sum of per-line contingency amounts. |
| Estimate contingency | An estimate-wide contingency, entered as a % or a $ amount. |
| Grand total | The final sell price. |
| Gross margin % | Profitability at the current pricing. |
Itemized vs. lump-sum (Bid First) pricing
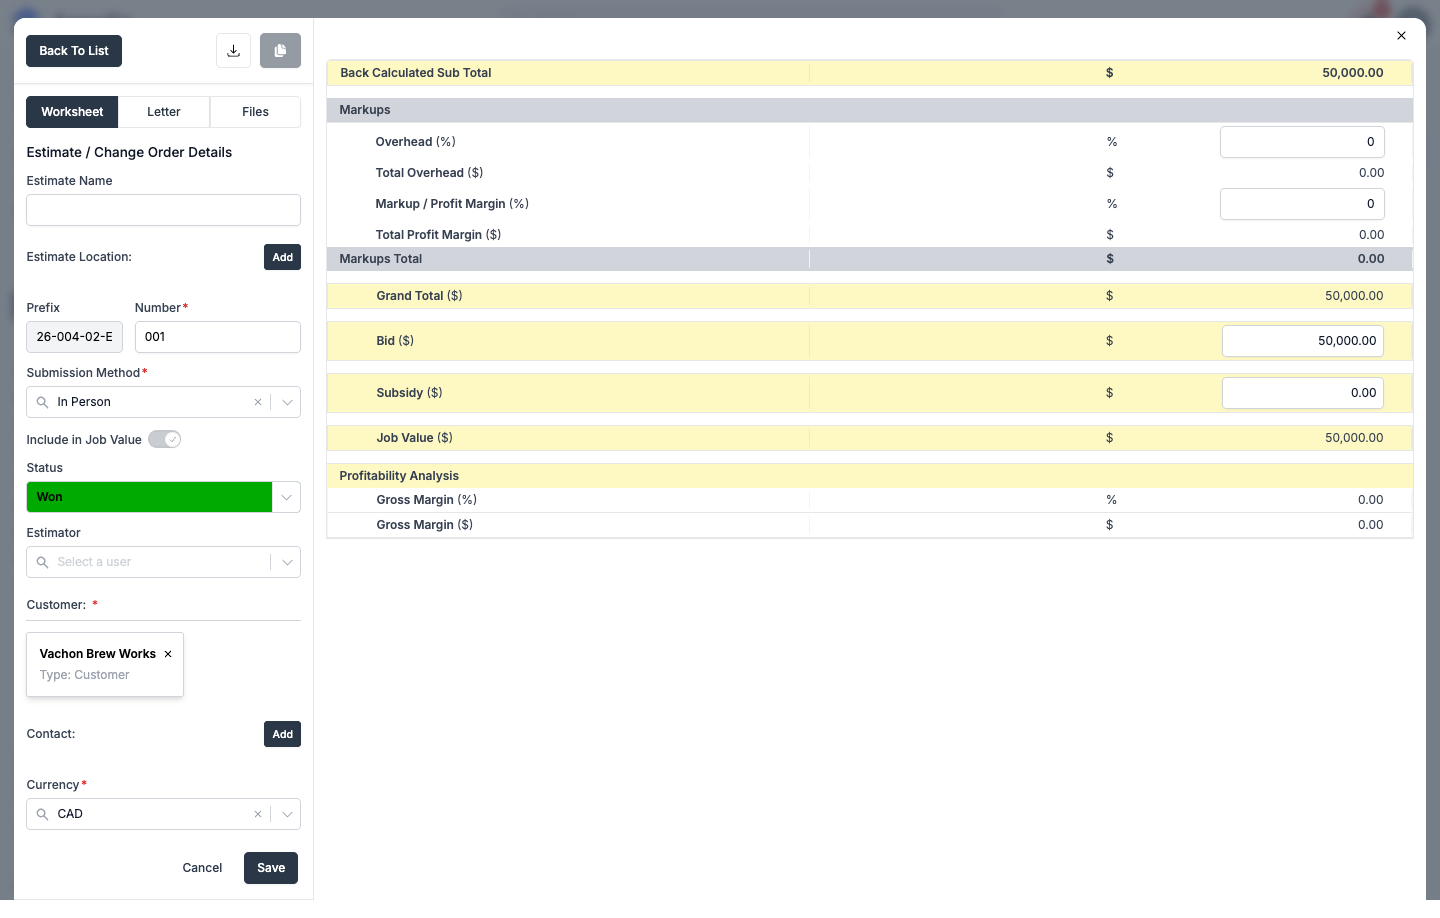
A Bid First estimate replaces the takeoff table and summary panel above with a compact bid worksheet: a Bid ($) amount, Overhead (%) and Total Overhead ($), Markup / Profit Margin (%) and Total Profit Margin ($), a Subsidy ($), and a Profitability Analysis block (Gross Margin % and Gross Margin $). There are no sections or line items to build -- the bid amount is the starting point and overhead/markup are applied on top of it.
Cost codes on estimates
Cost codes are not assigned inside the estimate Worksheet -- line items are typed as Labor, Material, Equipment, or Custom, and a Custom line can be tied to an account item, but there is no cost-code field on the takeoff table itself. Based on the application source, cost codes are set up at the job level (cost code templates applied to a job) rather than on the estimate that precedes it, typically after a won estimate has been converted to a job. This relationship could not be confirmed with a canary screenshot, since it lives outside the estimate editor covered in this guide.
Once a job exists with cost codes applied, editing the bid on an already-Won estimate re-checks those cost codes and can warn you that the job's Schedule of Values is now out of sync -- see the SOV warning in How estimate status changes drive workflow below, and Cost Codes & Schedule of Values for the full picture of how cost codes feed the SOV.
How estimate status changes drive workflow
The Status field on the Worksheet tab drives what happens to the estimate or change order next -- see Estimate and change order statuses above for what each status slot means. Changing the Status field to your instance's won status and saving does the following, in order:
-
If the record isn't yet linked to a job, it immediately opens the convert-to-job wizard described below, before the save completes.
-
If the bid amount changed on a Won Estimate that already has cost codes on its job (i.e. it was won once already and a bid value is edited again), a warning interrupts the save:
Schedule of Values May Be Out of Sync The bid value has changed on this Won Estimate. The Schedule of Values and any associated Progress Reports may need to be updated to reflect this change.
Choosing Save Anyway proceeds; Cancel returns to the form without saving. See Cost Codes & Schedule of Values for what the Schedule of Values actually is and how it's built from a job's cost codes.
-
If the bid amount and subsidy together are lower than the record's current gross margin, a separate warning appears regardless of status ("Warning: Losing Value for this estimate... Are you sure you want to proceed?") -- Modify returns to the form, Proceed saves anyway.
-
If it's a Change Order on a job that already has a progress report needing regeneration, Appello shows an informational dialog before continuing:
Progress Report Needs Regeneration This job has a progress report that needs to be regenerated to include this change order. The job's percent complete will be affected until the...
This is a notification (single acknowledgement button), not a blocking confirmation -- it informs you the regeneration is needed without stopping the save.
All of the above are in-app dialogs shown at save time; this documentation found no email or push notification tied specifically to an estimate/change-order status change in the application source.
No dedicated Send action was found in the application source for moving an estimate from Draft to Sent -- that transition is a manual Status change you make yourself, typically after exporting or sharing the quote letter (see Generating and sending a quote letter below).
Conversion tracking
Once an estimate is approved, it can be converted into a project:
| Action | Result |
|---|---|
| Convert to Project | Creates a new project pre-populated with the estimate's customer, scope, and budget. |
| Link to Existing Project | Associates the estimate with an already-created project for tracking. |
| Create Change Order | If scope changes after approval, a change order can be issued against the original estimate. |
Converted estimates maintain a link back to the original so you can trace the full sales-to-operations pipeline.
Converting a won estimate to a job
When you change an estimate's Status to your instance's won status and there's no job linked yet, Appello opens a full-screen wizard titled Let's Get Started instead of just saving:
Your estimate has been approved! The next step is to set up the associated Job and Project details. This wizard will guide you through the process of either creating a new Project and Job, or connecting this estimate to existing ones.
1. Pick a workflow option
Choose one of four options:
| Option | What it does |
|---|---|
| Create a New Project & Job | Creates both a new project and a new job for this estimate. |
| Create a New Job Only | Creates a job without a parent project. |
| Associate to an Existing Project & Create a New Job | Links to a project you pick, then creates a new job under it. |
| Associate to an Existing Job | Links the estimate directly to a job you already have. |
2. Create or select the project and/or job
Depending on the option chosen, the wizard walks through the matching forms -- Create a Project & Job, Create a Job, Select a Project, or Select a Job -- pre-filling the estimator, customer, contact, location, and PO number from the estimate. The Create a Job form inside the wizard mirrors the standalone job-creation flow -- see Create a Job for the full field-by-field reference, including the job's cost-code setup that later feeds the Schedule of Values.
3. Confirm
The final step, Confirmation, summarizes the estimate's number, name, customer, and proposed value, then shows the job (and project, if applicable) that will be linked:
Please review and confirm that the following information is correct. The selected estimate, [number] - [name] created for [customer] with a proposed value of [amount], will be associated with the following job.
Confirming closes the wizard and leaves the estimate linked to the job (and project). Canceling the wizard reverts the Status field back to its original value and, if you had already created a job or project earlier in the wizard, deletes it.
This flow could not be captured with canary screenshots -- triggering it requires saving a real Status change to a won estimate, which is outside the read-only, cancel-only rule this documentation follows on the demo instance. The steps above are sourced directly from the wizard's own on-screen copy and its page sequence in the application code.
Generating and sending a quote letter
The Letter tab on the estimate editor is a full document editor -- not a separate page -- where you compose the customer-facing quote letter for this estimate.
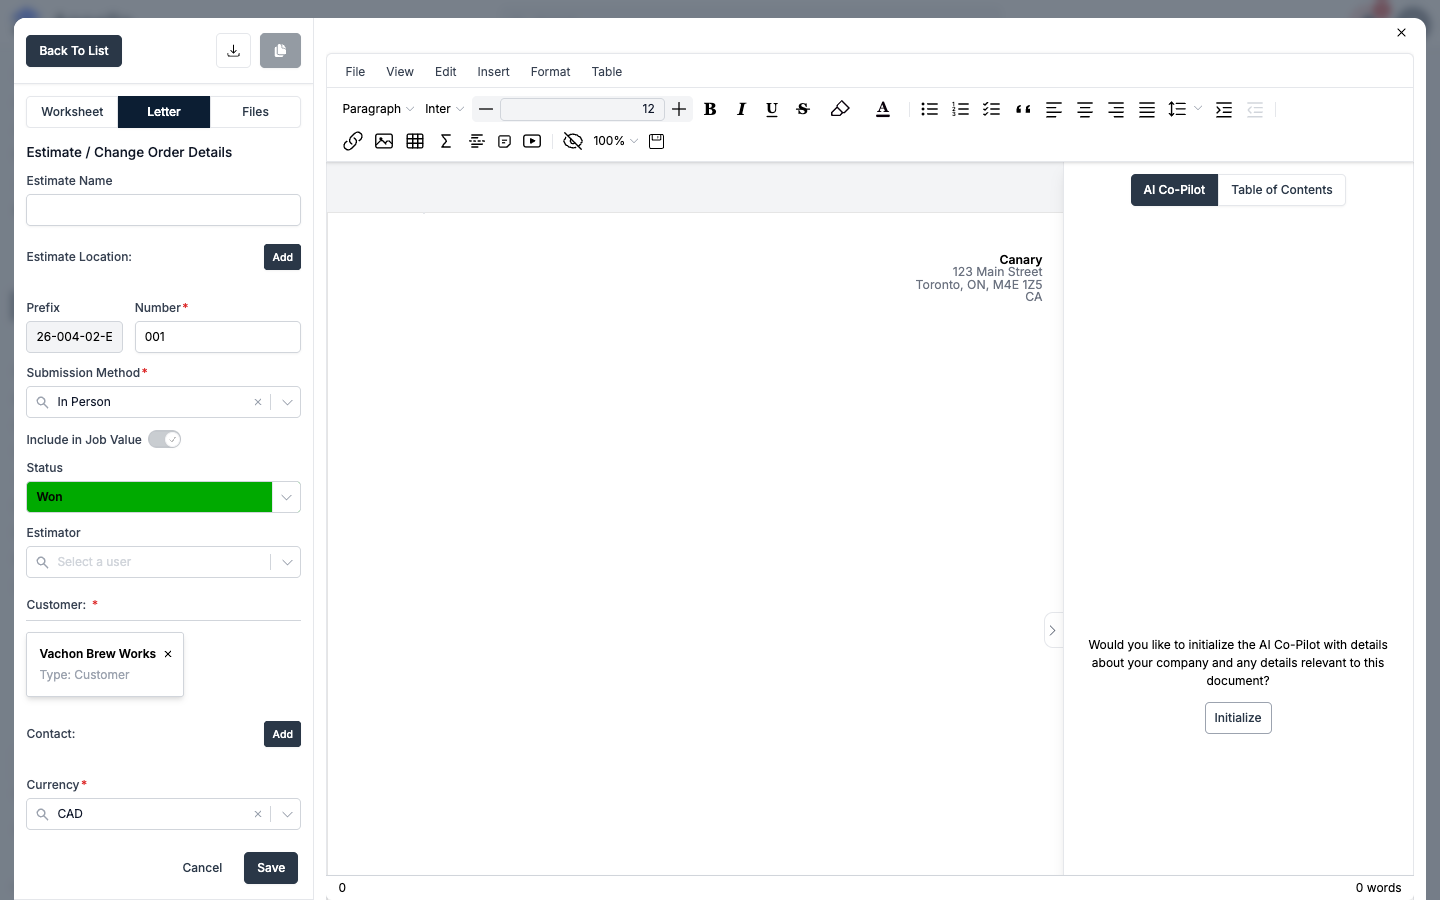
Starting from a document template
Use the File menu in the Letter tab's toolbar:
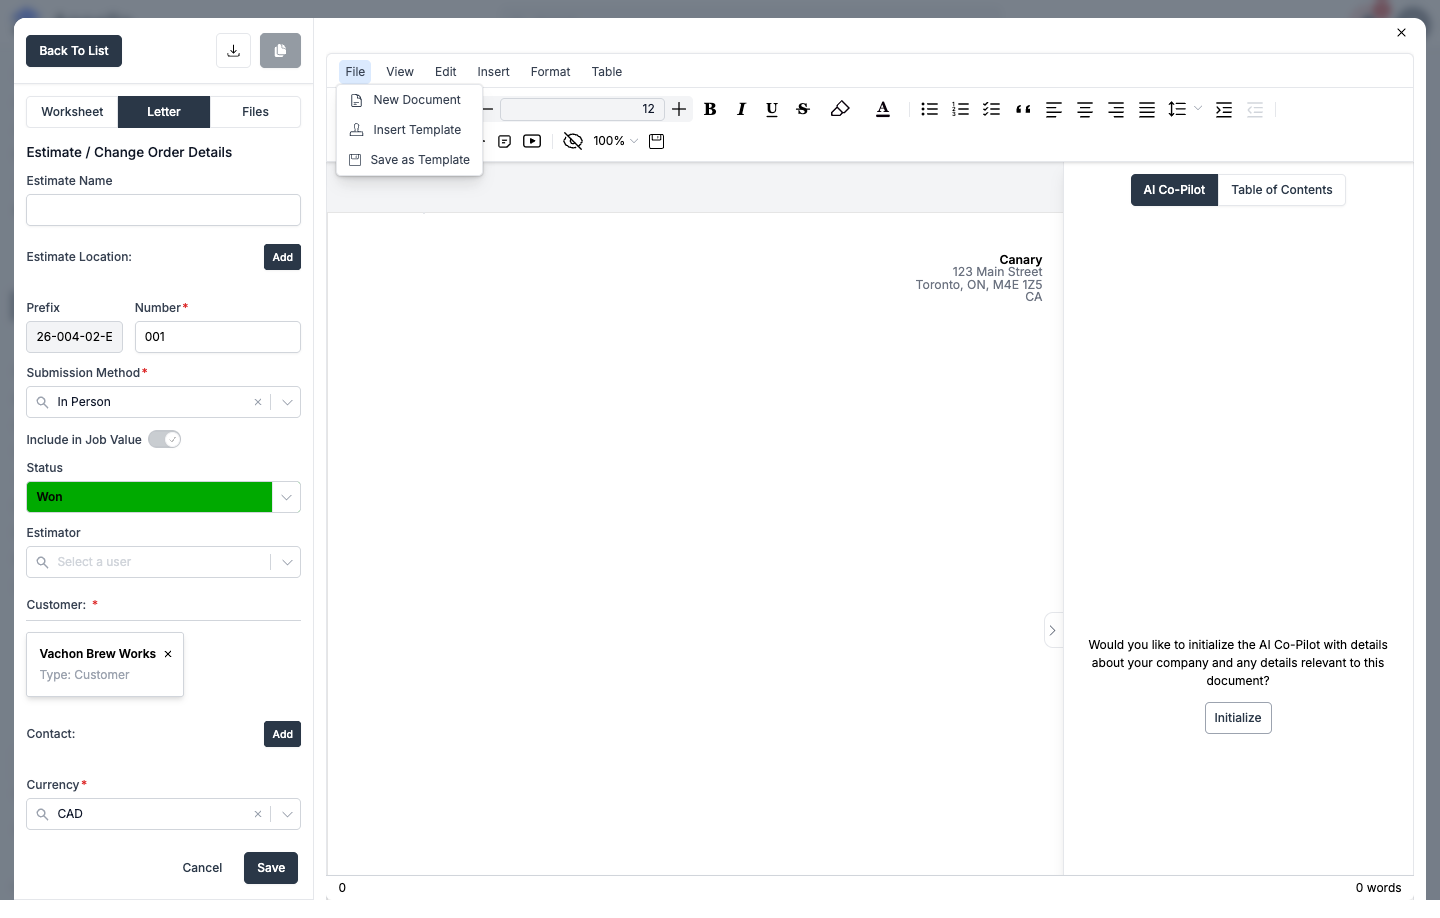
| Menu item | What it does |
|---|---|
| New Document | Starts the letter blank. |
| Insert Template | Opens a picker of your instance's saved document templates to drop into the letter. |
| Save as Template | Saves the current letter content as a new reusable template. |
Insert Template opens a searchable list (Name, Date Uploaded, Last Modified, Uploaded By, File Size):
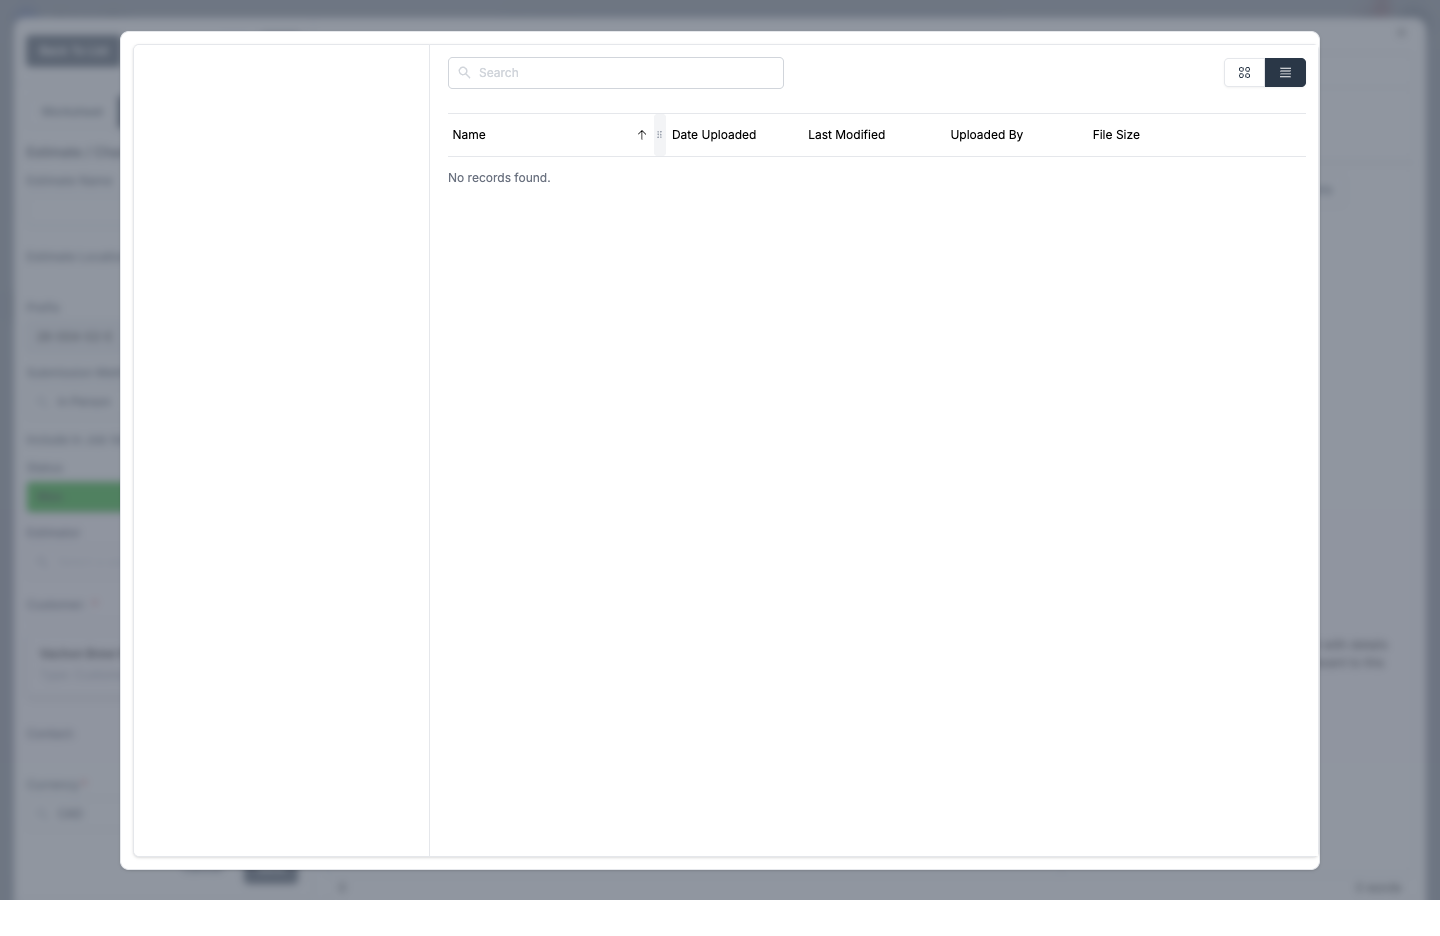
The canary instance used for this capture had no document templates configured, so the picker shows "No records found." Document templates themselves are managed under your instance's Settings; this guide only covers inserting one into a quote letter, not building the template.
Previewing and exporting the letter
The download icon in the estimate editor's header opens a menu with two checkboxes -- Estimate Letter and Estimate Worksheet -- and an export action that generates a combined PDF from whichever you check. This is how you preview the finished document and produce a file to send to the customer.
No in-app Send button was found for emailing the quote letter directly to a customer from this screen. Based on the application source, sharing an estimate means exporting this PDF and sending it through your own email or file-sharing workflow; this documentation could not confirm an in-app send action, and the download menu itself could not be captured in a canary screenshot despite being visible in the source.
Invoicing a won itemized estimate
A Won, Itemized estimate (not a change order, and not a Bid First/lump-sum record) with at least one line item and no invoice generated from it yet shows a Create Invoice button in the Worksheet tab, provided your role has permission to create job bills. Clicking it opens a confirmation panel before anything is created:
| Field / control | What it shows |
|---|---|
| Job | The linked job's number and name, read-only. |
| Line preview list | Every itemized line, labelled the same way as on the Worksheet, each with its overhead-adjusted dollar value. |
| Contingency | Shown as a single rolled-up line (line contingency + estimate contingency combined) if either is non-zero. |
| Total | The full grand total that will become the invoice amount. |
| Explanatory note | "Overhead is folded into per-line rates; contingency is added as a single line item. The estimate status will remain unchanged -- this action cannot be undone." |
| Cancel | Closes the panel; nothing is created. |
| Create invoice | Disabled while the line data is still loading or if there are zero lines. Creates a new job bill from the estimate's lines and opens it. |
Once an invoice has been generated this way, the button is replaced with View invoice [number] →, which takes you straight to that invoice on the job's Billing tab -- see Billing report for how invoices/job bills are managed from there.
This documentation could not capture the Create Invoice button or its confirmation panel live -- the canary instance used for these captures has only one Won estimate, and it's a Bid First/lump-sum record, which this feature explicitly excludes (it only appears for Itemized estimates). The field-by-field description above is sourced directly from the confirmation panel's own component code, including its exact wording.
How estimates connect to other features
| Feature | Relationship |
|---|---|
| Projects | A won estimate can create or link a project through the job wizard. |
| Jobs | A won estimate can create or link a job through the same wizard; see Create a Job for the job form itself. |
| Invoicing | An itemized, won estimate can generate a job bill directly -- see Invoicing a won itemized estimate above. |
| Change Orders | Scope changes after approval are tracked as change orders, sharing this same list component at /overview/change-order-report. |
| Cost Codes / SOV | A job's cost codes and Schedule of Values can fall out of sync with a won estimate's bid if the bid changes after the fact -- see Cost Codes & Schedule of Values. |
| Tax Settings | Tax rates configured in Settings are the options offered by each line's Add Tax Rate control. |