Users
Users are the people who sign in to your Appello instance -- from office staff running projects on a desktop, to crews clocking in and completing forms from the mobile app in the field. Every user is created from the same Create User form. What makes someone a desktop user or a mobile/field worker is which Role & Permissions you assign them, and whether you attach a Trade Classification for wage tracking -- not a separate signup flow.
Navigation
Sidebar → Workforce → Users
Before you start
- You need a role with permission to create and edit users.
- For a field worker, know their Employee Agreement (the applicable Collective Bargaining Agreement, or your company's non-union agreement) and Trade Classification ahead of time -- you'll need both to finish their setup.
- Desktop users sign in with email + password. Field workers sign in to the mobile app with a 5-digit PIN that you generate for them. Decide which one applies before you start.
Creating a desktop user
Desktop users are office staff, project managers, estimators, and admins who work from the web app.
Steps
-
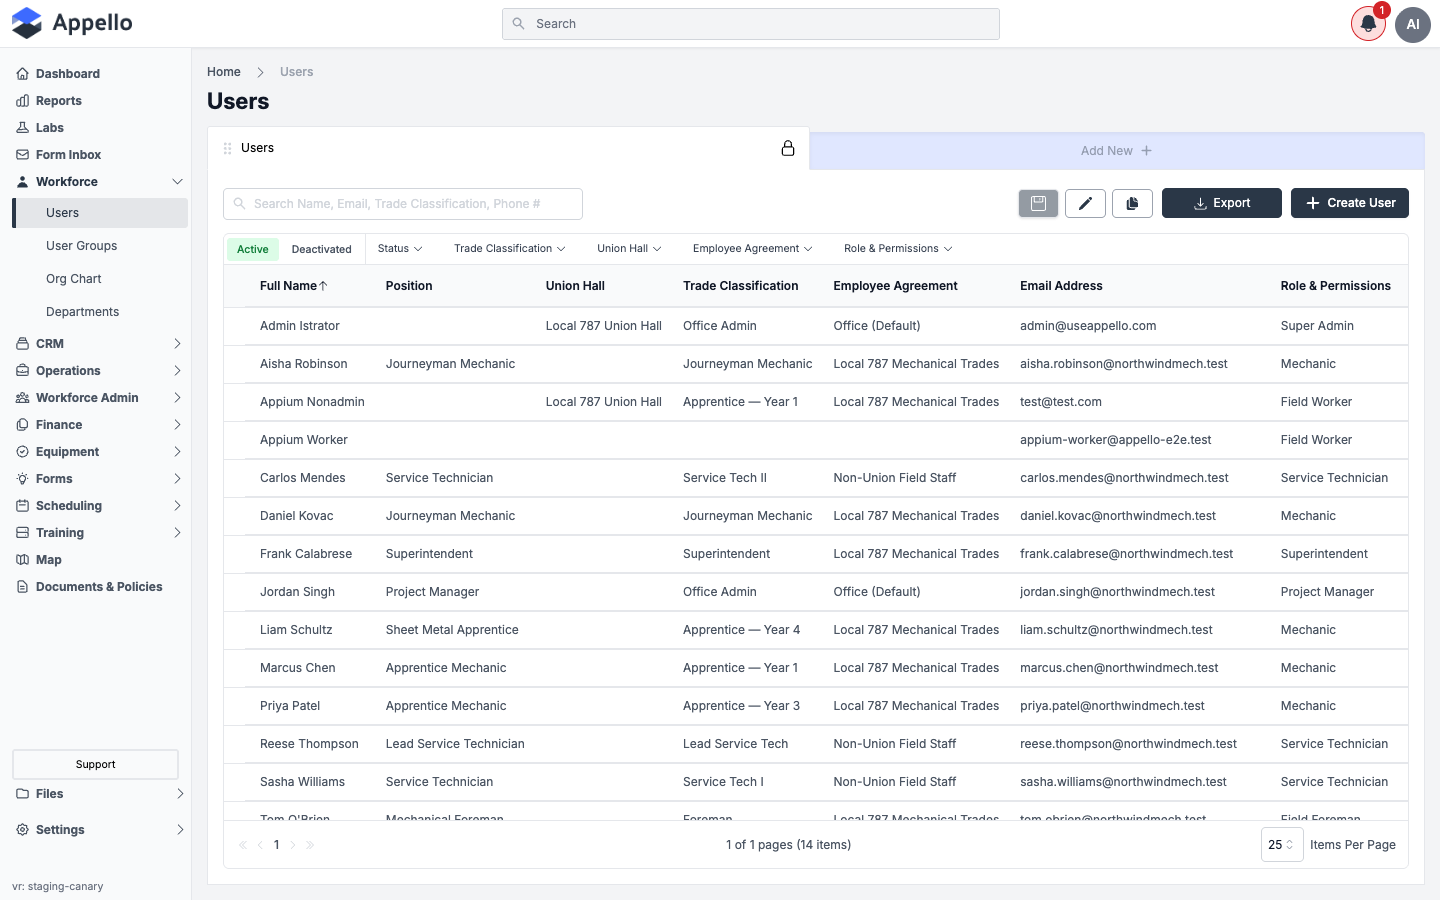
Go to Workforce → Users and click Create User in the top-right corner of the list.
-
Fill in the Personal and System Information sections of the panel that opens.
Field Required Notes First Name Yes Last Name Yes Date of Birth No Email Address Yes Must be unique -- Appello checks availability as you type. User Address No Set via the Set Home Address button. Role & Permissions Yes Controls both what the user can do and where they work from. For a desktop user, pick an office-facing role such as Office Admin, Project Manager, or Super Admin. GPS Tracking Enabled No On by default. Usually left on even for office roles that occasionally clock in. Require Timesheet Note No Off by default. 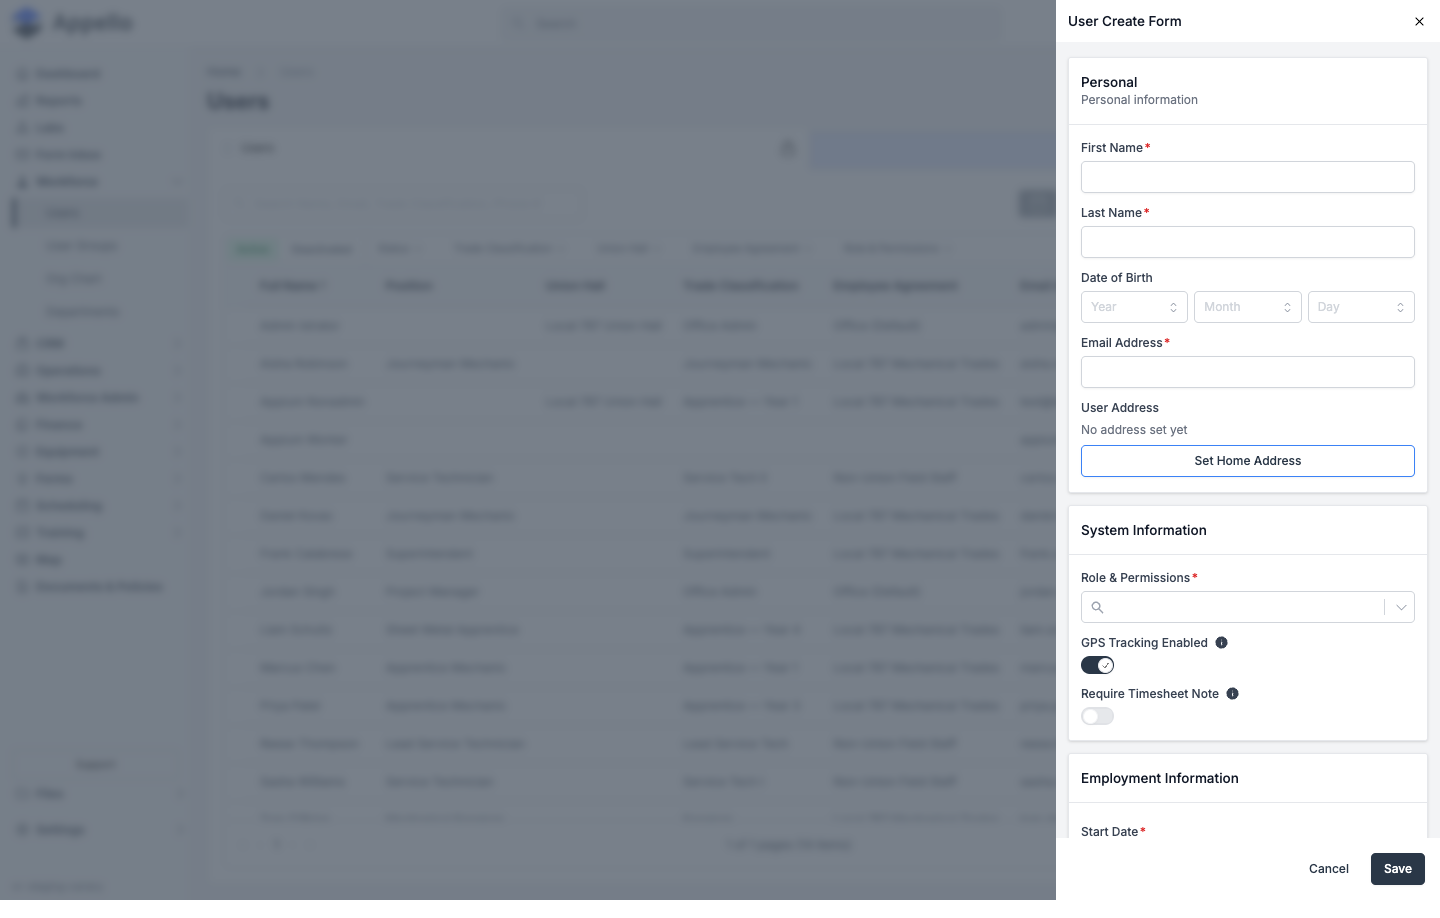
-
Scroll down and fill in Employment Information: Start Date and Employee Agreement are required; Position, Employee Number, Time Sheet Submissions Type, Reports To, and Department are optional. If you check Notify New User By Email before saving, Appello emails the person an invite link as soon as the record is created.
-
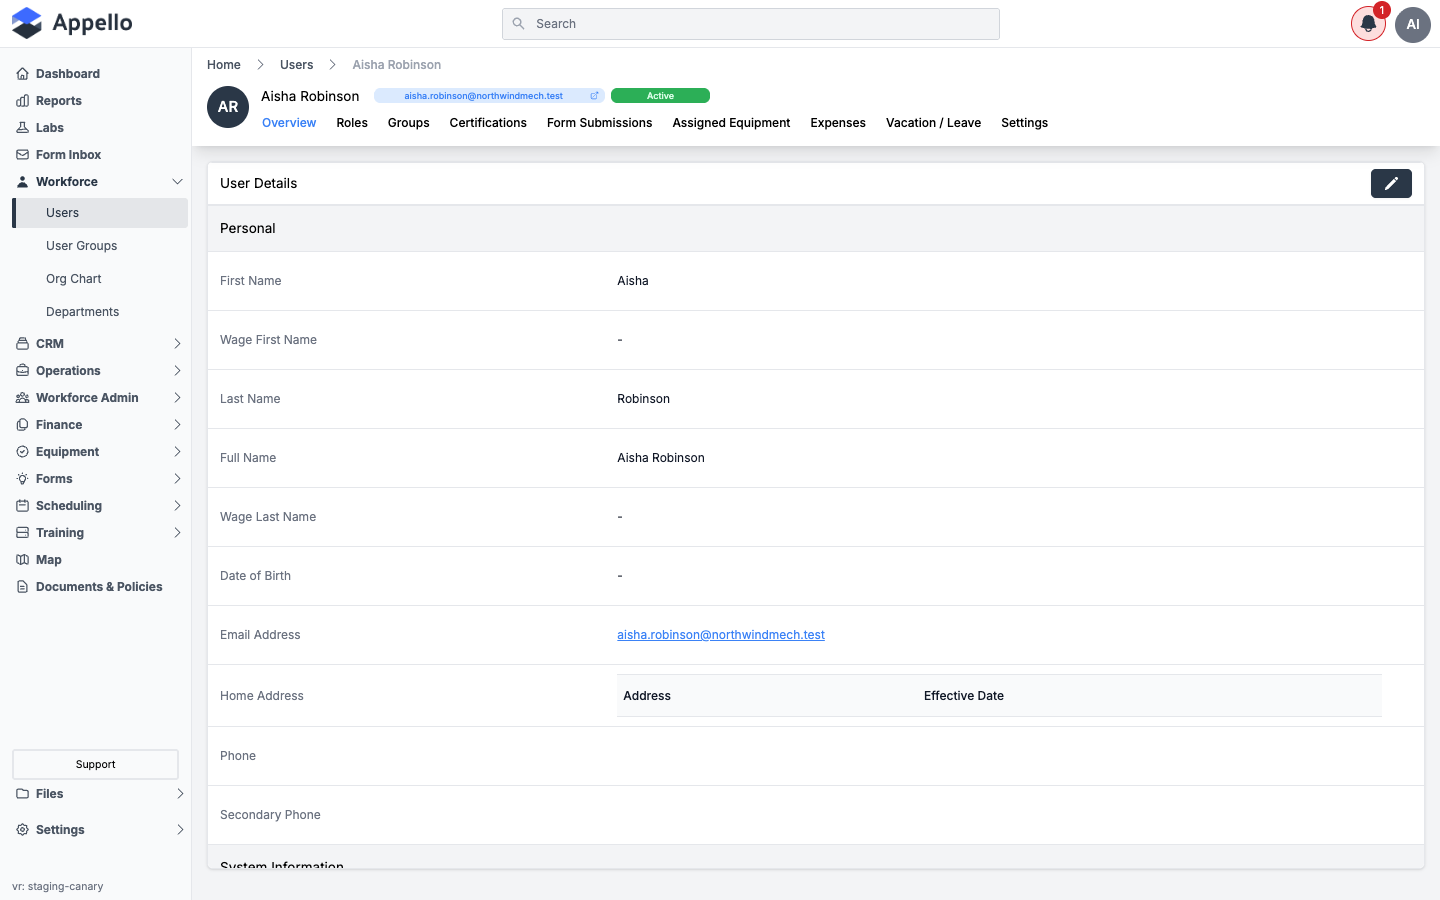
Click Save. Appello creates the user and opens their profile on the Overview tab, where you can see their status and the account-management actions.
-
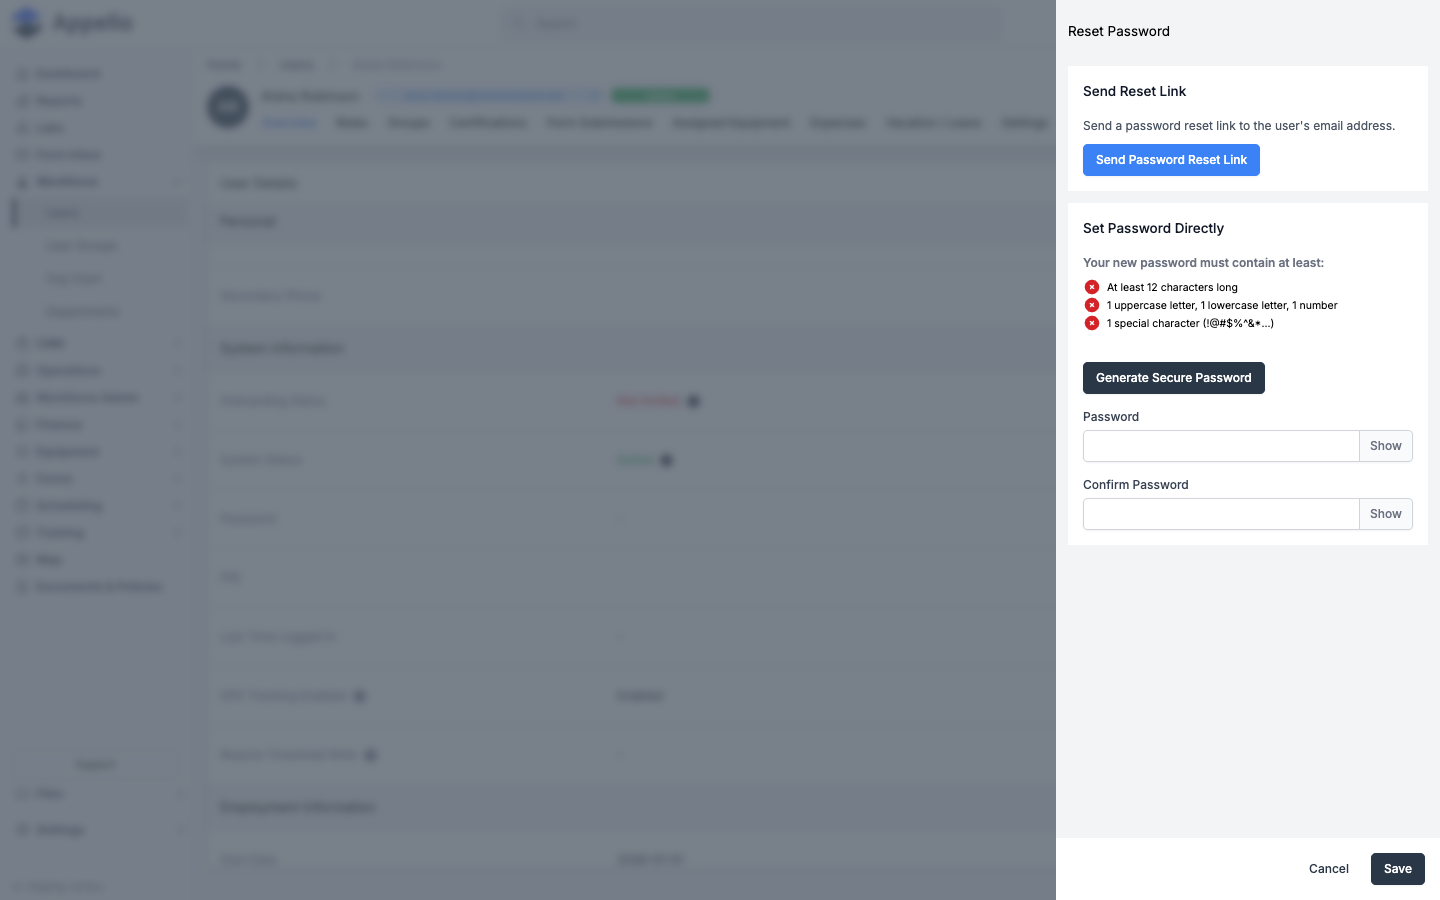
Get them signed in. If you checked Notify New User By Email, they'll receive an invite link to set their own password. Otherwise, click Reset Password from the Overview tab -- you can send them a reset link, or set a password directly.
Creating a mobile / field worker
Field workers are crew members who clock in, complete forms, and view their schedule from the Appello mobile app instead of the web console. They sign in with a PIN instead of a password, and almost always carry a Trade Classification so their hours calculate at the correct wage rate.
Steps
-
Create the user the same way as a desktop user (steps 1--4 above), but assign a field-facing role in Role & Permissions -- for example Field Worker, Mechanic, Service Technician, or Field Foreman -- instead of an office role. Leave GPS Tracking Enabled on so their location tracks with their timesheet.
-
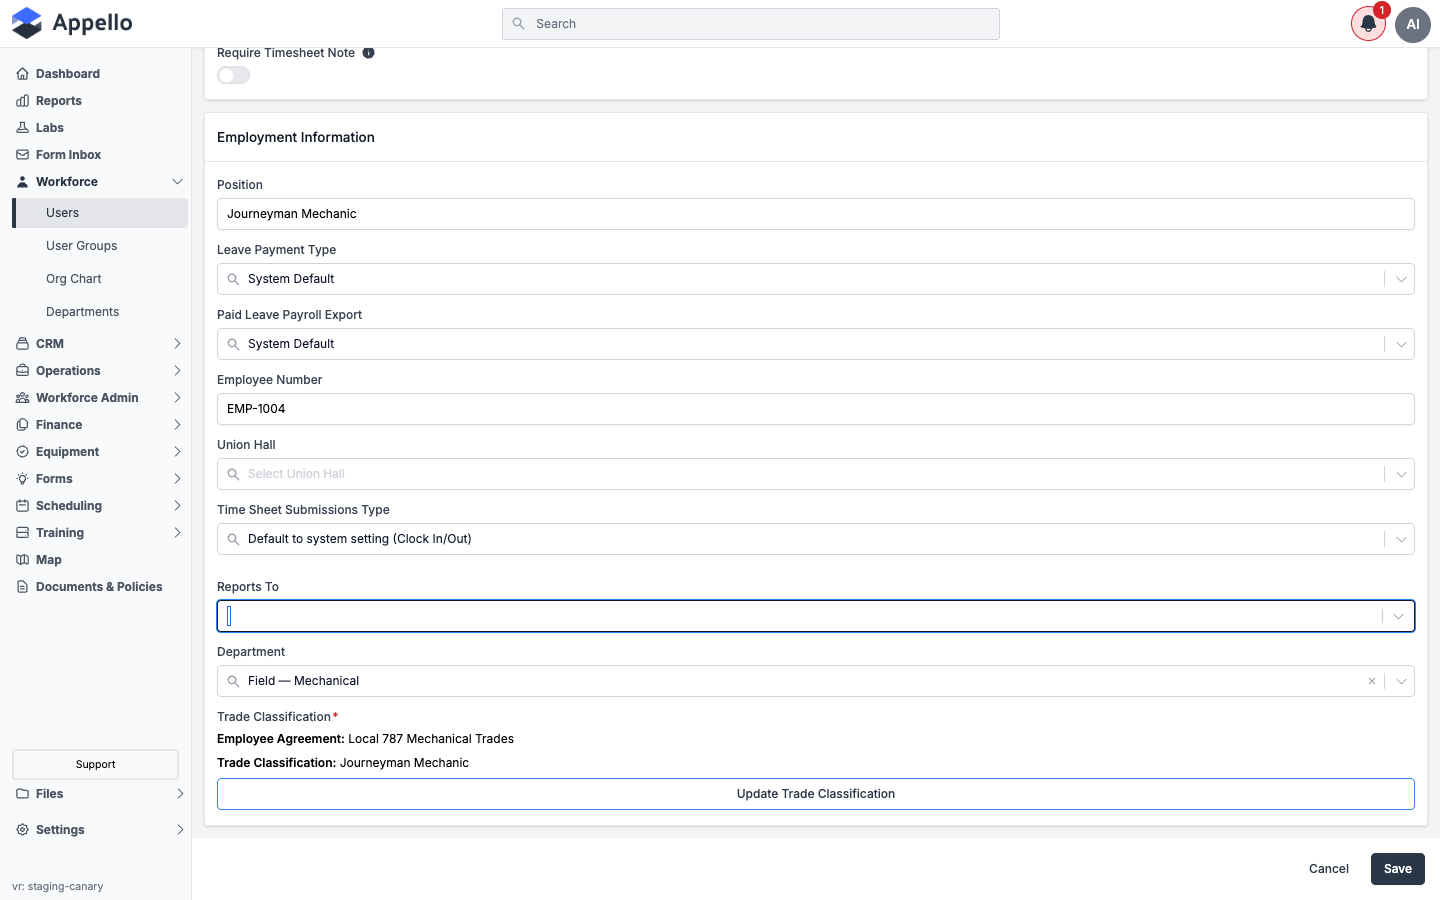
Open the new user's profile, click the edit (pencil) icon, and scroll to Employment Information. Set Union Hall if the worker is dispatched through one, then click Update Trade Classification.
-
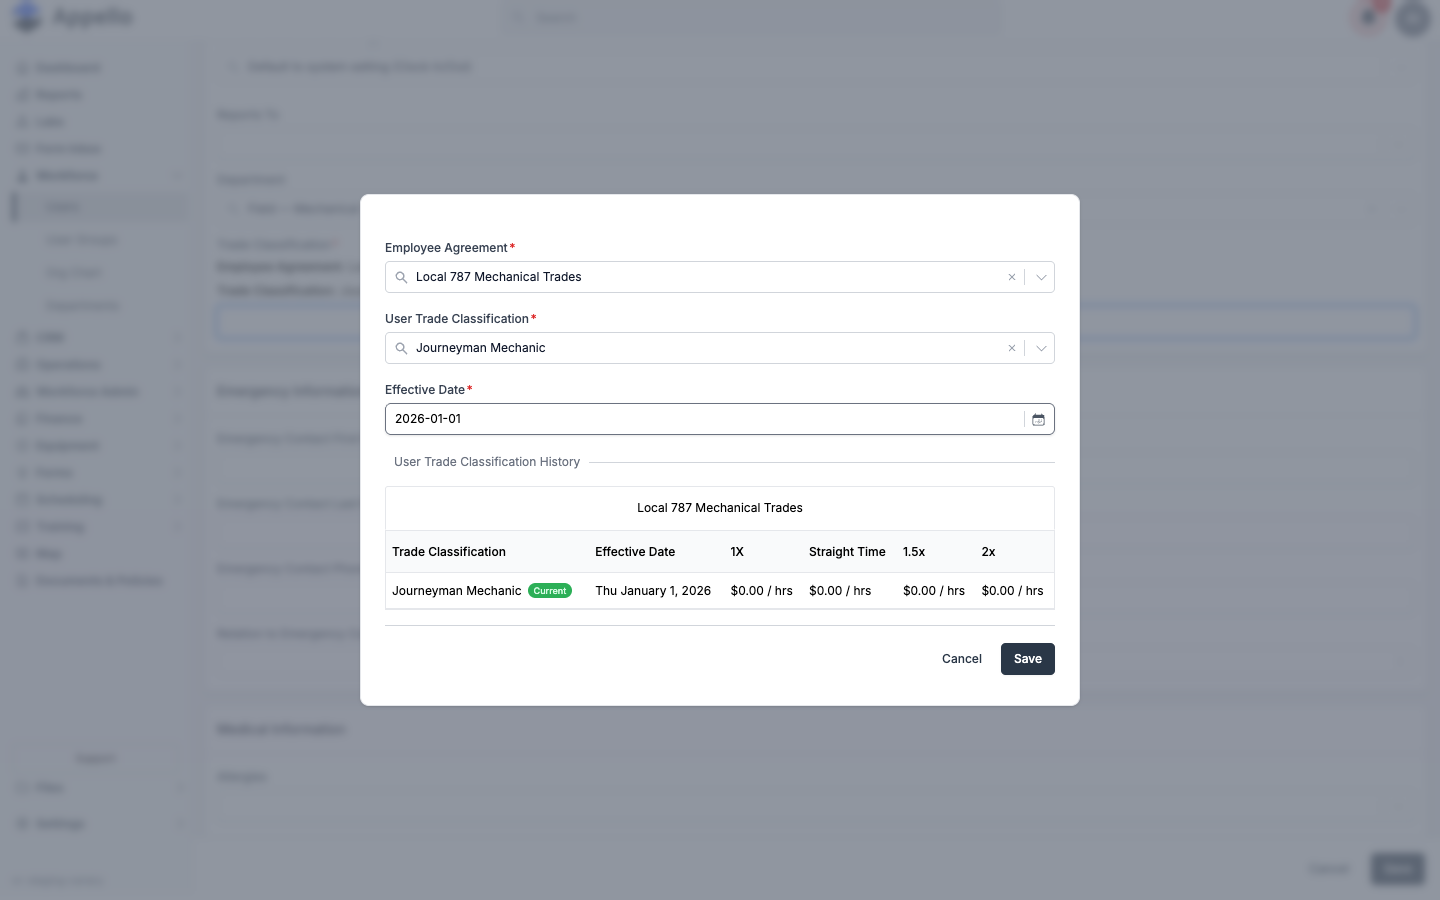
In the panel that opens, choose the Employee Agreement, the User Trade Classification (for example Journeyman Mechanic or Apprentice -- Year 1), and an Effective Date, then click Save. This also starts their trade classification history, which tracks any future changes and the wage rates tied to each period.
-
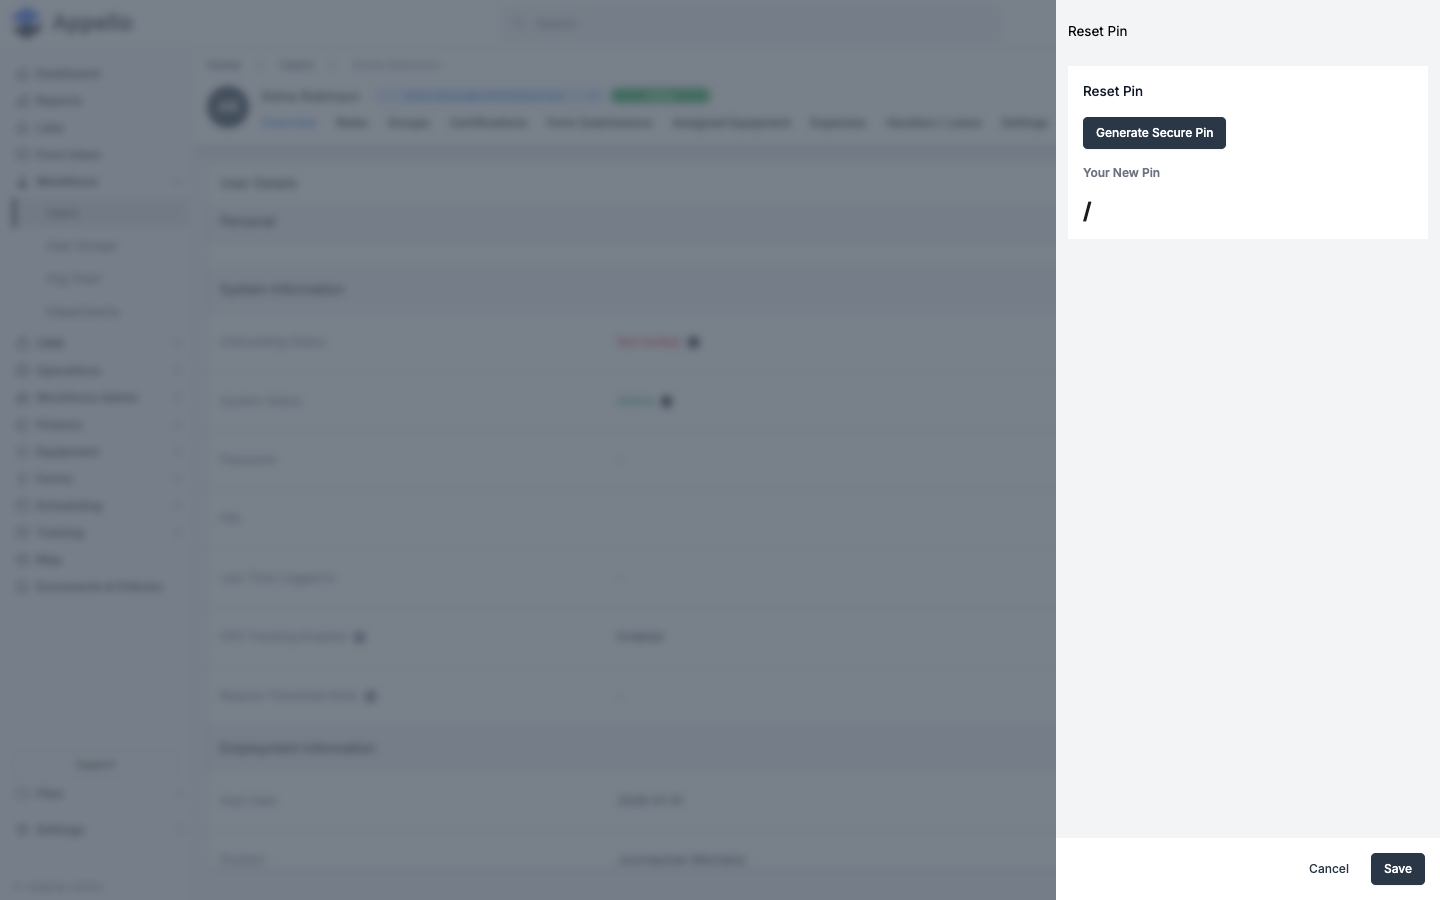
Back on the user's Overview tab, click Reset PIN. Click Generate Secure Pin, confirm the generated PIN in the field that appears, and click Save. Appello does not email the PIN -- write it down or read it out to the worker directly, since it is shown only once.
The web app has no separate "mobile only" switch. Whether a person works from the desktop app, the mobile app, or both is decided by the Role & Permissions you assign: field roles carry mobile permissions and a PIN for the mobile app, office roles carry desktop permissions and an email and password sign-in. A person can have both.
The Users list
Where: Sidebar → Workforce → Users. Route: /users. Opening this page requires the
user.view permission; the columns, filters, and actions below may require additional
permissions of their own, noted where they apply.
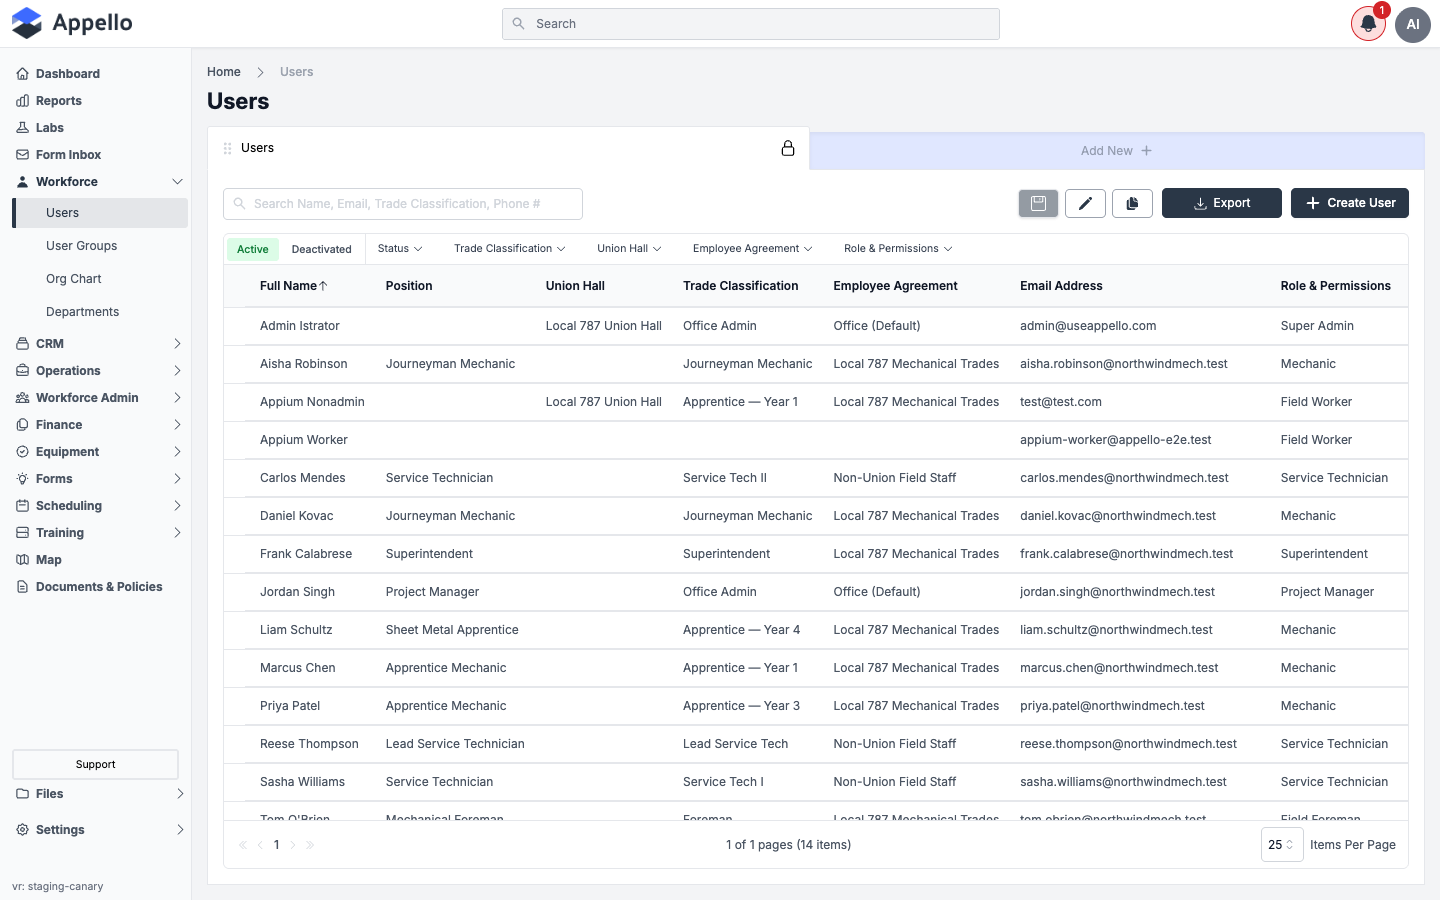
What it's for: The Users list is the single directory of every person who signs into your Appello instance -- desktop staff and mobile field workers alike. It's where you find an existing user to open their profile, search or filter down to a specific group, export the roster, and start creating a new user.
Columns
The default view shows these columns, left to right:
| Column | Sortable | Notes |
|---|---|---|
| Full Name | Yes | Links to the user's profile. Sorted ascending by default. |
| Position | No | From Employment Information on the user's record. |
| Union Hall | No | Blank if the user isn't dispatched through a union hall. |
| Trade Classification | No | The user's current trade classification, if any (e.g. Journeyman Mechanic, Apprentice -- Year 1). |
| Employee Agreement | No | The Employee Agreement tied to that trade classification. |
| Email Address | Yes | Desktop sign-in identity. |
| Role & Permissions | No | The role(s) assigned to the user. |
| Status | No | Active or Deactivated, shown as a colored badge. Scroll the table right to see it -- it's the last column and doesn't fit on a standard-width screen alongside the others. |
Only Full Name and Email Address support click-to-sort on the column header; the rest are filter-only.
Several other fields exist on the User record (Phone, Wage First/Last Name, Reports To,
Department, Onboarding Status, and more) but aren't offered as list columns at all --
isGuest, isSuperUser, isSystemUser, pin, imageURL, contactId, and a few others are
explicitly excluded from the column set at the source level. This is a fixed list, not
something you can extend by adding a column.
Quick tabs, search, and filters
Two quick tabs sit above the column headers -- Active and Deactivated. There is no "All" tab; to see both, use the Status filter described below instead of a quick tab, or check each tab in turn.
The search box (Search Name, Email, Trade Classification, Phone #) matches against the user's name, email address, trade classification, and phone number.
Five filter chips sit next to the quick tabs -- Status, Trade Classification, Union Hall, Employee Agreement, and Role & Permissions. Each opens a searchable, multi-select checklist of the distinct values currently present among users (plus an Empty option for records with nothing set in that field), except Status, which is a simple Yes checkbox mirroring the Active/Deactivated split. Checking one or more values narrows the list to users matching any of them.
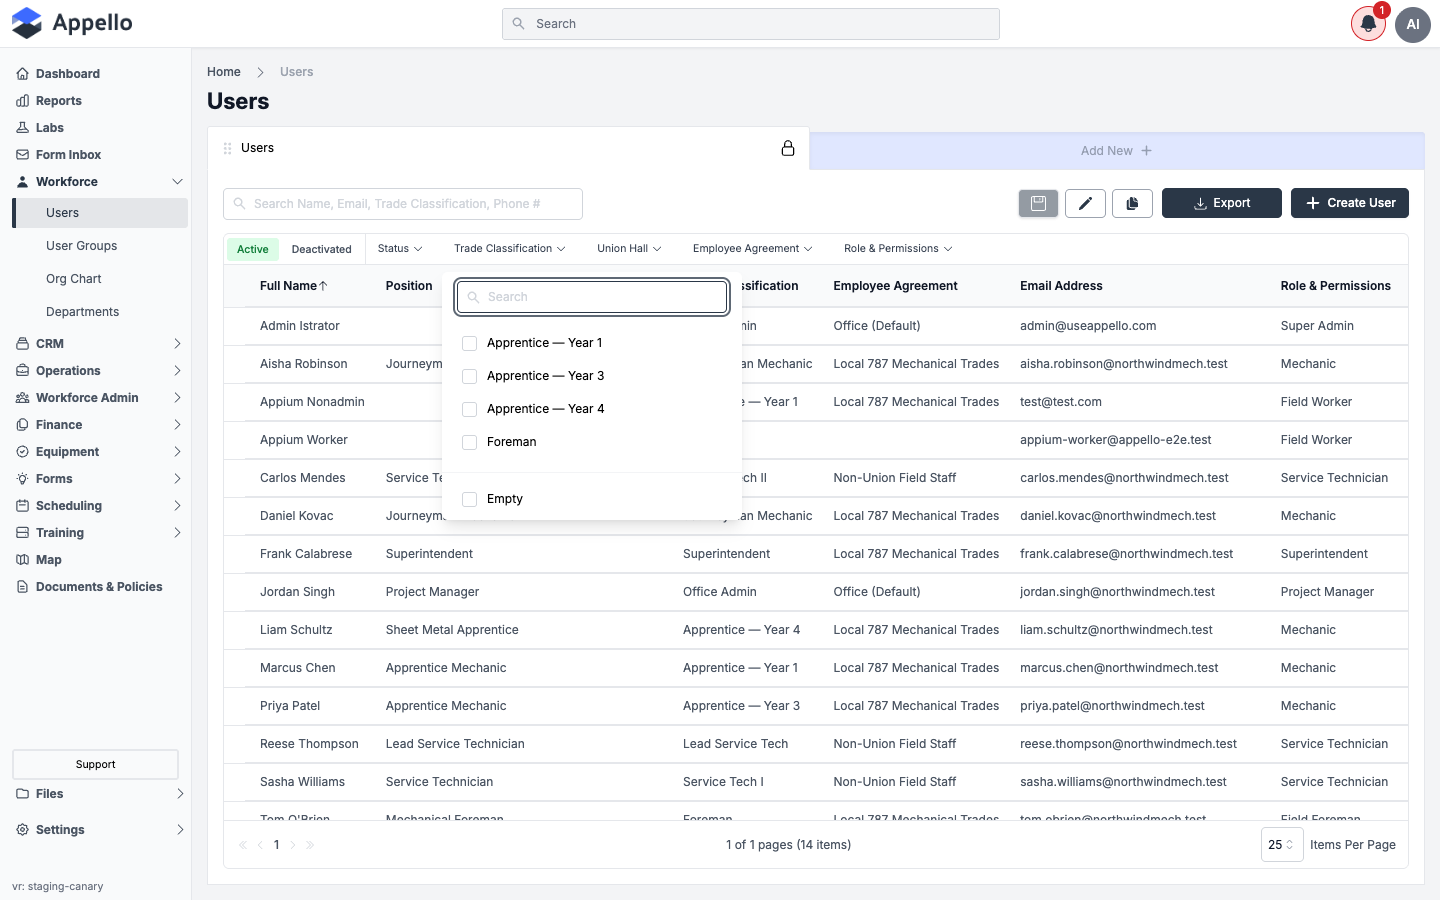
Use Items Per Page (25 / 50 / 100 / All) at the bottom right to change how many rows load at once, and the arrows beside it to page through results.
The Deactivated tab is shown empty on the demo instance -- every seeded user is currently Active.
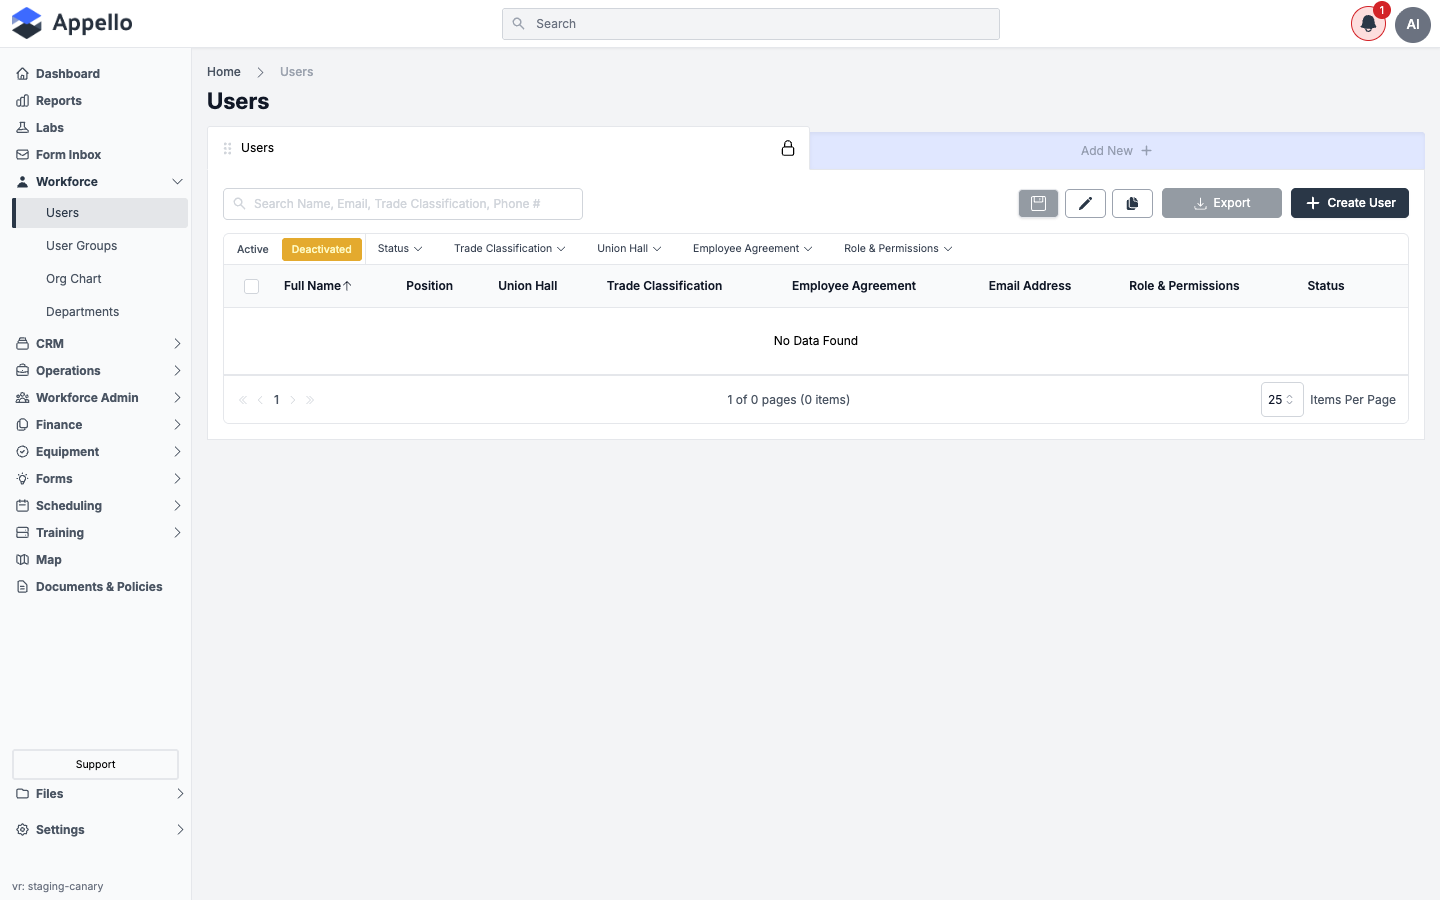
View controls
The "Users" card above the filter row behaves like the saved views on other list pages in Appello:
- Lock icon -- The default "Users" view is a system view and can't be renamed or deleted.
- Save icon -- Enabled only when you have unsaved filter/column changes; saves them back to the view.
- Edit icon (pencil) -- Rename the view or change which columns it displays.
- Duplicate icon -- Create a copy of the current view as a starting point for your own saved view.
- Add New -- Creates an additional saved table view of this list, with its own name and column selection.
Export
Click Export to open a small menu with a single option, Export as CSV, which downloads the currently filtered/searched result set. The button is disabled when the current tab has no rows to export (for example, on an empty Deactivated tab).
Create User
Click Create User in the top-right corner to open the create panel -- see Creating a desktop user and Creating a mobile / field worker above for the full field-by-field walkthrough. That field table was re-verified against the live create form this pass and needed no changes.
Bulk actions
The Users list wires up exactly one bulk action: Delete, which permanently removes the
selected user record(s) via a deleteManyUsers call. It requires the delete permission on
the User resource. Before it runs, Appello counts related records that would be removed with
each user -- certifications, notes, comments, form submissions, and acknowledgements -- and
warns you with that count first.
There is no bulk Archive action for users -- unlike Companies, Contacts, and Jobs, the
Users list only wires up delete in its bulk-action toolbar, not archive. More broadly,
Appello has no user-facing "archive" concept for users at all. The only lifecycle action
short of permanent deletion is Deactivate / Reactivate, documented on
the user profile page -- it's a
single-user action from the profile (not a bulk action from this list), and it toggles the
user's Active/Deactivated status rather than setting anything called "archived."
Bulk selection (the row checkboxes that reveal the Delete toolbar) did not render consistently for the account used to crawl this page, so the actual delete-confirmation dialog and its related-record-count warning could not be screenshotted this pass. The mutation, permission, and related-count behavior above come directly from the source code, not a screenshot.
Edit User
Where: User profile → Overview tab → pencil icon, or directly at /users/[id]/edit.
Opening this page requires the user.edit permission -- except editing your own profile,
which is always allowed regardless of scope.
What it's for: Editing an existing user's record in place. It reuses the same field set as Create User with several differences described below, and adds a few fields (wage names, phone numbers, leave-payment overrides) that only appear once a user already exists.
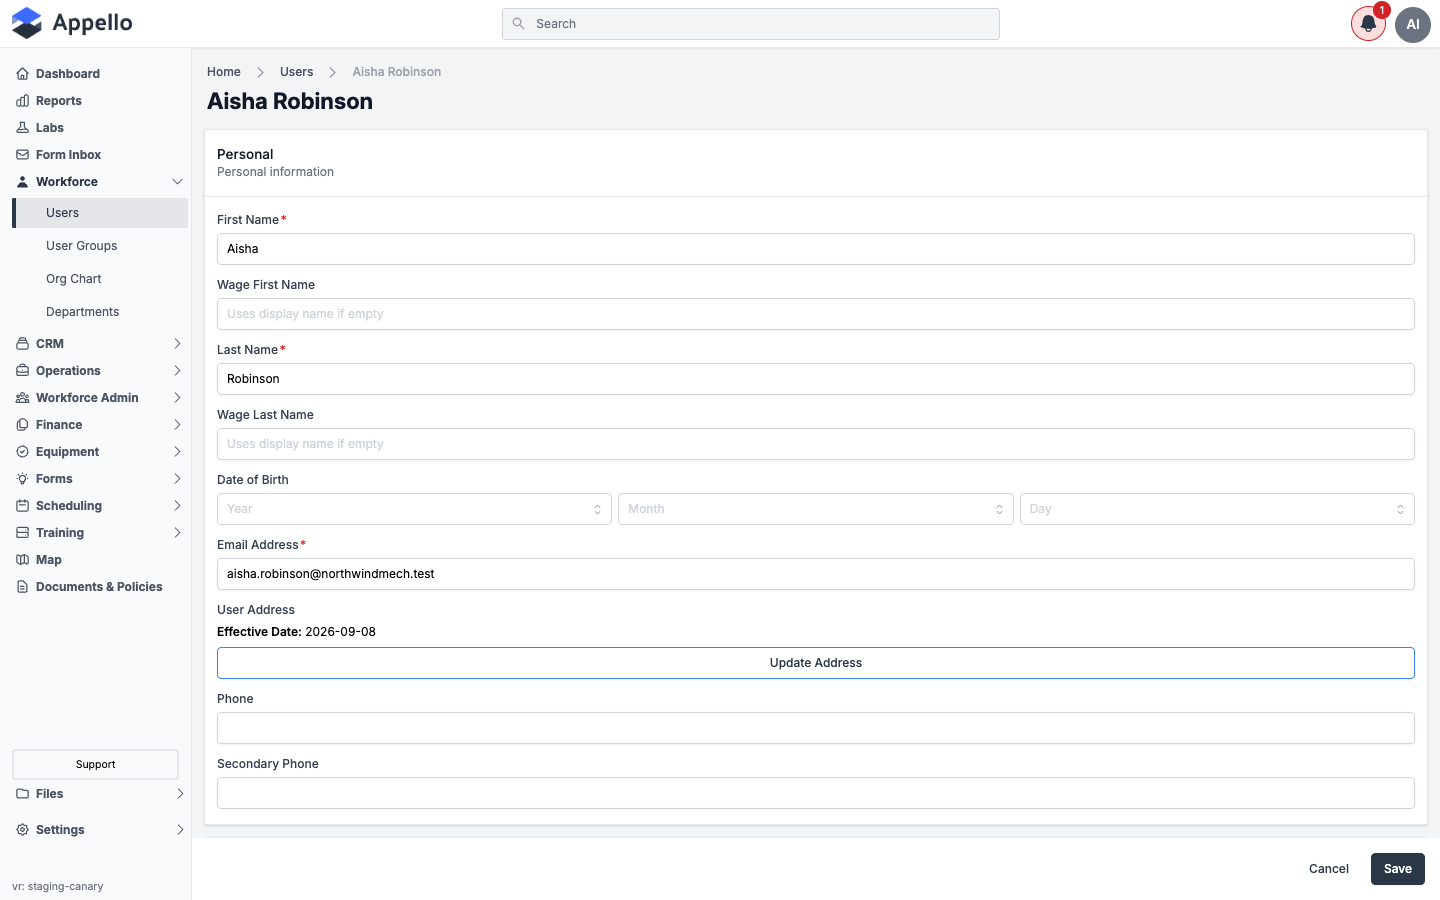
Fields
| Section | Field | Required | Notes |
|---|---|---|---|
| Personal | First Name | Yes | |
| Personal | Wage First Name | No | Placeholder "Uses display name if empty." Not present on Create. Used on wage/payroll exports if set. |
| Personal | Last Name | Yes | |
| Personal | Wage Last Name | No | Same fallback as Wage First Name. Not present on Create. |
| Personal | Date of Birth | No | Separate Year/Month/Day dropdowns. |
| Personal | Email Address | Yes | Checked for availability as you type, same as Create. |
| Personal | User Address | No | Shows the current address and its effective date, plus Update Address (not "Set Home Address" -- see Differences from Create). |
| Personal | Phone | No | Not present on Create. |
| Personal | Secondary Phone | No | Not present on Create. |
| System Information | GPS Tracking Enabled | No | Toggle; carries over the value set at creation. |
| System Information | Require Timesheet Note | No | Toggle. Only shown when the instance has Require Timesheet Note enabled instance-wide. |
| Employment | Position | No | |
| Employment | Leave Payment Type | No | Dropdown, defaults to "System Default." Not present on Create. |
| Employment | Paid Leave Payroll Export | No | Dropdown, defaults to "System Default." Not present on Create. |
| Employment | Employee Number | No | |
| Employment | Union Hall | No | Always visible on Edit (only appears on Create after an Employee Agreement is chosen), filtered to union halls under the user's current trade classification's Employee Agreement. |
| Employment | Time Sheet Submissions Type | No | Dropdown, defaults to "Default to system setting (Clock In/Out)." |
| Employment | Reports To | No | |
| Employment | Department | No | |
| Employment | Trade Classification | Yes | Read-only display of the current Employee Agreement and Trade Classification, plus an Update Trade Classification button -- see Trade Classifications. |
| Emergency | Emergency Contact First Name | No | |
| Emergency | Emergency Contact Last Name | No | |
| Emergency | Emergency Contact Phone | No | |
| Emergency | Relation to Emergency Contact | No | Dropdown. |
| Medical | Allergies | No | Multi-select dropdown. |
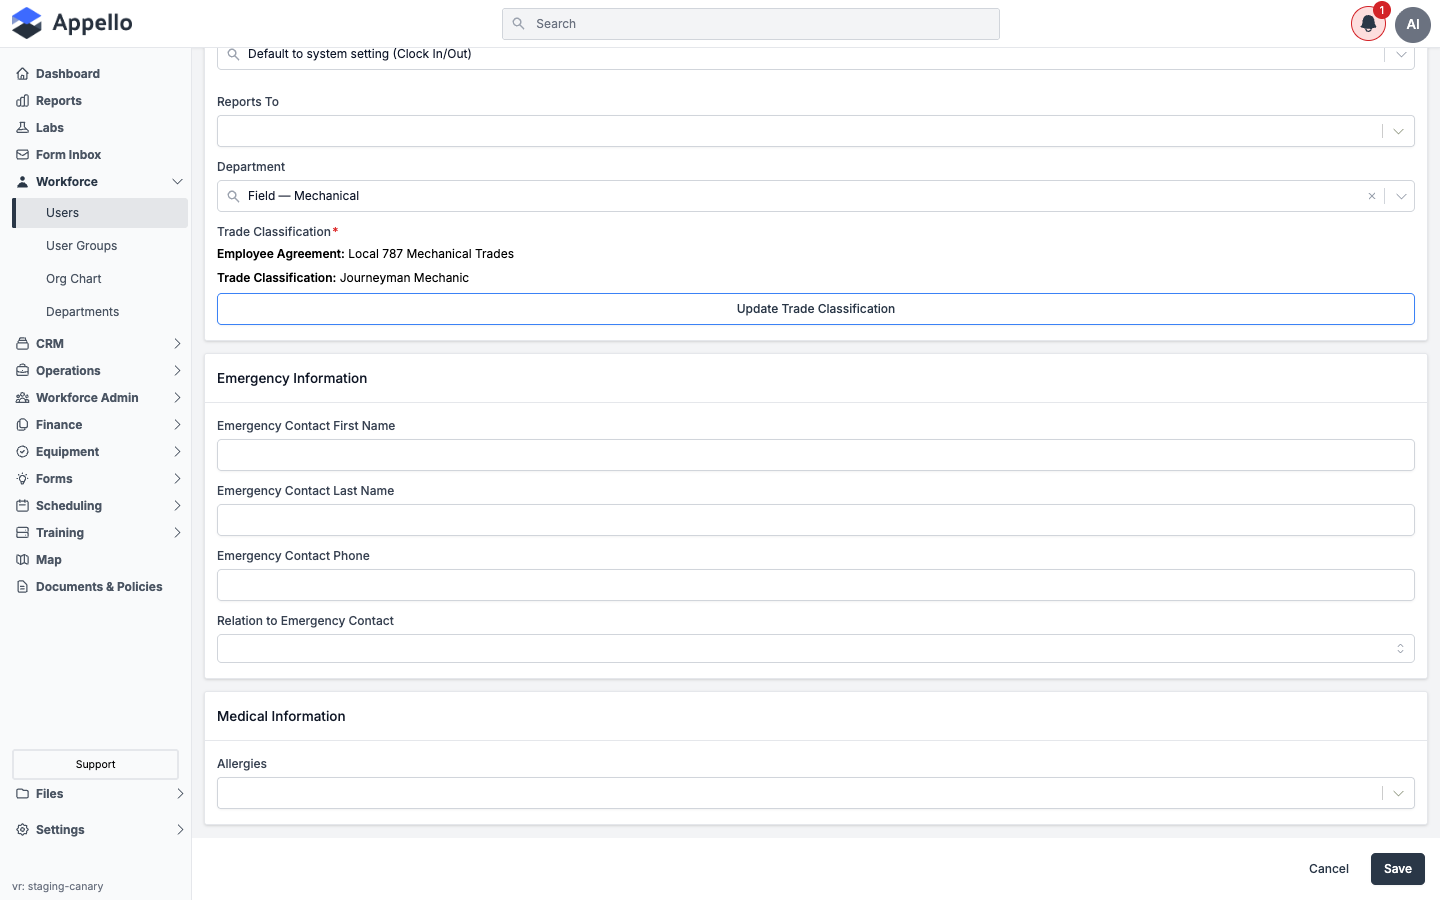
Differences from Create
- Employee Agreement isn't shown as its own field at all on Edit -- it's read-only text inside the Trade Classification block, and only changes via Update Trade Classification.
- Wage First Name, Wage Last Name, Phone, Secondary Phone, Leave Payment Type, and Paid Leave Payroll Export appear only on Edit, not on Create.
- Home Address: Create shows Set Home Address and "No address set yet" until one is added; Edit shows the current address with its effective date and an Update Address button that opens a panel with its own address history.
- Union Hall is always visible on Edit; on Create it only appears once an Employee Agreement is picked.
- Start Date and Notify New User By Email exist only on Create -- start date can't be changed from this form once the user exists, and re-inviting happens from Resend Invite Email on the Overview tab instead.
- Role & Permissions isn't on this form at all -- change roles from the user's Roles tab.
Workflow
- From the user's Overview tab, click the pencil icon (or navigate to
/users/[id]/editdirectly). - Change any of the fields above. Updating User Address or Trade Classification opens its own panel (see the tables above) and saves that piece immediately rather than waiting for the main Save.
- Click Save to write the remaining changes and return to the user's Overview tab, or Cancel to discard them and return without saving.
Appello does not send a notification to the edited user when their record is saved from this form.
Permissions and settings
- user.edit -- required to open this page and save changes to someone else's record.
- Editing your own profile is always allowed, regardless of your user.edit scope.
- Require Timesheet Note only appears as a field when the instance-wide Require Timesheet Note setting is enabled.
Troubleshooting
| Issue | Try this |
|---|---|
| Invite email not received | Open the user's Overview tab and check Onboarding Status. If it still reads Not Invited, click Resend Invite Email, and ask the user to check spam/junk. |
| User can't log in on mobile | Confirm their Role & Permissions grants mobile access and their account isn't locked (an Unlock Account button appears on their Overview tab after repeated failed attempts). If they've forgotten their PIN, click Reset PIN to issue a new one. |
| Reactivating a deactivated user | Open the deactivated user's profile and click Activate User in the same spot the Deactivate User button appears on an active user. |
Related pages
- User Profile Page -- the profile tabs (Overview, Roles, Groups, Certifications, and more) this list and the Edit page open into.
- Trade Classifications -- how classifications drive wage lookups.
- Employment Agreements -- the wage tables Employee Agreements reference.
- Union Hall Management -- dispatch locations for union field workers.
- Departments -- organizing users by division.
- User Groups & Crews -- grouping users for scheduling and forms.