Bulk Timesheet Entry
Bulk Timesheet Entry lets a foreman or office admin enter time for an entire crew on one job in a single spreadsheet-style grid, instead of each worker submitting their own timesheet. It is the fast path for the end-of-day/end-of-week ritual on ICI jobs where one person reports the whole crew's hours at once.
Navigation
Sidebar → Workforce Admin → Bulk Timesheet Entry
URL: /timesheets/bulk-entry
Permission: the Timesheet Record → View permission gates the whole route — without it, Bulk Timesheet Entry does not appear under Workforce Admin in the sidebar and the route itself refuses to load. Within the page, editing is a separate check:
- Timesheet Record → Edit — required to see the Submit for Review button and to submit via Preview & Submit All (a user without it sees a read-only Preview All button instead and can still Save Draft).
- Timesheet Record → Delete — required to remove a worker row from the grid.
- Timesheet Record → Add Timesheet Record For Unscheduled Job(s) — required to add a worker who isn't already scheduled to the job, and gates the Copy To Users button entirely.
Overview
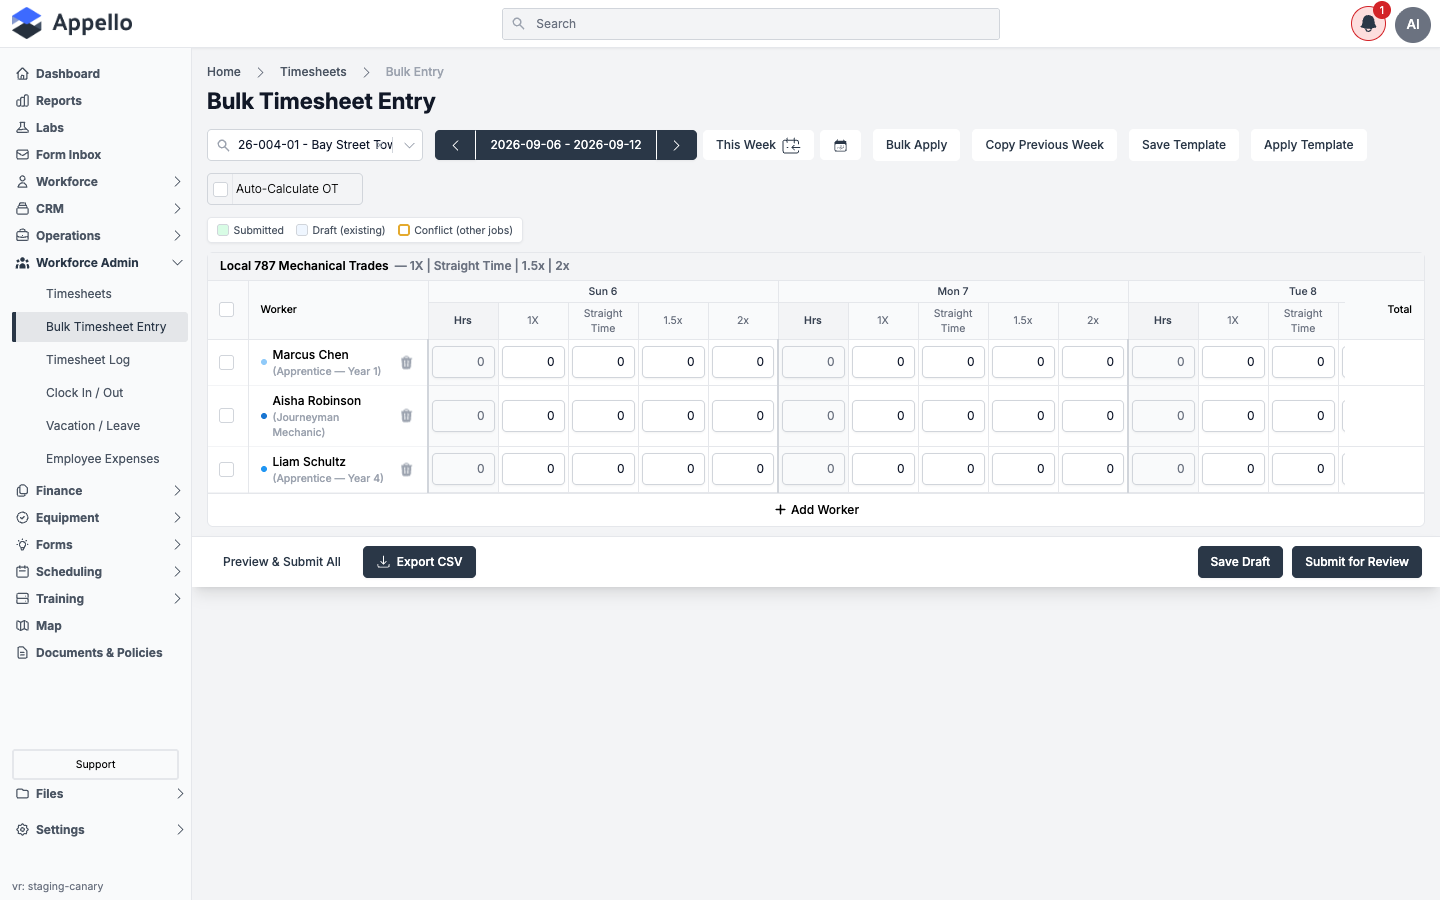
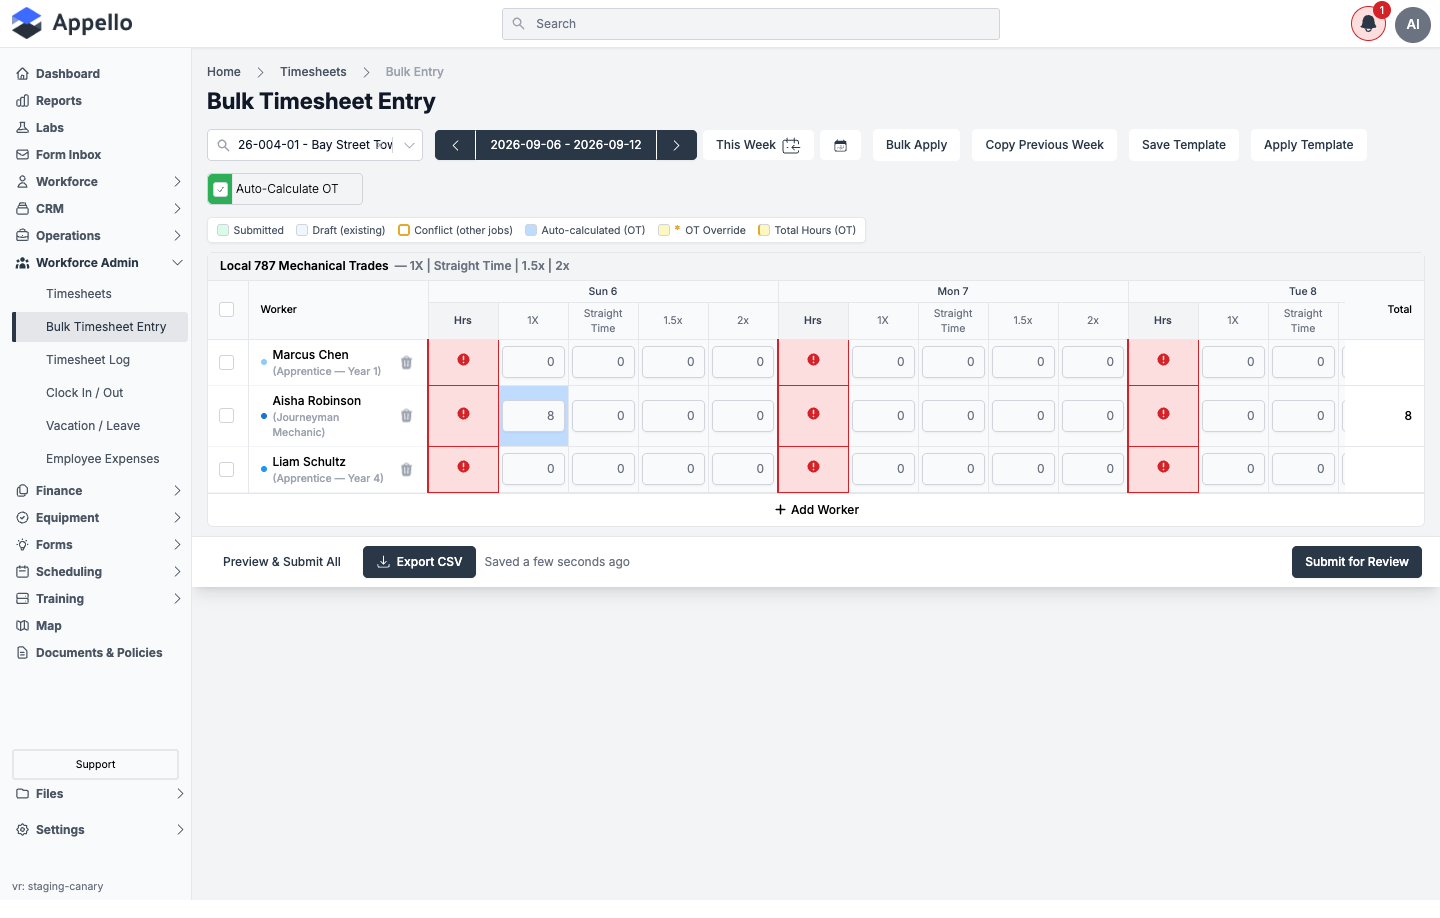
Once a job and week are selected, the grid is rows = workers, grouped under an Employee Agreement header, and columns = one block per day (Sunday through Saturday for the selected week), each block holding an Hrs cell plus one cell per that agreement's active rate labels (for example 1X, Straight Time, 1.5x, 2x). A running Total column sits on the right edge. See Entering Hours for a Day or a Week for how the cells behave.
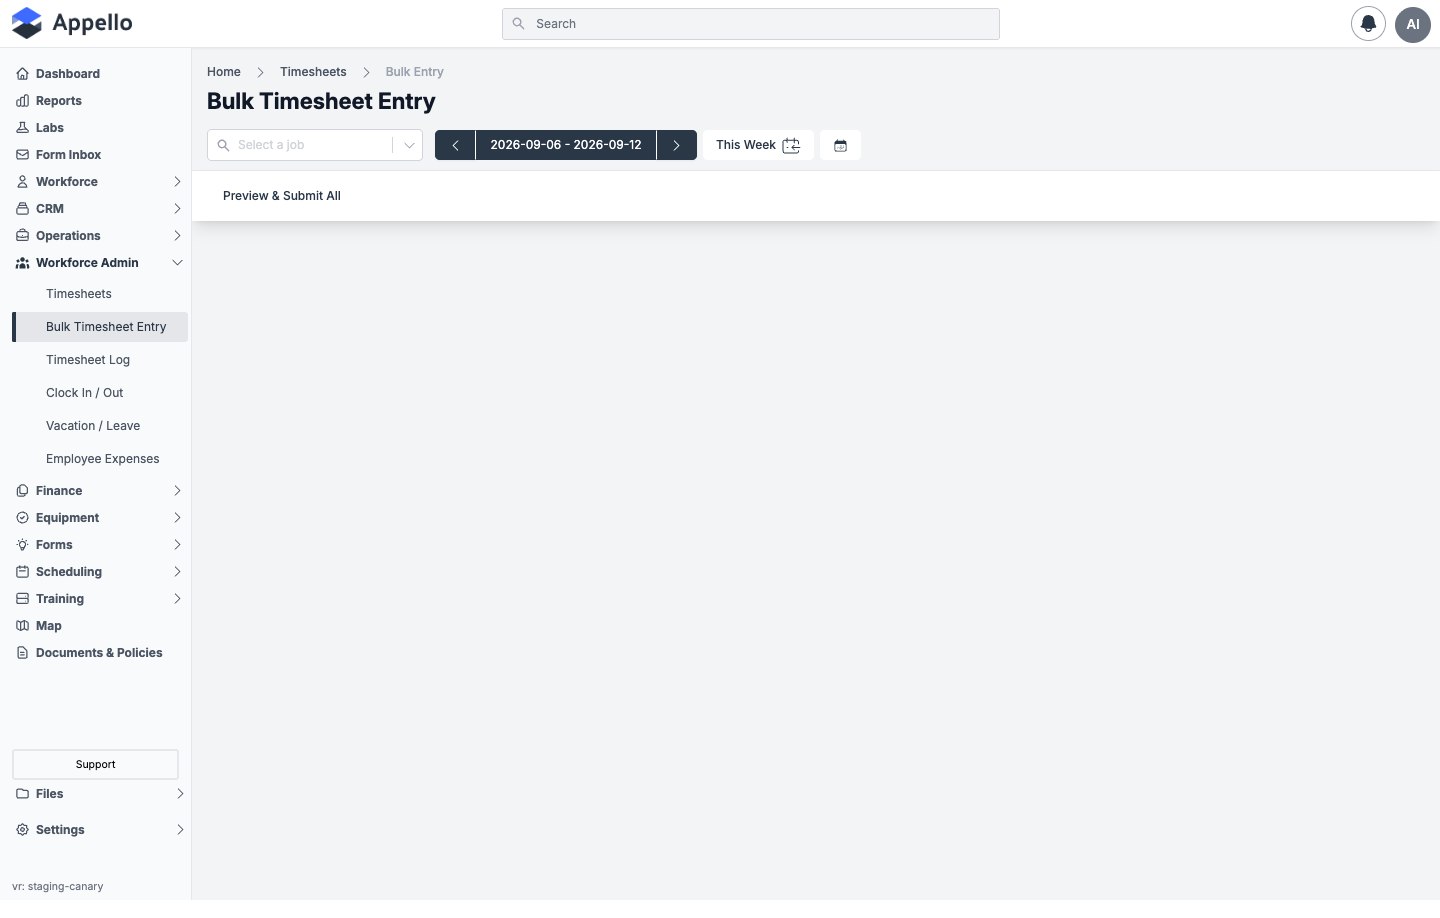
Before a job is selected, the page shows only the toolbar and a Preview & Submit All link — see Empty States below.
Controls
Every control that can appear in the toolbar, top to bottom of how it's laid out left to right:
| Control | Type | Effect |
|---|---|---|
| Select a job | Combobox | The single job whose grid is shown. Every other control on the page is disabled until a job is chosen. Searches in-progress jobs by job number/name. See the note on this control below. |
| By Person / By Day | Radio toggle | Only rendered once the selected job has cost codes on its Schedule of Values. Switches between the week-at-a-glance grid described in this page and the By Day view, a single-day, cost-code-first layout. |
| Week/day selector | Date range control | See Week and Day Navigation below. |
| Copy Yesterday | Button | By Day view only. Copies the previous day's entries for this job into the currently selected day. |
Bulk Apply (Bulk Apply (N)) | Button | Opens Bulk Apply. Label shows the count once one or more worker rows are checked. |
| Copy To Users | Button | Only shown once exactly one worker row is checked, and only for a user with the unscheduled-job permission. Opens Copy To Users. |
| Copy Previous Week | Button | By Person view only. Opens Copy Previous Week. |
| Save Template | Button | By Person view only. Opens Save Template. |
| Apply Template | Button | By Person view only. Opens Apply Template. |
| Auto-Calculate OT | Checkbox | See How Overtime Is Calculated Automatically. Disabled (locked) whenever the grid itself is locked. |
| Preview & Submit All / Preview All | Button (below toolbar) | Opens Submitting on Behalf of Workers's Review All Batches panel. Label depends on the edit permission. |
| Export CSV | Button (footer) | Only shown once a job is selected. Downloads the current job/week's grid as a CSV, using the same export as the Timesheet Export & Payroll page. |
| Save Draft / Submit for Review | Buttons (footer) | See Submitting on Behalf of Workers. |
Note on the job picker
The job selector is a searchable combobox shared with other pages: type part of a job number or name and pick the job from the list. The screenshots on this page were captured against job 26-004-01 — Bay Street Tower. The sections below that need a job selected first (Copy Previous Week, Copy To Users, and the two template modals) are described in text, without a screenshot.
Filters
Unlike the Timesheet Matrix, Bulk Timesheet Entry has no department or user-group filter — the Job selector above is the only top-level scope control on this page, and it isn't a filter over an already-loaded list so much as the thing that decides which grid loads at all.
The one filter inside the page lives inside the Bulk Apply modal: Filter by Trade Classification, a multi-select checklist that narrows the worker checklist to specific classifications (for example only Apprentice — Year 1) before you pick who the hours apply to. It has no equivalent on the plain Add Worker search or on Copy To Users' worker list, both of which just search by name.
Week and Day Navigation
- By Person view shows a week range (for example "2026-09-06 – 2026-09-12") with left/right arrows to move a week at a time and a This Week shortcut, plus a calendar icon to jump to an arbitrary week.
- By Day view (only reachable once the toggle above is visible) shows a single date instead, with the same left/right/Today controls stepping one day at a time, and adds the Copy Yesterday button described above.
Switching the week or the job while the grid has unsaved changes triggers a best-effort autosave of the current draft before the new grid loads — if that save fails, the switch proceeds anyway rather than blocking navigation.
Selecting Workers for Bulk Entry
There are two ways to get workers onto the grid for a job and week.
Adding workers one at a time
- Click + Add Worker at the bottom of the grid.
- A Search for a worker... field opens. By default it is scoped to workers already scheduled to this job -- if none are scheduled yet, it automatically shows your full roster instead (a small No workers on this job yet -- showing all note appears under the field).
- Type a name. If the scoped list has no match, a + Search all workers link appears so you can broaden the search; the + Show all workers link does the same at any time.
- Click a worker to add them as a new row. Each result shows the worker's name and current trade classification.
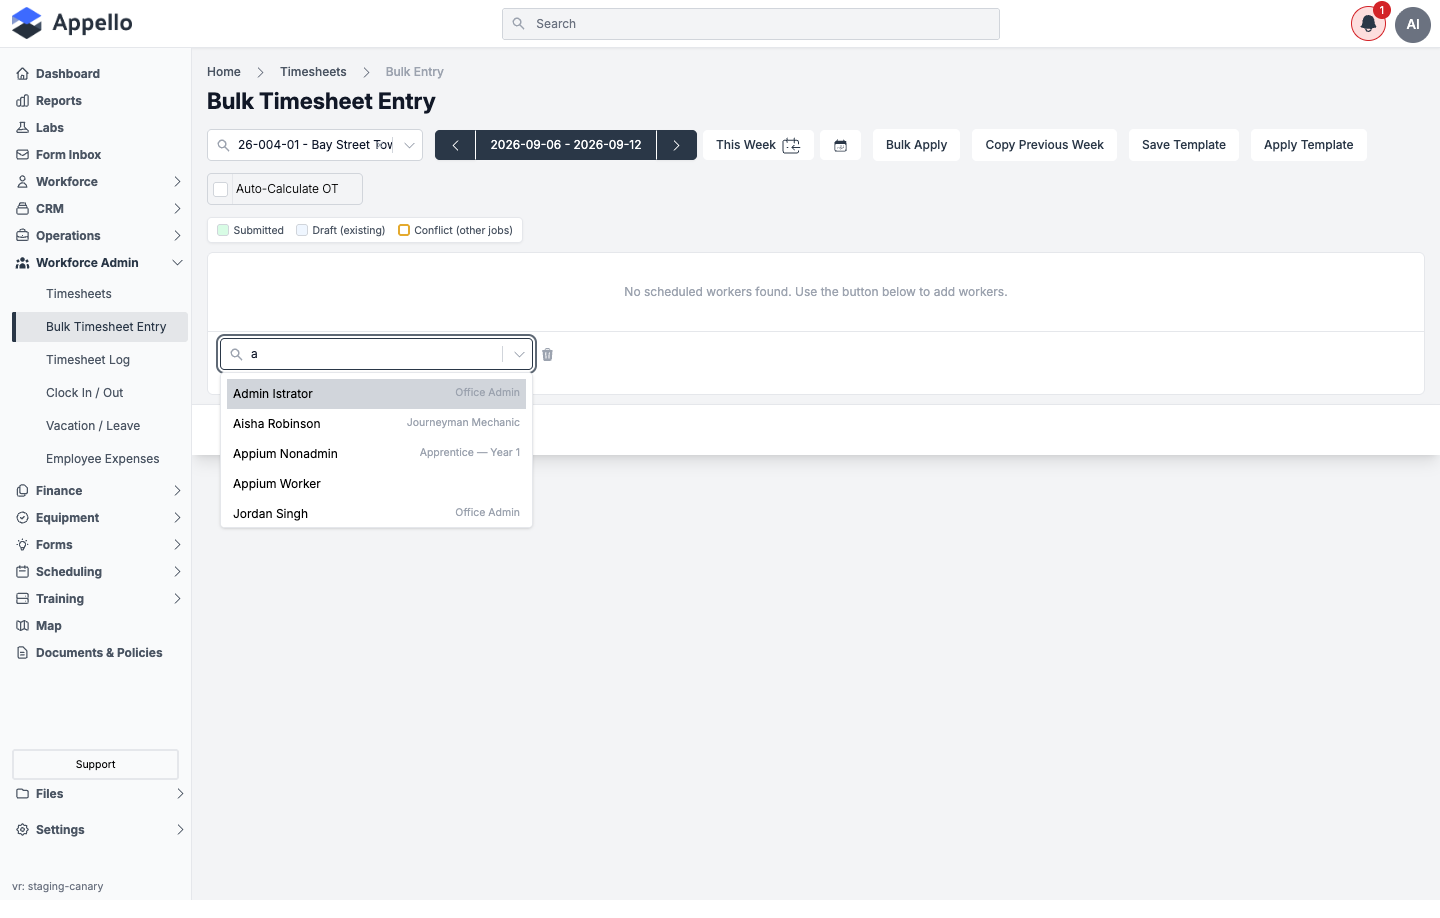
Repeat for each crew member. Rows are grouped under an Employee Agreement header, so a crew that spans two agreements (for example a union CBA and a non-union agreement) renders as two separate groups on the same grid.
Adding an unscheduled worker (one with no existing scheduled/timesheet row on this job) requires the Timesheet Record → Add Timesheet Record For Unscheduled Job(s) permission; without it, the + Add Worker control and the trash icon on unscheduled rows are hidden, and existing rows for workers who are scheduled remain editable.
Selecting a whole crew at once with Bulk Apply
Bulk Apply (in the toolbar) is the faster path when you want to key in one set of hours for many workers at once instead of adding rows one by one:
- Click Bulk Apply. The Bulk Apply Hours panel opens.
- Choose an Employee Agreement. This determines which rate labels (1X, Straight Time, 1.5x, 2x, etc.) the hour matrix below will use. Skipped entirely if you already checked one or more worker rows on the grid before opening the modal — it reuses their agreement instead.
- Optionally use Filter by Trade Classification to narrow the worker list to specific classifications (for example only Apprentice -- Year 1 or only Foreman).
- Under Select target users, search for specific workers or click Select All to apply the same hours to everyone shown.
- Fill in the Day x rate label matrix -- one row per day of the selected week, one column per rate label -- with the hours that apply to every selected worker.
- Click Apply to Grid. The hours are written into every selected worker's row for the matching days.
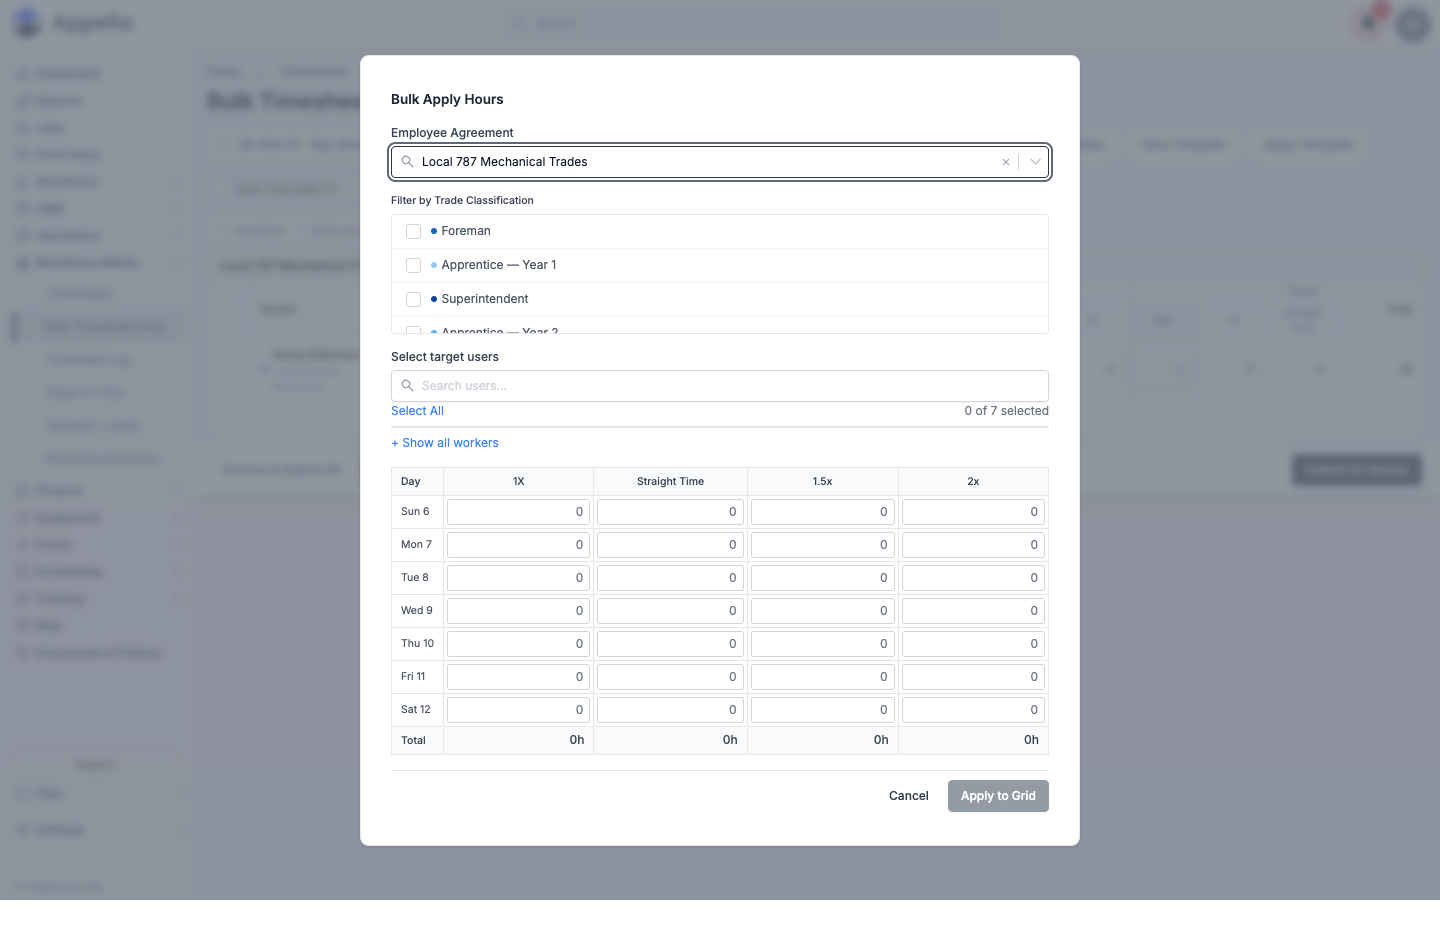
Bulk Apply is the tool to reach for when, say, every apprentice on a crew worked the same 8-hour day and you don't want to type "8" into each row individually. A warning banner appears above the table if one or more selected workers already have hours that week ("Applying will override their existing hours"). Nothing is sent to the server until the batch itself is saved or submitted -- Cancel discards the panel's inputs with no effect on the grid.
| Field | Required | Type |
|---|---|---|
| Employee Agreement | Yes, only when no workers are pre-selected | Combobox |
| Filter by Trade Classification | No | Multi-select checklist |
| Select target users | Yes, only when no workers are pre-selected | Searchable checklist, with Select All |
| Day x rate label hour grid | Yes (at least one value) | Numeric inputs, one row per day of the week, one column per rate label (or a single Hours column when Auto-Calculate OT is on) |
Entering Hours for a Day or a Week
Once workers are on the grid, each one gets a block of columns per day of the selected week (Sun through Sat, matching the date range shown in the toolbar), plus a running Total column on the right edge of the grid.
Each day's block has:
- An Hrs cell -- the total hours the worker worked that day. This is the cell you normally type into. There is no client-side maximum on this cell -- Appello does not refuse an implausibly large number of hours in a single day.
- One cell per active rate label for the worker's agreement (for example 1X, Straight Time, 1.5x, 2x). With Auto-Calculate OT off, everything you type into Hrs flows straight into the base rate label.
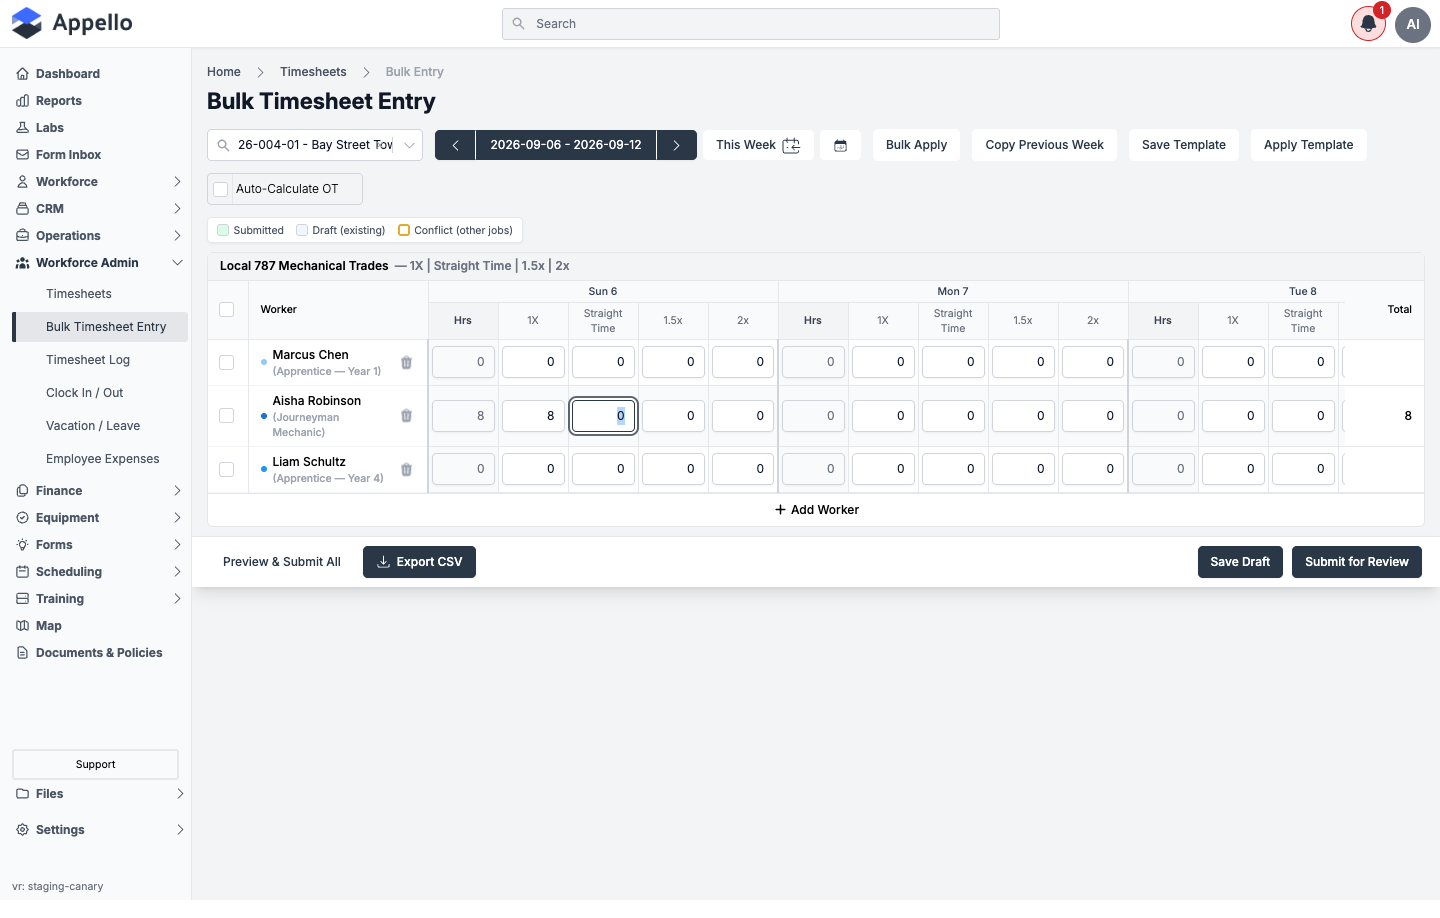
A colored legend above the grid explains the state of each row/cell:
| Legend swatch | Meaning |
|---|---|
| Submitted | This worker/day has already been submitted for approval |
| Draft (existing) | A draft record already exists for this worker/day |
| Conflict (other jobs) | The worker already has hours logged against a different job on this day |
To enter a full week for a crew, tab across each worker's row filling in Hrs for each day, or use Bulk Apply (above) to fill several workers' weeks in one pass. Copy Previous Week and Apply Template (also in the toolbar) can seed the grid from a prior week or a saved template instead of typing from scratch.
By Day View
For a job with cost codes configured on its Schedule of Values, the By Person / By Day toggle appears in the toolbar (see Controls). By Day pivots the grid to a single date at a time -- the same worker rows, but each worker's Hrs and rate-label cells now sit next to their Split by Cost Code breakdown for just that one day, rather than a week of day-blocks. The date selector becomes a single date (not a week range) with a Copy Yesterday button to seed the day from the one before it.
None of the demo jobs used for this page have cost codes configured on their Schedule of Values (see the note under Splitting Hours Across Cost Codes below), so the By Person / By Day toggle never appeared and no screenshot is included for this section.
How Overtime Is Calculated Automatically
Checking Auto-Calculate OT in the toolbar turns on live overtime calculation for the whole grid:
- The Hrs cell for every day becomes read-only (shown with a warning glyph) -- you now enter overtime by adjusting the rate-label cells directly, or by editing Hrs with OT temporarily off.
- Appello recalculates each worker's day against their agreement's overtime rules and fills the rate-label cells for you. A cell it filled in is highlighted as Auto-calculated (OT).
- Three additional legend swatches appear: Auto-calculated (OT), OT Override (you manually changed an auto-calculated cell -- Appello will not overwrite that cell again), and Total Hours (OT).
Where the overtime rules come from: Overtime Rule Sets
The thresholds that drive this calculation are not configured on the Bulk Timesheet Entry screen itself. They live on the Employee Agreement Contract each worker is on, under one Overtime Rules tab per wage region:
Settings → Human Resources → Employee Agreements → (open an agreement) → open a contract version → Overtime Rules tab
Each rule set is built from one or more day groups (for example "All Days", or separate groups for weekdays vs. weekends), and each group defines:
- Days of Week the group applies to.
- Reduce weekly threshold per stat holiday (hrs) -- shrinks the weekly threshold for each statutory holiday in the period.
- A Wage Rate Tiers table: one row per rate label (for example 1X, Straight Time, 1.5x, 2x), each with an optional Daily Threshold (hrs) and Weekly Threshold (hrs). The first tier is always the base rate and needs no threshold; each higher tier kicks in once the prior tier's threshold is exceeded, and the last tier absorbs all remaining hours for the day or week.
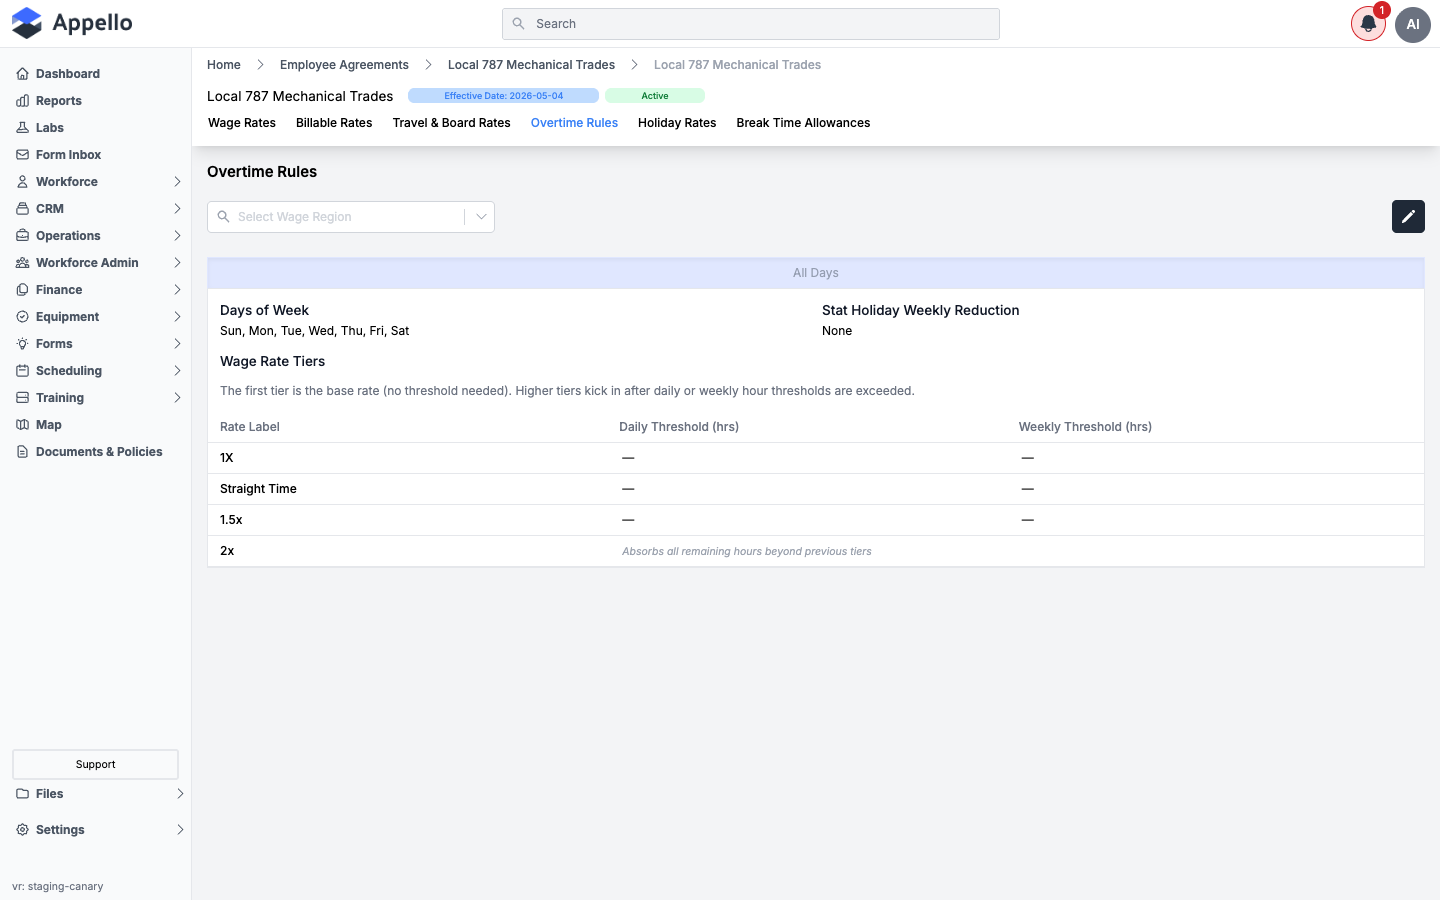
Click the pencil icon in the top-right to edit a rule set -- you can add day groups, check or uncheck days of the week, reorder tiers by dragging the handle on the left, and set the daily/weekly threshold for each tier.
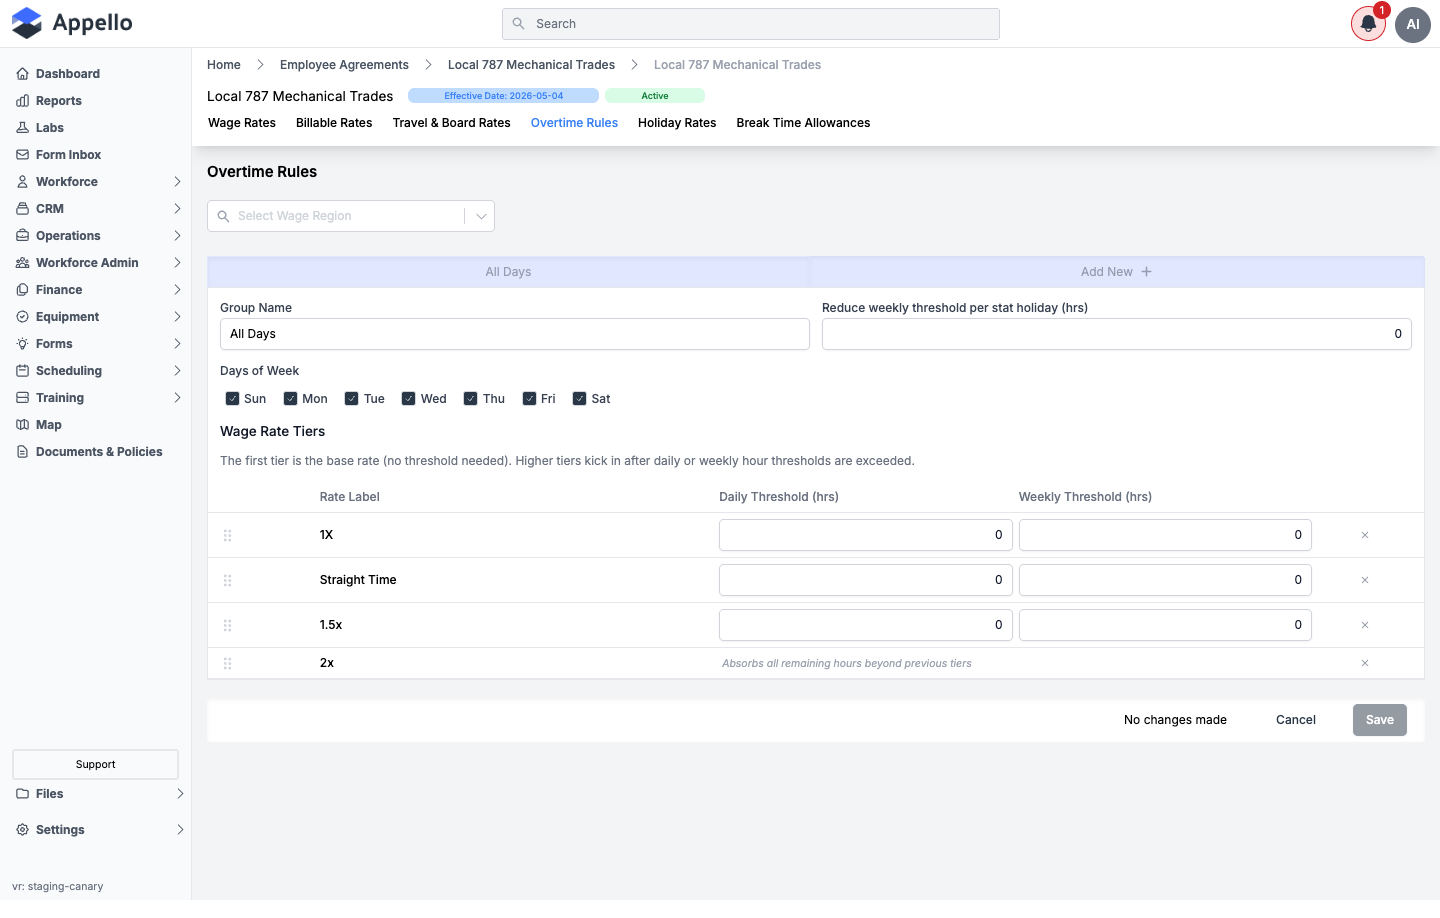
Every demo employee agreement used for these screenshots (Local 787 Mechanical Trades, Local 787 Mechanical Trades 2) has its daily and weekly thresholds set to "--" (none configured), so entering a large number of hours in one day did not visibly split across the 1.5x/2x tiers -- the base tier absorbed all of them. If a contract has no overtime rule set at all for the wage region in use, Appello shows a "Cannot auto-calculate OT without rules configured" warning with a Configure OT Rules link straight to this tab.
Splitting Hours Across Cost Codes
When the job you're entering time against has cost codes on its Schedule of Values, each worker row gains a Split by Cost Code control under their name. Selecting it adds an indented sub-row where you:
- Choose one of the job's cost codes from a dropdown.
- Enter that code's share of the worker's hours, per day, per rate label.
You can add more than one cost-code sub-row per worker (one per code -- a code already used by that worker is excluded from the picker to prevent duplicates). The parent row's Hrs and rate-label cells stay in sync automatically: they always equal the sum of that worker's cost-code rows, so the split can never add up to more than the hours you entered for the day.
None of the three demo jobs used for this page (Bay Street Tower -- RTU Replacement, Mercy Hospital -- Chiller Plant Retrofit, Vanguard Plant 1 -- Process Cooling Upgrade) have cost codes configured on their Schedule of Values, so the Split by Cost Code control never appeared and no screenshot is included for it. This is the same reason By Day View above and the By Person / By Day toggle have no screenshot either -- both need a job with cost codes.
Copy Previous Week
Copies every entry for the current job from an earlier week into the week currently open in the grid, matching day-to-day (Monday to Monday, and so on). Only available in By Person view, from the Copy Previous Week toolbar button.
- Click Copy Previous Week. A calendar opens.
- Click any day in a past week to select that whole week as the source -- the current week and any future week are disabled and cannot be clicked.
- Appello loads a live preview: worker count, total hours, and an hours-by-day breakdown for the selected source week and job. A week with no entries shows "No entries found for this week and job." instead.
- Click Copy Week to copy the entries into the current week, or Cancel to close without copying anything.
| Field | Required | Type | Effect |
|---|---|---|---|
| Source Week | Yes | Calendar -- click any day in a past week to select that whole week | The week to copy from. The current week and any future week are disabled; picking a day loads a live preview (worker count, total hours, and an hours-by-day breakdown) before you commit. |
Copy Week is disabled until a source week with at least one entry is selected. The copy lands in the same place a normal edit would -- it does not submit anything on its own; the copied hours still need Save Draft or Submit for Review afterward. See Entering Hours for a Day or a Week for how a copied week then behaves alongside manual edits.
This modal only opens once a job is selected, so no screenshot is included for this section (see the note on the job picker).
Copy To Users
Copies one already-entered worker's hours for the week onto other workers, without retyping them. The Copy To Users toolbar button only appears once exactly one worker row is checked, and only for a user with the Timesheet Record → Add Timesheet Record For Unscheduled Job(s) permission.
- Check exactly one worker's row checkbox on the grid.
- Click Copy To Users. A preview of that worker's hours for the week opens -- one row per rate label used, one column per rate label, plus a Total column. A worker with no hours entered yet shows "No hours entered for this worker." instead of a table, and Copy stays disabled.
- Under the worker checklist, search for or select the workers who should receive the copy. Workers already on the grid are excluded from the list.
- Click Copy to write the copy into the grid for every selected worker, or Cancel to close without copying.
| Field | Required | Type | Effect |
|---|---|---|---|
| Hours preview (read-only) | -- | Table, one row per day, one column per rate label plus Total | The source worker's own hours for the week, so you can confirm what is about to be copied before picking targets. Reads "No hours entered for this worker" instead of a table when there is nothing to copy. |
| Select users | Yes (at least one) | Searchable checklist, with select all / deselect all | Which other workers on the same employee agreement receive the copy. Workers already on the grid are excluded from the list. |
Like Copy Previous Week, this writes into the open grid only -- Save Draft or Submit for Review is still required afterward.
This modal only opens once a job is selected and a worker row is already on the grid, so no screenshot is included for this section (see the note on the job picker).
Save Template
Save Template (in the toolbar, By Person view only) captures the current grid's worker assignments, hours, and cost-code breakdowns as a reusable template for this job.
- Click Save Template.
- Fill in the fields below.
- Click Save Template in the modal to save, or Cancel to discard.
| Field | Required | Type | Effect |
|---|---|---|---|
| Template Name | Yes | Text | The template's display name. |
| Description | No | Textarea | Free-text notes shown in the template list. |
| Make available to all users | No (defaults off) | Checkbox | Saves the template as Global so every user can apply it, instead of only its creator. |
Apply Template
Apply Template (in the toolbar, By Person view only) lists every template available for the current job -- name, an optional Global badge, description, worker/cost-code counts, creator, and creation date -- each with its own Apply button, plus a delete icon for templates you created.
- Click Apply Template.
- Find the template you want and click its Apply button. This maps that template's saved worker entries onto the week currently open in the grid, day-of-week to day-of-week.
- The modal closes once the template has been applied.
A job with no saved templates shows "No templates found. Save your current grid as a template first." instead of a list. Clicking the delete icon on a template you created asks you to confirm ("Delete template "name"?") before removing it -- this deletes the template itself, not any timesheet it was previously used to create.
Applying a template saves its hours as this job's current-week Draft -- the same thing a manual Save Draft does -- so it does not go through the Conflicts modal even if it overwrites hours that were already on a day for one of its workers.
Both template modals only open once a job is selected, so no screenshot is included for this section (see the note on the job picker).
Conflicts
A conflict is a worker who already has hours logged against a different job on the same day you're entering hours for on this grid -- a potential double-booking. Appello checks for this automatically when you click Submit for Review (or when Submit All Drafts submits a batch that has one); it is not something you open from a toolbar button, and it only blocks days where the current batch actually has new hours typed in -- a day where the worker's other-job hours are untouched by this batch does not block submission.
When conflicts exist, the Unresolved Conflicts panel opens instead of submitting, listing each conflicting worker/day with:
| Column | Description |
|---|---|
| Worker / Date | Who and which day the conflict is on. |
| Source | Where the existing hours came from (for example mobile clock-in, a prior bulk-entry batch), plus their current approval status. |
| Hours (per rate label, plus Total) | Two rows per conflicting job: the Existing hours already on record, and the New hours this batch is trying to write. |
| Resolution | One of three modes, chosen per conflict (or in bulk via Resolve all) -- see below. |
| Resolution mode | Effect |
|---|---|
| Keep Existing | Discards this batch's new hours for that worker/day; the existing job's hours are untouched. The only option offered once the existing hours are Approved -- an approved conflict cannot be Merged or Overwritten. |
| Merge (default) | Adds the new hours alongside the existing job's hours -- both survive. |
| Overwrite | Replaces the current job's own prior hours with the new ones. Only offered when the current job already had hours that day (hidden otherwise, since it would be identical to Merge); it never touches hours logged against a different job. |
Click Submit once every conflict has a resolution (or leave the default of Merge in place), or Cancel to back out of the submit attempt entirely without resolving anything -- the grid stays exactly as it was, still unsubmitted.
Because this panel only opens mid-submit, no screenshot is included for this section.
Travel and Notes
As shipped in this release, the Bulk Timesheet Entry grid itself does not have Start Time, End Time, Notes, or Travel/Board/Parking columns -- the grid is Worker rows plus, per day, an Hrs cell and one cell per rate label (plus cost-code sub-rows where applicable). Per-record Worker Note text and travel/board/parking amounts belong to the underlying timesheet record rather than the bulk entry screen: they show up on the Timesheet Log and Timesheet Matrix once a batch is submitted, and travel rates are calculated from the worker's employee agreement (see the agreement's Travel & Board Rates tab, next to Overtime Rules) rather than typed in per row here. Bulk entry is the fast path for getting hours and cost-code splits in; notes and travel detail are reviewed and adjusted afterward on the Timesheet Log/Matrix.
Submitting on Behalf of Workers
Bulk Timesheet Entry is built around one person -- a foreman or office admin -- entering and submitting time for an entire crew, rather than each worker submitting their own timesheet. Every row you fill in belongs to the worker named in it, not to whoever is signed in.
Two levels of submission are available:
| Action | Scope | Permission |
|---|---|---|
| Save Draft | Saves the current job's grid without submitting it for approval. Nothing is submitted for approval until you submit. | Timesheet Record → View (anyone who can open the page) |
| Submit for Review | Submits the current job's grid for approval. This is the point at which real timesheet records are created or updated for every day with hours on it. | Timesheet Record → Edit |
| Preview & Submit All | Reviews every draft batch for the selected week -- across jobs -- before submitting them all at once | Timesheet Record → Edit to submit; shown as read-only Preview All without it |
Preview & Submit All opens a Review All Batches panel listing each outstanding draft batch for the week: the job, the customer, a Draft status chip, and the same worker-by-day-by-total table shown in the grid. It tells you how many draft batches will be submitted, and gives you Export All CSV and Cancel alongside Submit All Drafts -- useful when a foreman has been entering time for a crew split across more than one job during the week and wants one final check before anything goes to the Timesheet Matrix for approval. Opening this panel forces a save of the current job's draft first if it has unsaved changes, prompting Save & Preview or Discard & Preview.
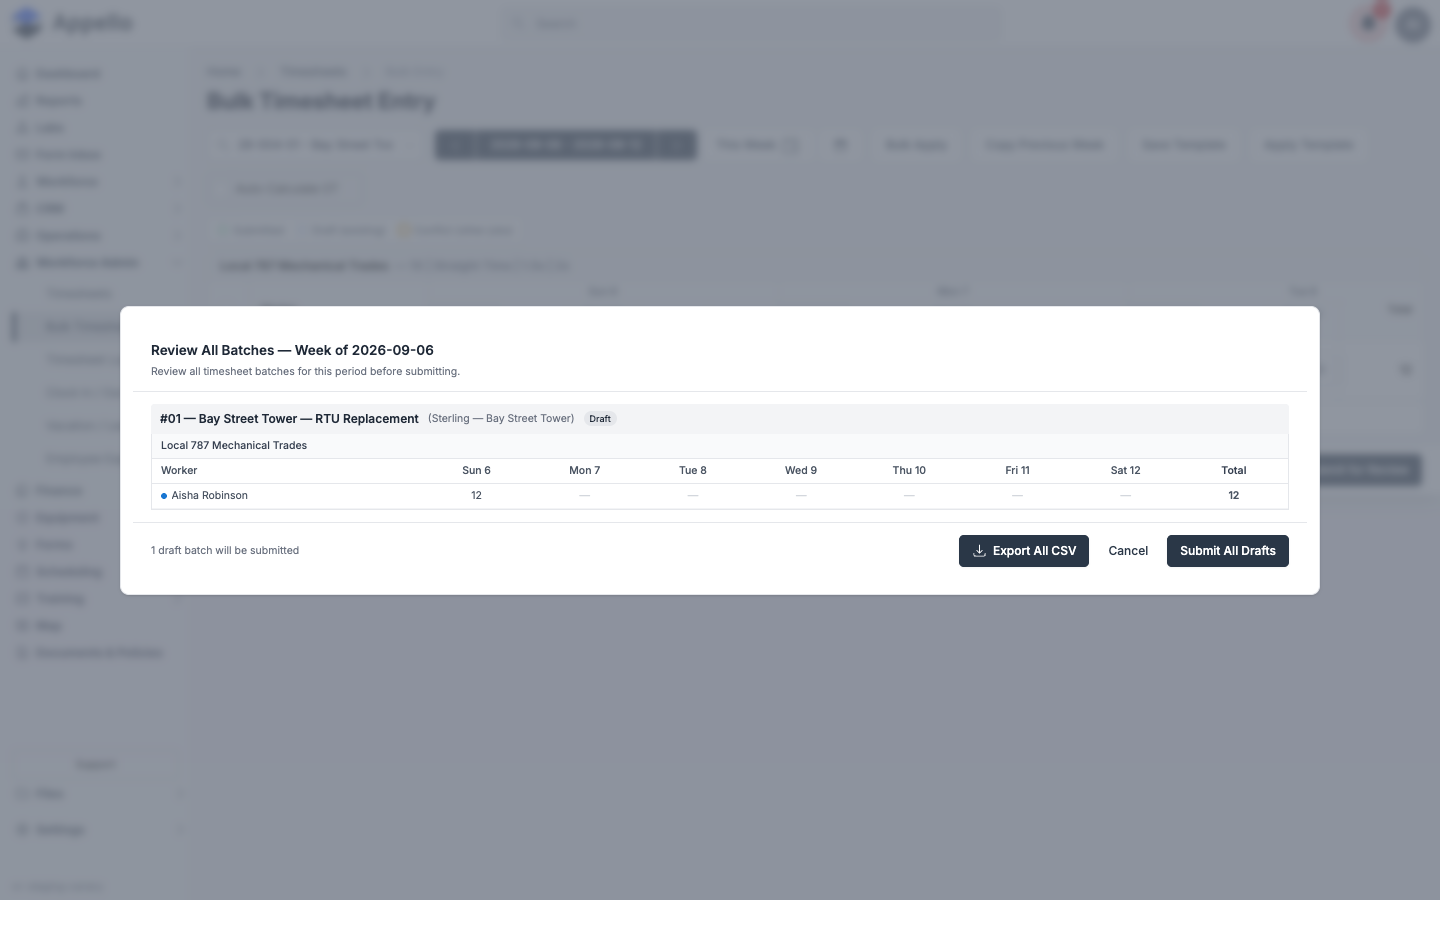
On success, Submit All Drafts notifies "All draft batches submitted for review," closes the panel, and clears the current job's local batch state.
Status changes and notifications
| Event | What changes | Notification |
|---|---|---|
| Save Draft succeeds | The draft is updated; no timesheets are created or changed. | "Draft saved" |
| Submit for Review succeeds | Every worker/day with hours becomes a timesheet in status In Review (or Not Submitted, if the batch itself stays a Draft -- see below); the batch's status flips to Submitted. | "Timesheet batch submitted for review" |
| Submit All Drafts succeeds | Every Draft batch for the week (across jobs) is materialized the same way. | "All draft batches submitted for review" |
| A submit skips a worker (no active trade level for the job's wage region) | That worker's hours for the batch are dropped, not created. | A warning toast naming the skipped worker(s): "Name(s) skipped -- no active trade level" |
| A submit produces zero live timesheet rows (every entry was a zero-hour day with no prior record) | The batch is reverted to Draft automatically rather than left as an empty "Submitted" batch. | None -- the grid simply stays editable. |
Validation Errors
- Generic failure toast. A Save Draft or Submit for Review that the server rejects (for example because the week is locked -- see Locked Weeks below, or a permission check fails) surfaces only as a generic "Failed to save batch" toast. The specific server error message is logged to the browser console but is not shown to the user for these two buttons.
- Preview & Submit All is more specific. Submit All Drafts, by contrast, shows the server's actual error text inline in the Review All Batches panel (for example the week- locked message below) rather than a generic toast -- it is the one place on this page where a rejected submit tells you exactly why.
- Duplicate-record guard. Appello refuses to create a second timesheet record for a worker/date pair that already has one, with "A timesheet record was already created for this date" -- in practice Bulk Entry avoids this by editing the existing record instead of creating a new one whenever it finds one.
- No client-side hours cap. The Hrs cell itself has no maximum -- Appello will accept and save an implausibly large number of hours for a single day without a warning. (A soft cap exists only on cost-code split cells, which cannot exceed the parent day's total.)
- Approved days are immutable. A day that is already Approved on another job (or that contains a leave record) is skipped on submit rather than overwritten or blocking the rest of the batch -- it simply doesn't get touched.
No screenshot is included for the week-locked or duplicate-record errors -- seeing either one would mean actually submitting a batch against a locked week or a duplicate date. The exact wording of both messages is quoted above.
Locked Weeks
Bulk Timesheet Entry has no lock indicator of its own -- there is no "this week is locked"
banner or disabled state visible on the grid itself. The lock is a payroll-wide control set on
the Timesheet Matrix (a lock/unlock toggle per week, gated
by the Timesheet Record → Lock Week permission), and it is enforced underneath Bulk Entry
the same way it is everywhere else time is saved: the moment a Save Draft or Submit for
Review tries to create or edit an actual timesheet record for a date inside a locked week,
Appello refuses with "The Week of YYYY-MM-DD has been locked. Unlock the week to change
timesheets in it."
Two practical consequences follow from there being no lock check earlier in the flow:
- You can freely open a locked week in Bulk Entry, add workers, and type hours into the grid -- none of that touches the database.
- Save Draft only stores the draft, so it succeeds even for a locked week's dates -- the draft is saved, but attempting to Submit for Review afterward fails with the generic "Failed to save batch" toast described in Validation Errors above (or the specific locked-week message, if submitted via Submit All Drafts).
No screenshot is included for a locked week -- the lock is never visible on the Bulk Entry grid itself, only in the error you get when you try to submit into it.
Empty States
| State | What you see |
|---|---|
| No job selected | Just the toolbar and a Preview & Submit All link -- no grid, no Bulk Apply / Copy Previous Week / template buttons (they all require a job). |
| Job selected, no workers on it yet | "No scheduled workers found. Use the button below to add workers." above the + Add Worker control. |
| Add Worker search, nothing scheduled to the job | "No workers on this job yet -- showing all" note under the search field, and the search silently falls back to the full roster. |
| Add Worker search, typed term has no scoped match | "No matches in workers on this job." with a + Search all workers link to broaden the search. |
| Copy Previous Week, source week has no entries | "No entries found for this week and job." and Copy Week stays disabled. |
| Copy To Users, source worker has no hours yet | "No hours entered for this worker." in place of the preview table, and Copy stays disabled. |
| Apply Template, job has no saved templates | "No templates found. Save your current grid as a template first." |
Permissions
| Permission | Name | Controls |
|---|---|---|
| View | Timesheet Record → View | Gates the entire /timesheets/bulk-entry route and its sidebar link. |
| Edit | Timesheet Record → Edit | Shows Submit for Review and enables submitting via Preview & Submit All; without it those become Preview All (read-only) and Save Draft is still available. |
| Delete | Timesheet Record → Delete | Shows the trash icon to remove a worker row from the grid. |
| Add unscheduled | Timesheet Record → Add Timesheet Record For Unscheduled Job(s) | Required to add a worker not already scheduled to the job, and gates the Copy To Users button entirely. |
| Lock/unlock week | Timesheet Record → Lock Week | Set on the Timesheet Matrix, not this page -- see Locked Weeks. |
Worked Example
A foreman on the Local 787 Mechanical Trades agreement is closing out a crew's week on the Bay Street Tower -- RTU Replacement job:
- Foreman selects the job and confirms the week in the toolbar.
- Adds Aisha Robinson (Journeyman Mechanic), Marcus Chen (Apprentice -- Year 1), and Liam Schultz (Apprentice -- Year 4) with + Add Worker.
- Since all three worked the same 8-hour day on Monday, the foreman uses Bulk Apply -- picks the Local 787 Mechanical Trades agreement, clicks Select All for the three workers, and enters 8 hours in the 1X column for Mon 7 -- then Apply to Grid.
- Aisha put in a longer day on Sunday, so the foreman types 12 directly into her Sun 6 Hrs cell.
- With cost codes not configured on this particular job, hours stay unsplit against the job as a whole.
- Foreman reviews the week with Preview & Submit All, confirms the one draft batch shown, and clicks Submit All Drafts to send the crew's week to the Timesheet Matrix for office approval.
Related Pages
- Timesheet Matrix — Review and approve submitted timesheets; owns the payroll week lock referenced above
- Timesheet Log — Flat, filterable, per-entry list of the same underlying records
- Timesheet Export & Payroll — The export this page's Export CSV button uses
- User Groups & Crews — Pre-built crew lists (not directly wired into this page's filters, but useful context for who to add)
- Employment Agreements — Wage rates, rate labels, and Overtime Rule Sets used in calculations
- Travel Rate Cards — Travel zone allowances applied once a batch is submitted