Form Builder & Management
Appello's form builder lets you create custom digital forms for safety inspections, toolbox talks, quality checklists, incident reports, and any field documentation. The drag-and-drop builder supports conditional logic, multiple field types, digital signatures, and GPS-stamped submissions — replacing paper forms entirely.
Navigation
Sidebar → Forms → Safety Inspection Forms
URL: /safety-inspection-forms
Permissions
| Permission | Gates |
|---|---|
| Safety Form → View | The list page itself, and the Form Submissions and Details tabs on a form's detail page. |
| Safety Form → Edit | The Form Builder and Settings tabs on a form's detail page. Without it those two tabs don't render at all. |
| Job → View | The Attached Jobs tab on a form's detail page. |
Overview
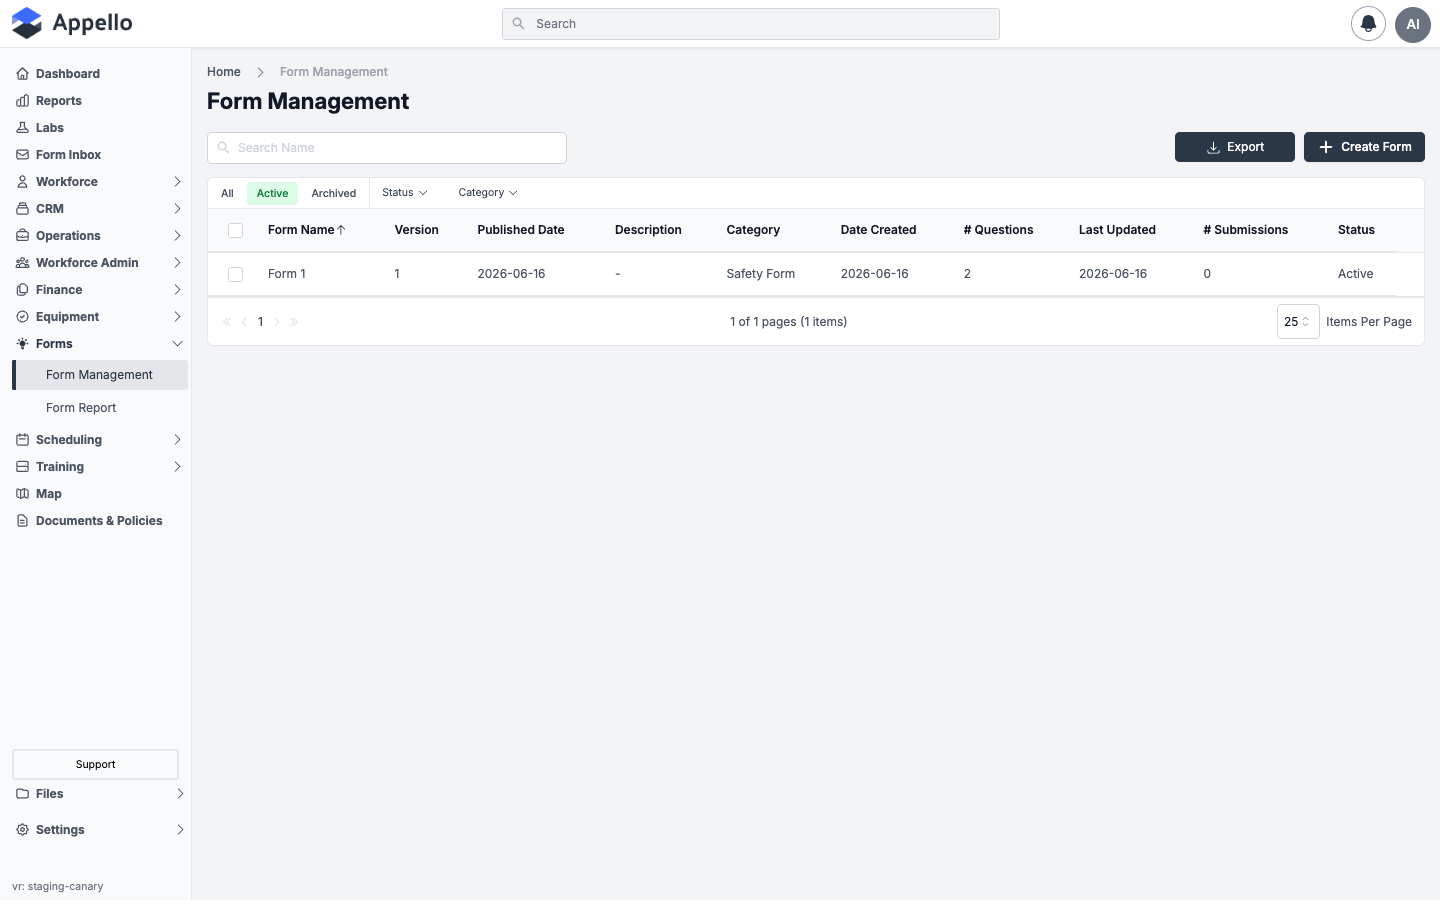
The Form Management page lists every safety/inspection form template (a form wrapper) in your organization. Each row is a form wrapper, not an individual submission -- to see submissions, open a form and go to its Form Submissions tab (see Form Detail Page below), or use Form Inbox / Form Report to work across every form at once.
The screenshots on this page come from a demo instance that holds a single form ("Form 1"). The mechanics described here don't depend on how many forms your instance has.
Each template can be:
- Active — Available for field workers to fill out
- Draft — In progress, not yet available
- Archived — No longer active, but historical submissions are preserved
Table columns
| Column | Description |
|---|---|
| Form Name | The form wrapper's name, linked to its detail page (opens on the Form Submissions tab). Sortable; sorted ascending by default. |
| Version | The version number of the form's currently active (live) version -- see Version Control. |
| Published Date | The date the active version was first set to Active status; falls back to the wrapper's created date if it has never been published. |
| Description | The active version's description, HTML-stripped to plain text and truncated. Shows - when empty. |
| Category | The active version's category (e.g. "Safety Form"). |
| Date Created | The date the form wrapper was created. |
| # Questions | The number of questions on the active version. |
| Last Updated | The date the form wrapper was last modified. |
| # Submissions | Completed-submission count across all versions of the form, not just the active one. |
| Status | The active version's status property (e.g. Active, Inactive). |
Quick tabs: Active, Archived, All
- Active -- the default tab. Shows form wrappers that have not been archived.
- Archived -- shows only archived form wrappers.
- All -- shows active and archived form wrappers together.
Search, filters, and sort
| Control | Behavior |
|---|---|
| Search | Free-text search against form name (placeholder: "Search Name"). |
| Status | Searchable multi-select checklist of the form statuses in use (e.g. Active, Inactive). |
| Category | Searchable multi-select checklist of the categories in use (see Pre-Built Form Library below). |
| Sort | Click the Form Name column header to sort by it; click again to reverse direction. |
Export
Export downloads the current view (respecting search, filters, and tab) as a CSV.
Bulk actions
Check the box on one or more rows to reveal a bulk-action bar. Which action appears depends on the active tab, and each acts on the whole form wrapper -- every version and, for Archive and Delete, every submission underneath it:
| Tab | Action | What it does |
|---|---|---|
| Active | Archive | Archives the selected form wrappers. A confirmation checkbox, Also archive all form submissions (checked by default), controls whether the form's existing submissions are archived along with it -- when unchecked, submissions stay accessible after the form is archived. |
| Archived | Restore | Moves the selected form wrappers back to the Active view. |
| Archived | Delete | Permanently deletes the selected form wrappers and their versions. |
Building a Form
Starting a New Form
- Click Add New to open the form builder.
- Enter a form name (e.g., "Daily Safety Inspection Checklist").
- Start dragging field types onto the canvas.
Available Field Types
| Field Type | Use Case | Example |
|---|---|---|
| Text | Short text answers | "Inspector Name" |
| Text Area | Long-form descriptions | "Describe any hazards observed" |
| Number | Numeric values | "Temperature reading" |
| Date | Date selection | "Inspection date" |
| Dropdown | Single select from list | "Site condition: Good / Fair / Poor" |
| Checkbox | Multiple selections | "PPE verified: Hard hat / Safety glasses / Gloves" |
| Radio Buttons | Single selection from options | "Pass / Fail" |
| Signature | Digital signature capture (PIN-based) | Worker and supervisor sign-off |
| Photo | Camera capture or upload | "Photo of hazard" |
| File Upload | Attach documents | "Upload supporting documentation" |
| Section Header | Visual separator | Group related fields |
| Instruction Text | Read-only instructions | Safety reminders, procedures |
Conditional Logic
Create forms that adapt based on responses:
- Show/Hide fields — If "Hazard Found?" = Yes → show "Describe Hazard" and "Photo of Hazard"
- Required conditionally — If "Working at Heights?" = Yes → "Fall Protection Type" becomes required
- Skip sections — If "N/A" is selected, skip the entire section
Signature Modes
Every form has a Form Signature Setting, chosen when the form is created and editable later from the form's Details tab (click the pencil icon next to Form Information):
| Mode | How It Works | Use Case |
|---|---|---|
| One Form Per Job | One worker signs on behalf of the crew | Toolbox talks, daily site inspections |
| One Form Per Worker | Each worker individually signs | Safety acknowledgments, training records |
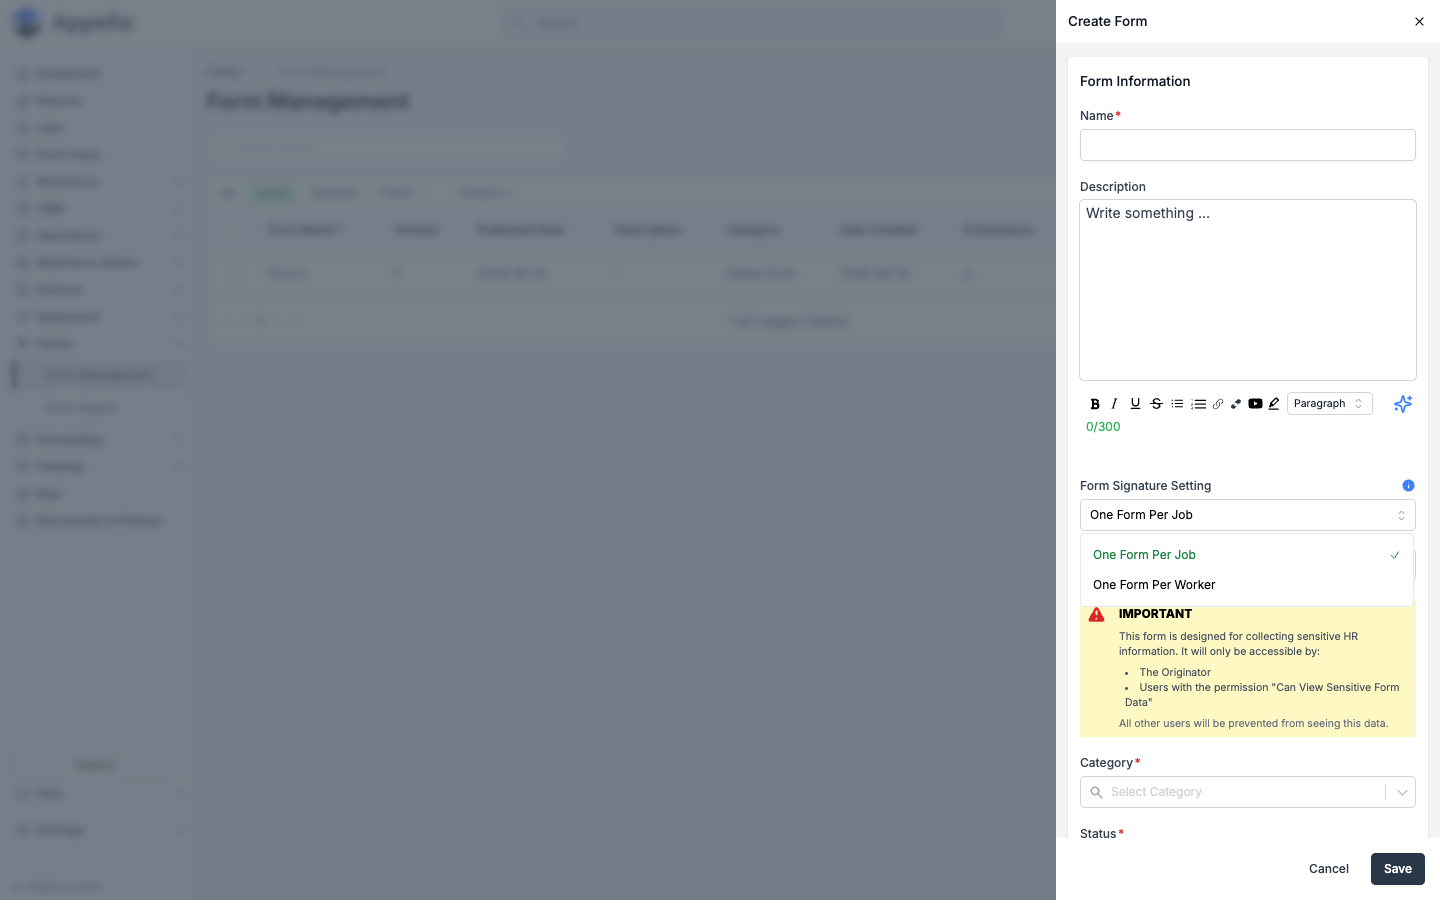
The panel's hint text changes with the selection -- One Form Per Job shows "All workers sign the same form," One Form Per Worker shows "Each worker signs their own form." This is what the setting controls when a worker fills the form out on mobile: a One Form Per Worker form has every worker on site complete and sign their own copy, while a One Form Per Job form is a single submission that one worker -- typically the foreman -- signs on behalf of the crew. See Mobile Form Submission for the signing step itself.
The signature mode is a property of the whole form, not a per-field setting. Changing it on a form that already has submissions is expected to require creating a new version, the same as any other structural edit (see Version Control below) -- though that behavior isn't documented here because it couldn't be verified.
Pre-Built Form Library
Clicking Create Form always opens a blank form -- there is no in-app gallery to browse a library of ready-made templates and click Use Template on one:
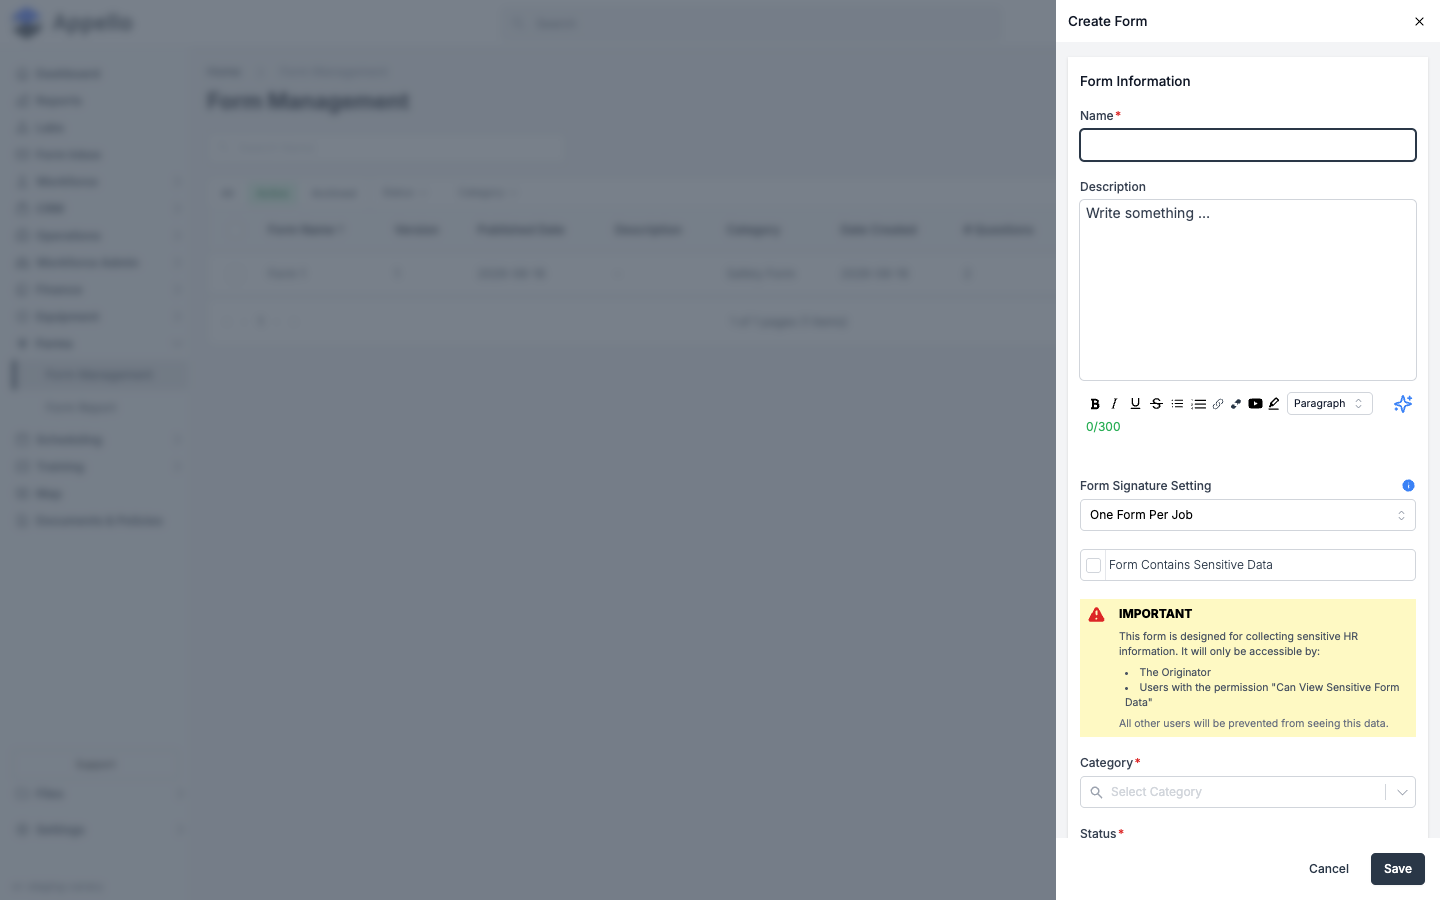
Every form belongs to a Category (a required field on the Create Form panel), and category is what the Pre-Built Form Library concept maps to in the product: it's an organizational label, not a fixed catalog of content. On the demo instance used for this page, only one category exists (Safety Form) because only one form has been created. Categories you might set up for your own instance include things like:
| Category | Example form names |
|---|---|
| Safety | Daily Safety Inspection, Toolbox Talk Record, Hazard Assessment |
| Quality | QA/QC Inspection, Deficiency Report, Commissioning Checklist |
| Equipment | Vehicle Pre-Trip Inspection, Equipment Condition Report |
| Incident | Incident Report, Near Miss Report, First Aid Log |
| Environmental | Spill Report, Waste Tracking, Environmental Compliance |
| General | Site Orientation Checklist, Visitor Log, Delivery Receipt |
To add a category to your instance, type its name into the Category field on the Create Form panel; an option to add it appears if it doesn't already exist. To build out a form under a category:
- Click Create Form.
- Enter a Name and, optionally, a Description.
- Choose the Form Signature Setting, Category, and Status (see Signature Modes above).
- Click Save -- this opens the new, empty form in the Form Builder tab, where you add sections and questions from scratch.
Appello has built full form sets for customers before -- inspection checklists, toolbox talk records, and the like -- which is why a "70+ pre-built templates" library is a reasonable expectation. What the product actually does is simpler: Create Form always starts blank, and categories are a configurable, per-instance list rather than a browsable template catalog. If your instance was set up with a starter set of forms, that was most likely built for you during onboarding rather than picked from an in-app library -- ask your Appello contact if you want existing templates copied into your account.
Create Form: Every Field
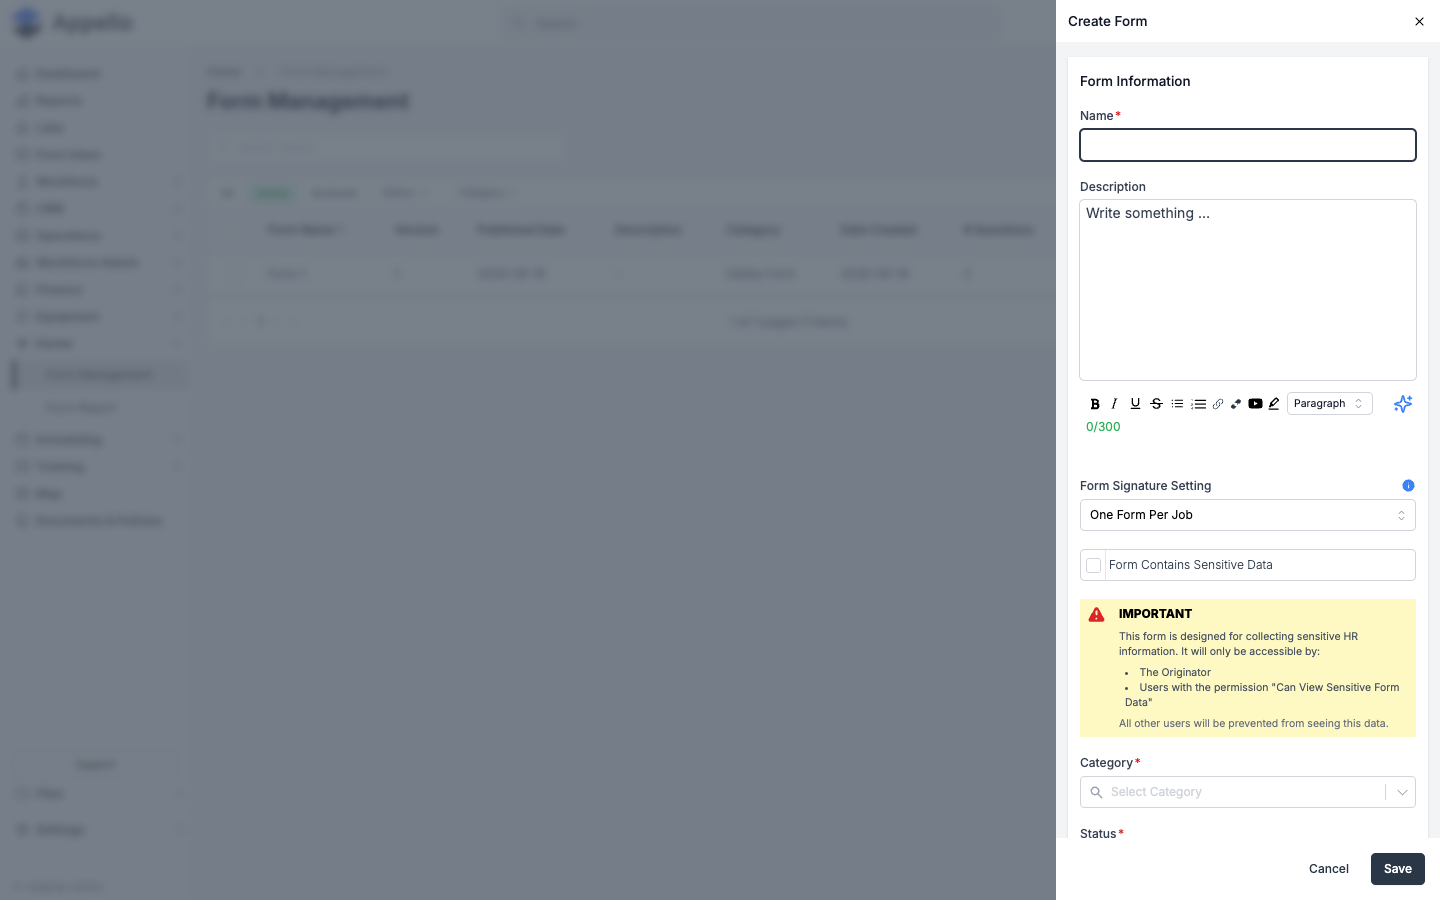
The same panel (titled Form Information instead of Create Form) opens for editing an existing form's information from its Details tab -- see Form Detail Page below.
| Field | Required | Type | Effect |
|---|---|---|---|
| Name | Yes | Text | The form's name. |
| Description | No | Rich text (300-char limit in this panel) | A short description of the form, shown on the Details tab and, unless Hide Description is on, included in exports. |
| Form Signature Setting | No, defaults to One Form Per Job | Radio | One Form Per Job -- all workers sign the same submission. One Form Per Worker -- each worker signs their own. See Signature Modes above. |
| Form Contains Sensitive Data | No | Checkbox | When checked, only the submission's originator and users with the Can View Sensitive Form Data permission can see the submitted data. |
| Category | Yes | Combobox (creatable) | Groups the form for the list's Category filter -- see Pre-Built Form Library above. |
| Status | Yes | Combobox, filtered to Active/Inactive | The form's status, shown on the list and the Status filter. |
| Skip Acknowledgement Step | No, off by default | Toggle | When on, the worker isn't prompted to add users who must acknowledge the submission. |
| Hide Result | No, off by default | Checkbox (under Default Export Settings) | Default for whether the Pass/Fail/Resolved result is hidden when this form's submissions are exported to PDF. |
| Hide Description | No, off by default | Checkbox (under Default Export Settings) | Default for whether the form/question description text is hidden on export. |
| Include Only Final Result | No, off by default | Checkbox (under Default Export Settings) | Default for whether a repeatable section's export includes only its final cycle instead of every cycle. |
| Include all pictures | No, off by default | Checkbox (under Default Export Settings) | Default for whether every photo attached to the submission is included on export, rather than a limited set. |
The Default Export Settings checkboxes set the defaults for this form's own PDF export, not settings for the whole instance. The exact per-question effect of Include Only Final Result and Include All Pictures isn't documented here because it couldn't be verified -- the demo form has no submissions to export yet.
One setting you might expect on this panel isn't here: there's no "require this form on every job" toggle. That behavior lives on the Attach to all open jobs checkbox in the Attached Jobs tab's Update Jobs panel -- see Assigning Mandatory Forms to Jobs above.
QA/QC and FireStop Forms
QA/QC and FireStop are not distinct object types in Appello -- they're regular safety forms, built the same way as any other form, that use a Category such as "Quality" or "QA/QC" (see Pre-Built Form Library above) to group them together in Form Management and in the category filter on the form list.
The demo instance used for this page has no forms in a Quality/QA-QC category and no form named "FireStop," so there's no populated example above. Appello has no separate FireStop-specific form type or question type -- if your instance has FireStop documents, they are ordinary forms under whatever category your team has set up for them.
Toolbox Talks Management
A toolbox talk is an ordinary safety form -- there's no separate "toolbox talk" object in Appello. What makes a form work well as a toolbox talk is a combination of settings you choose when building it:
- Category -- group toolbox talks under a category such as "Safety" so they're easy to filter in Form Management (see Pre-Built Form Library above).
- Form Signature Setting -- most toolbox talks use One Form Per Job, so the crew attends together and one worker (typically the foreman) signs on behalf of the group. Set this to One Form Per Worker instead if you need each attendee's individual signature for attendance/acknowledgment purposes. See Signature Modes above.
- Scheduling -- a toolbox talk is scheduled the same way any mandatory form is: by attaching it to a job so it appears on that job's crew. See Assigning Mandatory Forms to Jobs below. There's no separate recurrence/calendar feature for toolbox talks specifically.
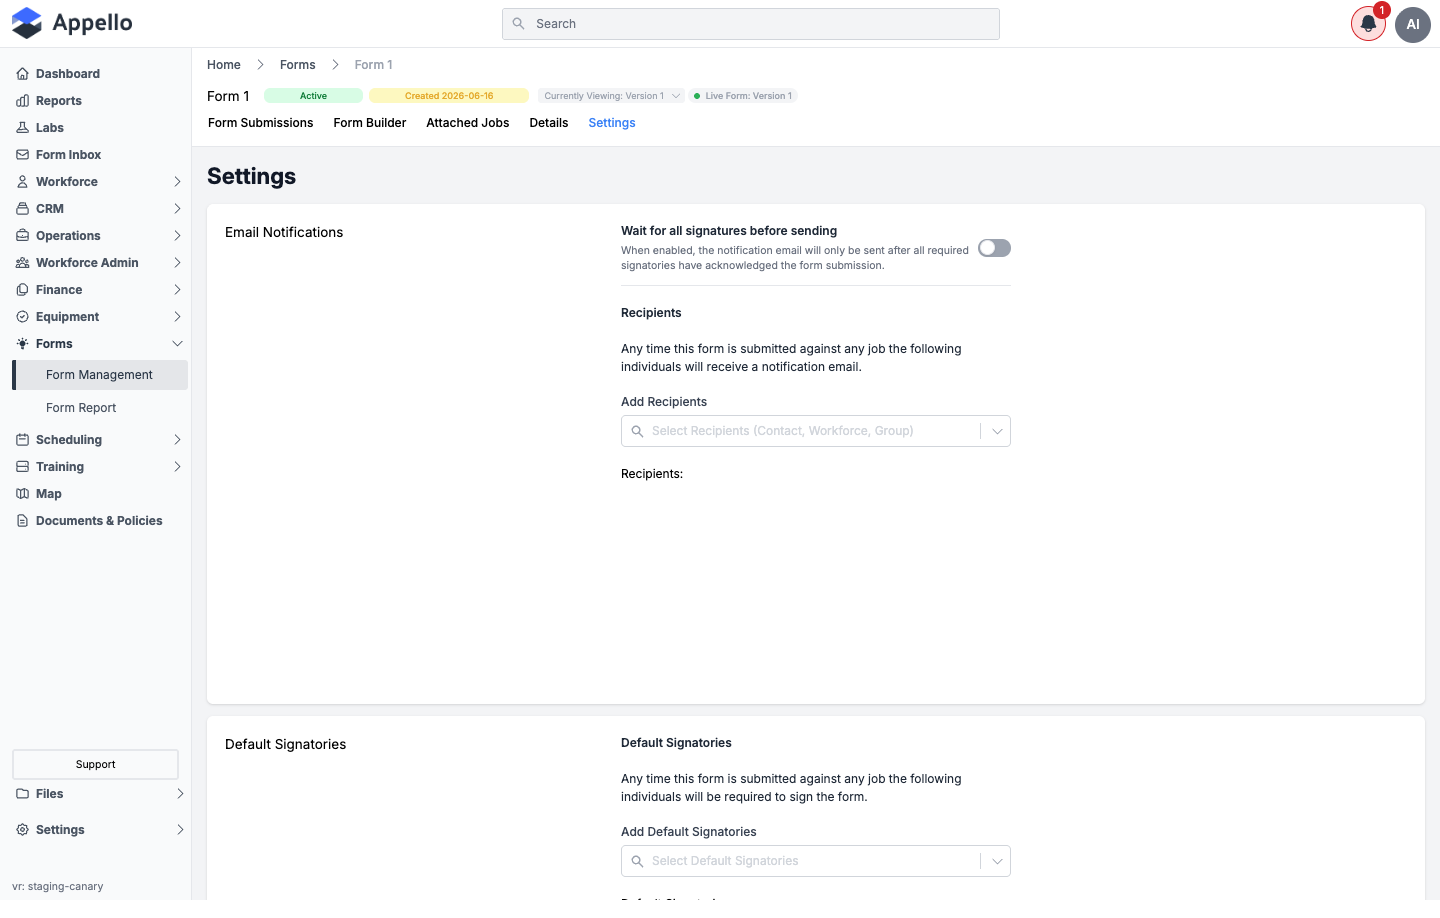
Office review happens from the form's Settings tab:
| Setting | What it does |
|---|---|
| Wait for all signatures before sending | When on, the notification email for a submission isn't sent until every required signatory has signed. |
| Recipients | Users, contacts, or groups who get a notification email every time this form is submitted against any job. |
| Default Signatories | Users who are automatically required to sign every submission of this form -- useful for a foreman or safety lead who must always sign off on a toolbox talk, regardless of who ran it. |
Completed toolbox talks then show up like any other submission in the Form Inbox for review, and in the Form Report for analytics across submissions.
Form Assignment to Equipment
Forms link to a specific piece of equipment through an Equipment question type inside the form builder, not through a form-level "attach to equipment" setting. Add one from the Form Builder tab:
- Open the form's Form Builder tab and click Add Question.
- Set Question Type to Equipment.
- Optionally turn on Refine Equipment List and pick one or more Equipment Categories -- this limits the dropdown the field worker sees to equipment from those categories only. Leave it off to let them pick from all equipment.
- Optionally turn on Add "Other" to drop down list to let a worker record equipment that isn't yet in the system (for example, rented equipment); selecting Other then requires them to enter details in a follow-up question.
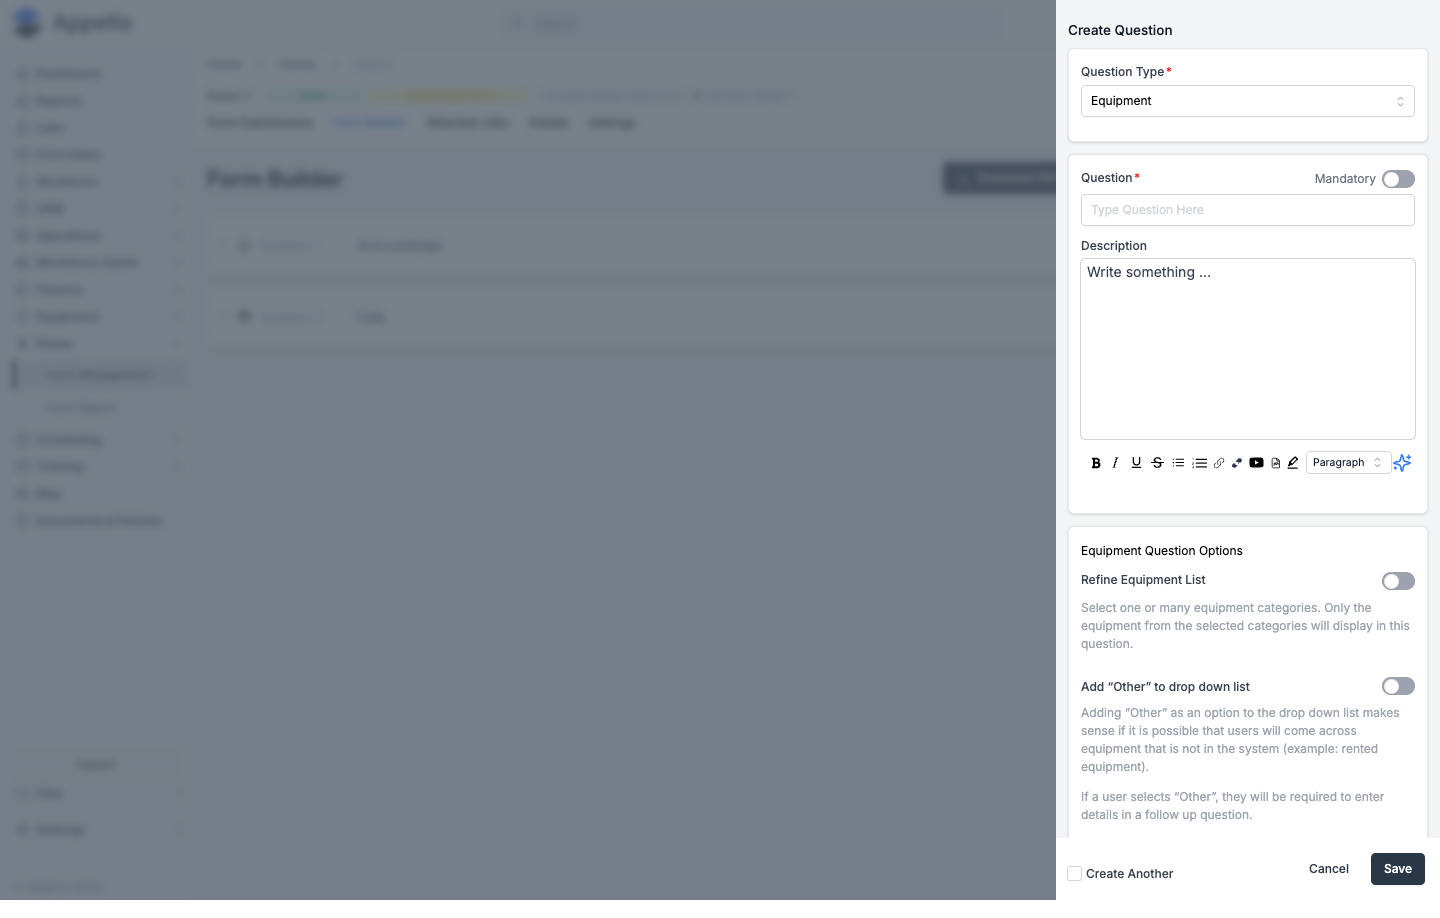
When a worker fills out the form on mobile (or in the office), this question shows as a dropdown of equipment records to choose from -- that's the piece of equipment the inspection is about. On the equipment record itself, submissions that named it through this question appear on its own Form Submissions tab:
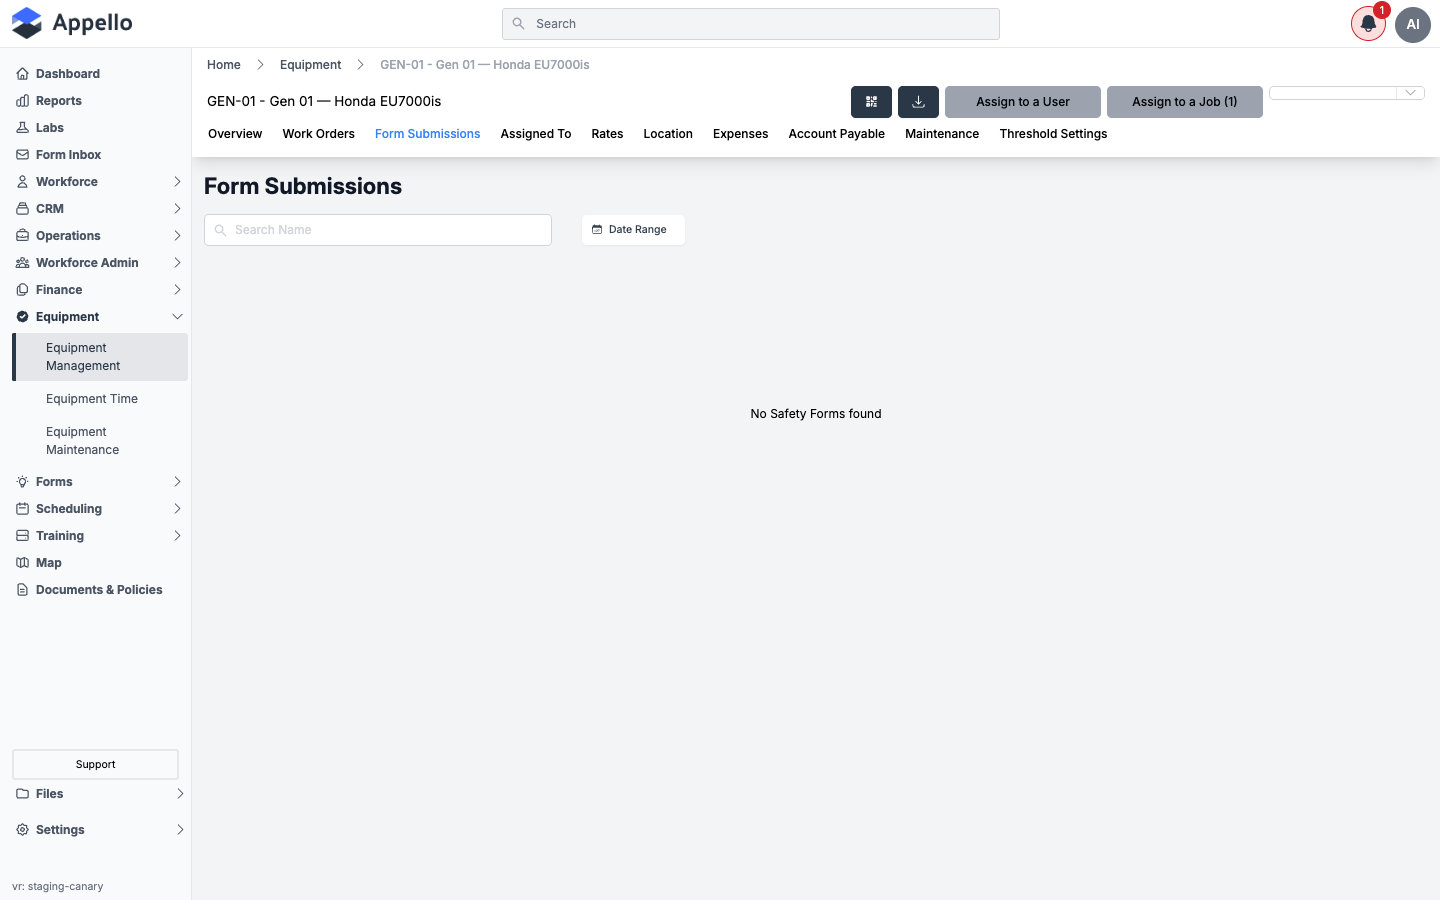
The demo instance has equipment records but no form submissions that reference them yet, so only the empty state is shown above. A populated equipment record's Form Submissions tab lists each matching submission the same way the form-level Form Submissions tab does.
Assigning Mandatory Forms to Jobs
Attaching a safety form to a job makes it required: every worker scheduled to that job must complete it, and it appears in their mobile app's My Forms tab. There's no separate "optional" mode — attaching a form is what makes it mandatory for that job. You can manage this from the form itself or from the job, and both ways update the same list.
From the Form (Attached Jobs Tab)
-
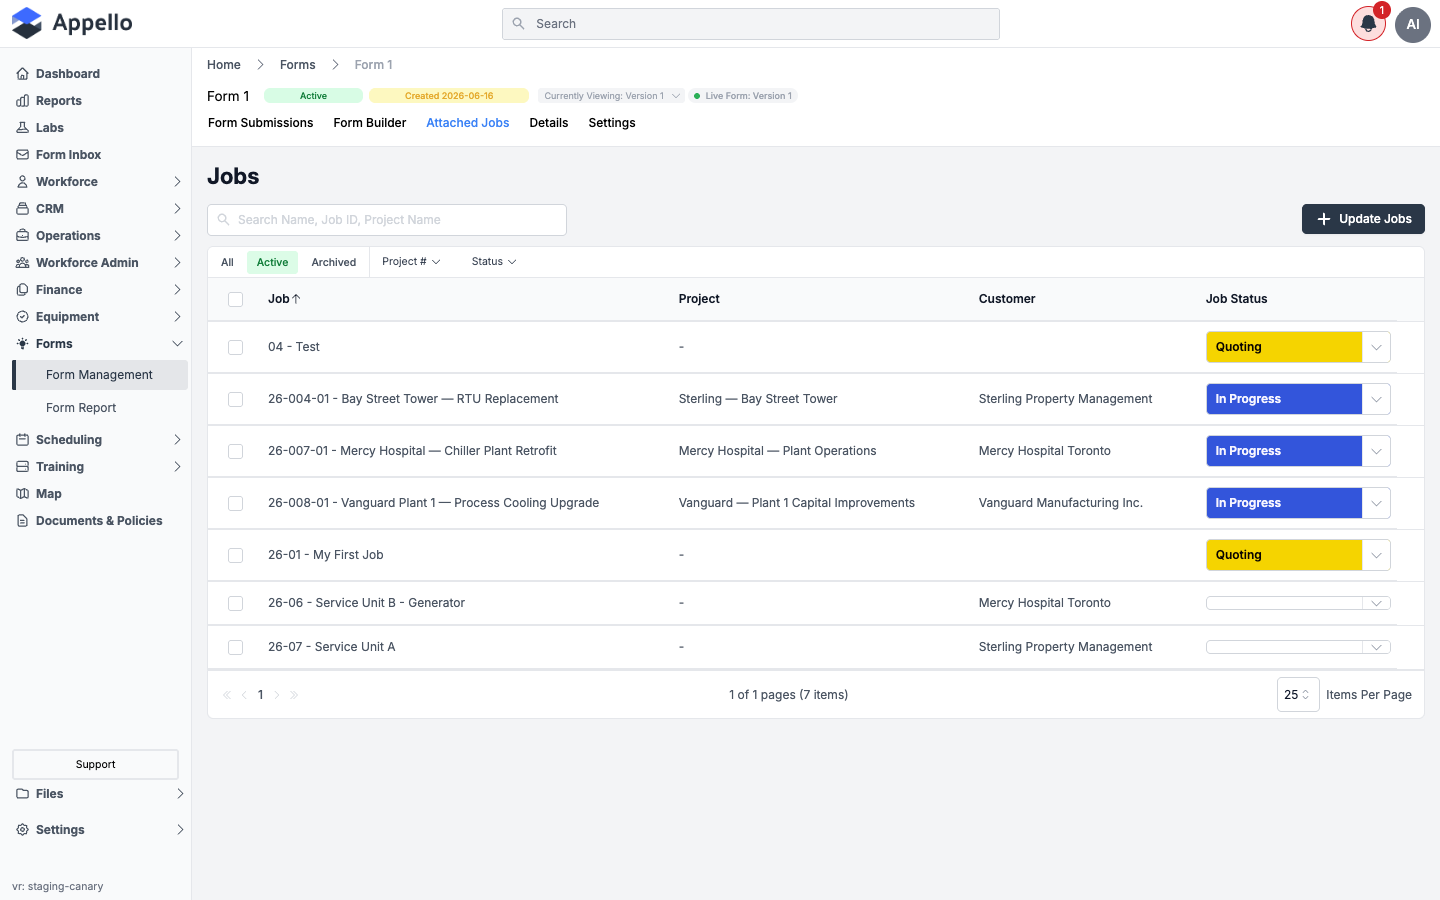
Open the form in Form Management and go to its Attached Jobs tab. This lists every job the form is currently required on.
-
Click Update Jobs.
-
Either:
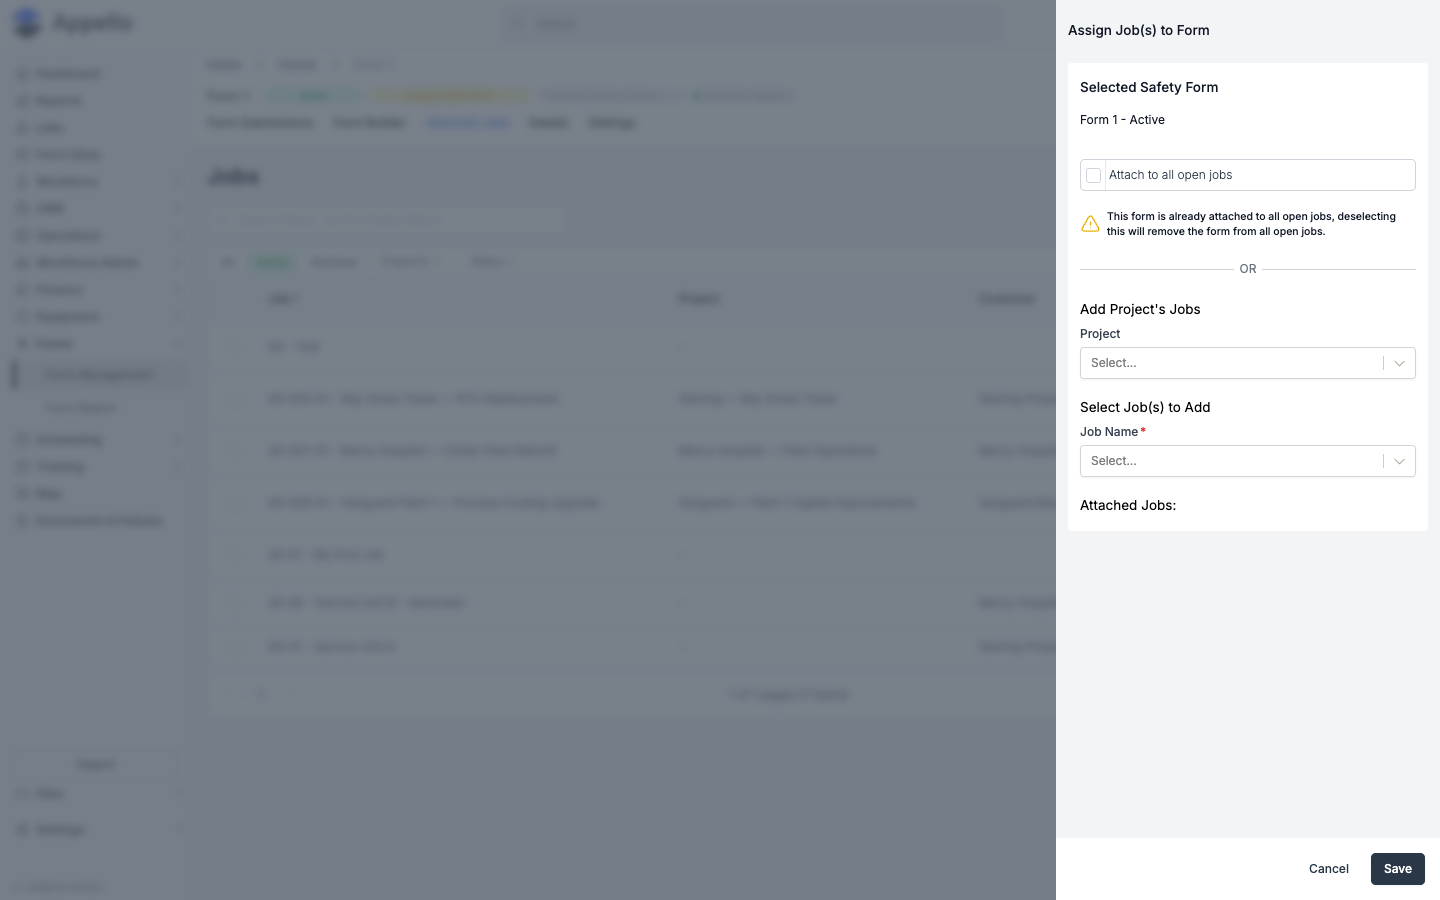
- Check Attach to all open jobs to require the form on every currently open job (and automatically on new jobs going forward), or
- Leave it unchecked and add jobs individually: pick a Project under Add Project's Jobs to pull in all of that project's open jobs at once, or use Select Job(s) to Add to add one job at a time. Jobs you've selected appear under Attached Jobs.
-
Click Save.
If a form is already attached to all open jobs, unchecking Attach to all open jobs and saving removes it from every open job. Appello shows a warning before you save.
From the Job (Settings Tab)
-
Open the job detail page and go to its Settings tab.
-
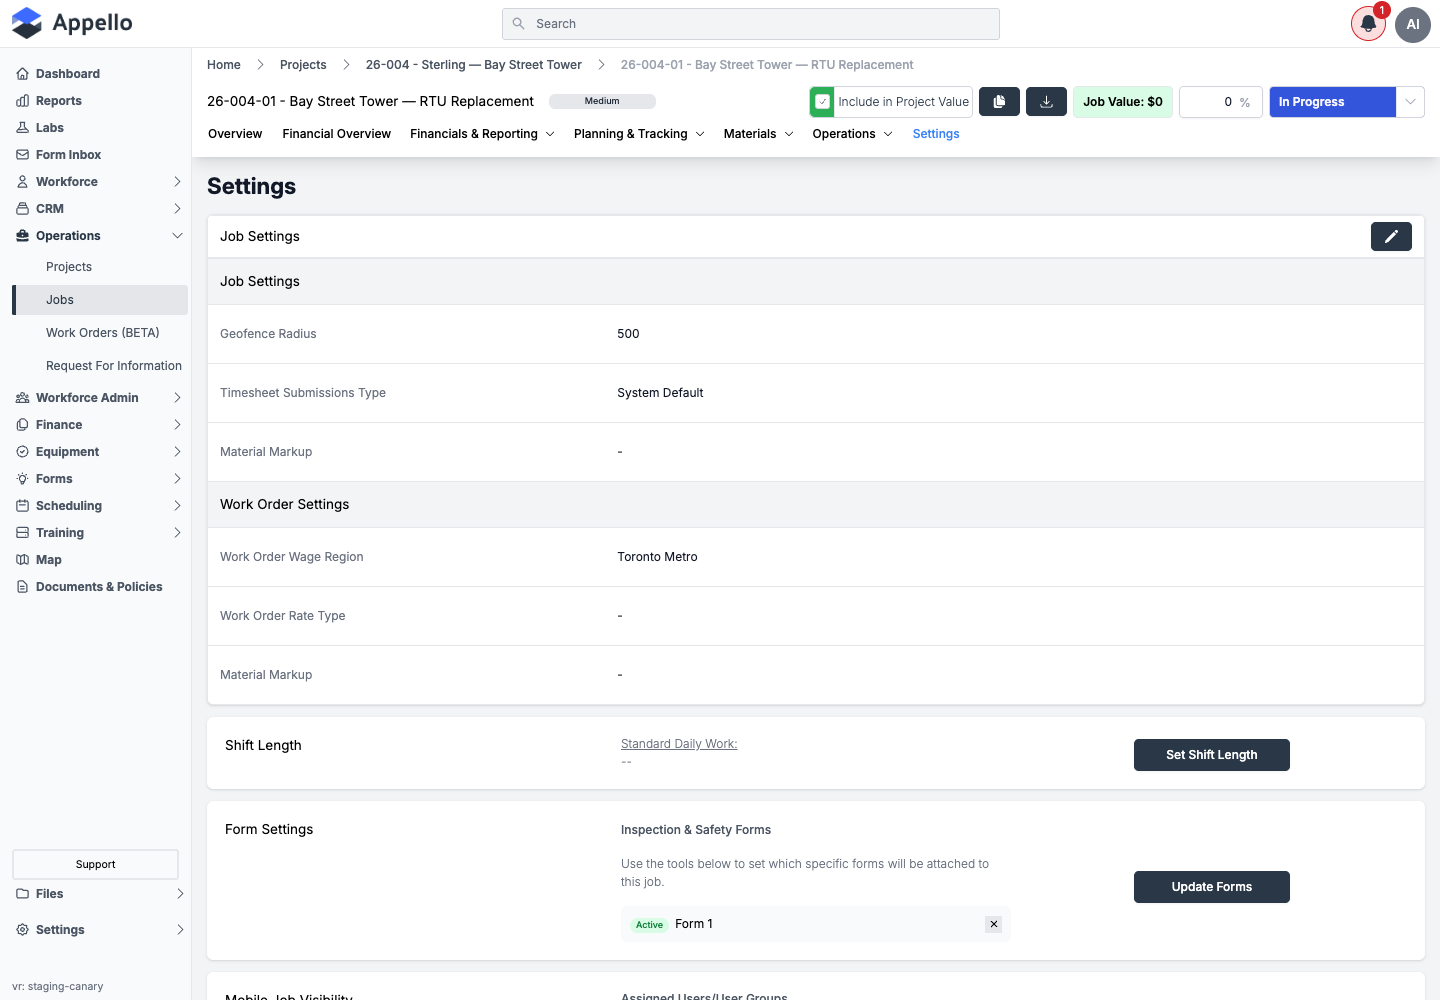
Scroll to the Form Settings card, under Inspection & Safety Forms. Any forms currently required on this job are listed here.
-
Click Update Forms.
-
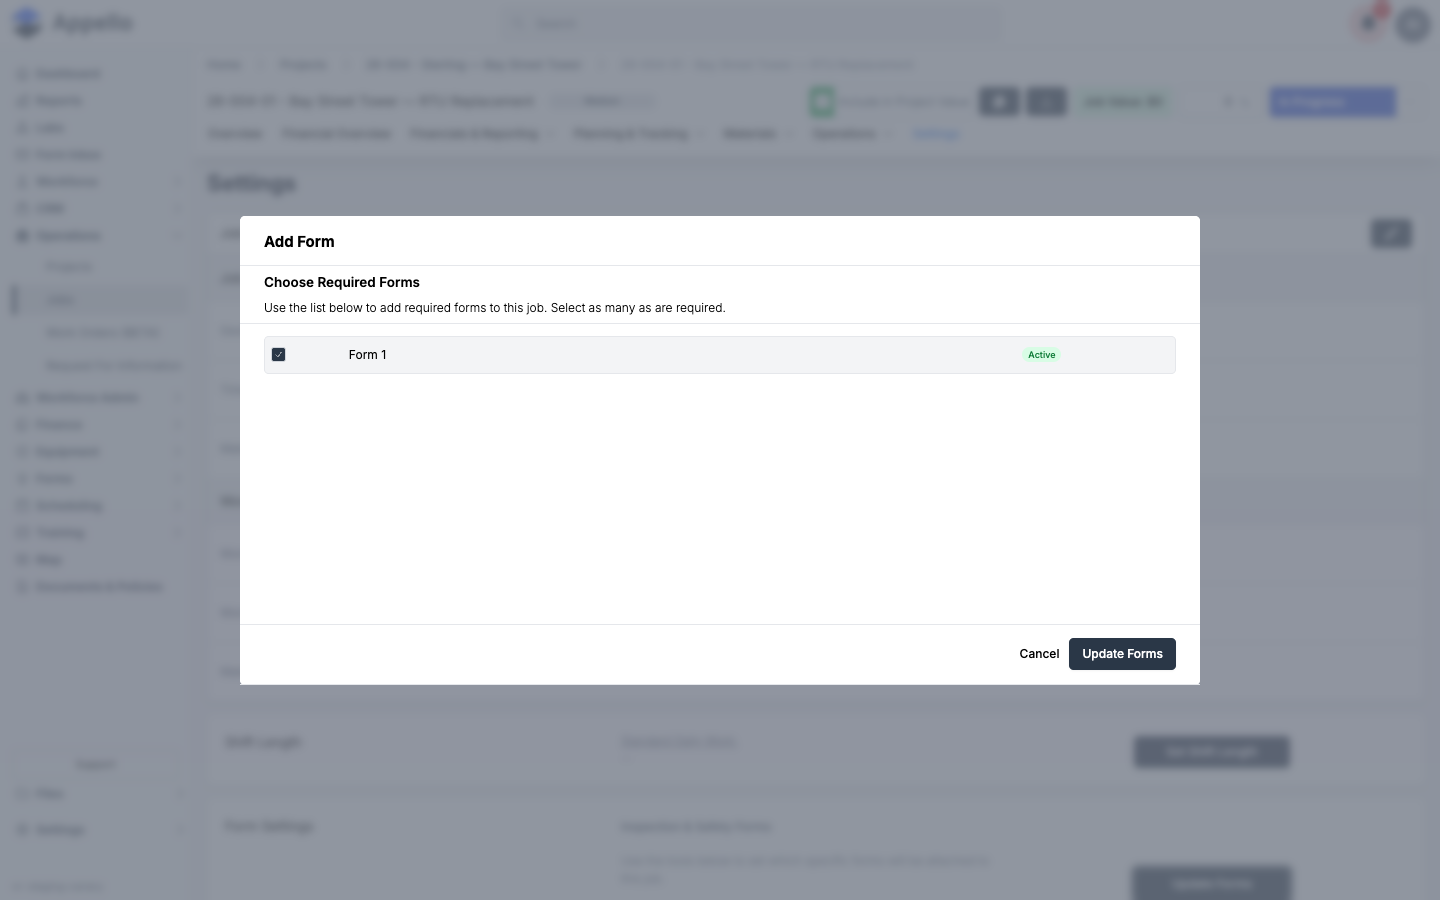
In the Add Form dialog, check every form this job should require, then click Update Forms to save.
To remove a single form from a job, click the X next to it on the Form Settings card.
Version Control
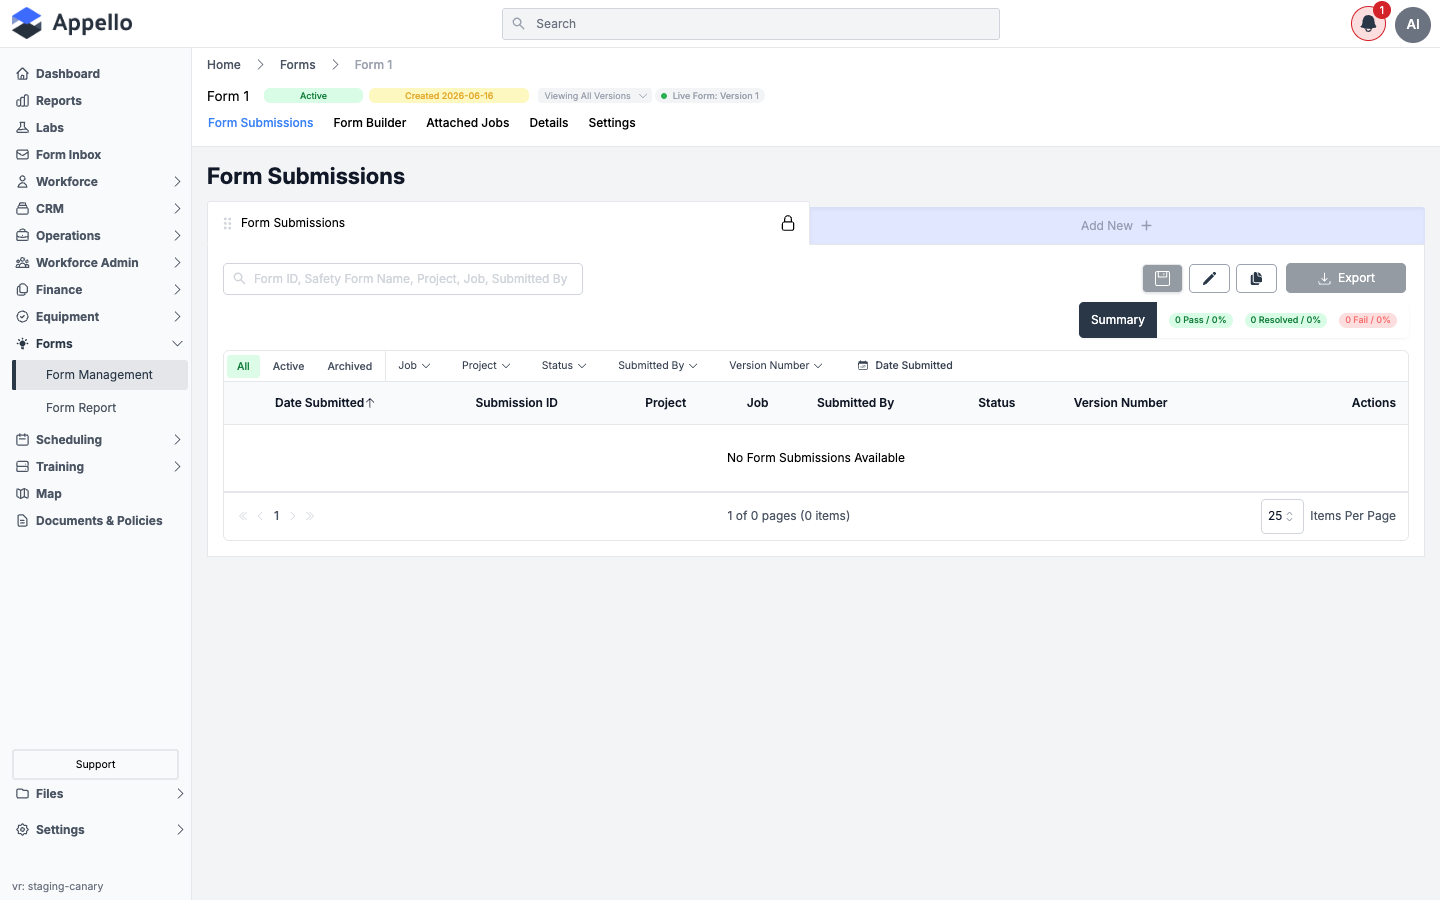
Every form's header shows which version you're looking at and which one is live:
Versions and In-Flight Submissions
A form's questions can be edited freely until it has received a submission. Once at least one submission exists against the current version:
- The version becomes locked -- you can no longer edit its questions directly.
- Trying to edit it prompts you to create the next version instead (a Version N+1 you build from a copy of the locked version's questions).
- The current live version keeps running as-is until you explicitly publish the new one -- publishing is a separate, deliberate step, not automatic.
- Each submission permanently keeps the version number it was filled out under, so a form's submission history stays readable even as the question set changes over time.
Publishing a New Version
Once you've made your edits on the new version, publish it from the same version control to make it live:
- Publishing asks you to confirm the version number, and warns that publishing "will make this version of the form live across the application."
- You can keep editing the newly-created version until it, too, receives its first submission.
- You aren't limited to publishing forward -- the product's own confirmation text notes "you can publish a different version of the form at any time," so an older version can be re-published as the live one if needed.
Viewing Older Versions
The Viewing All Versions control in the header (shown above) is also a dropdown. Opening it lists every version of the form with its submission count and which one is Live:
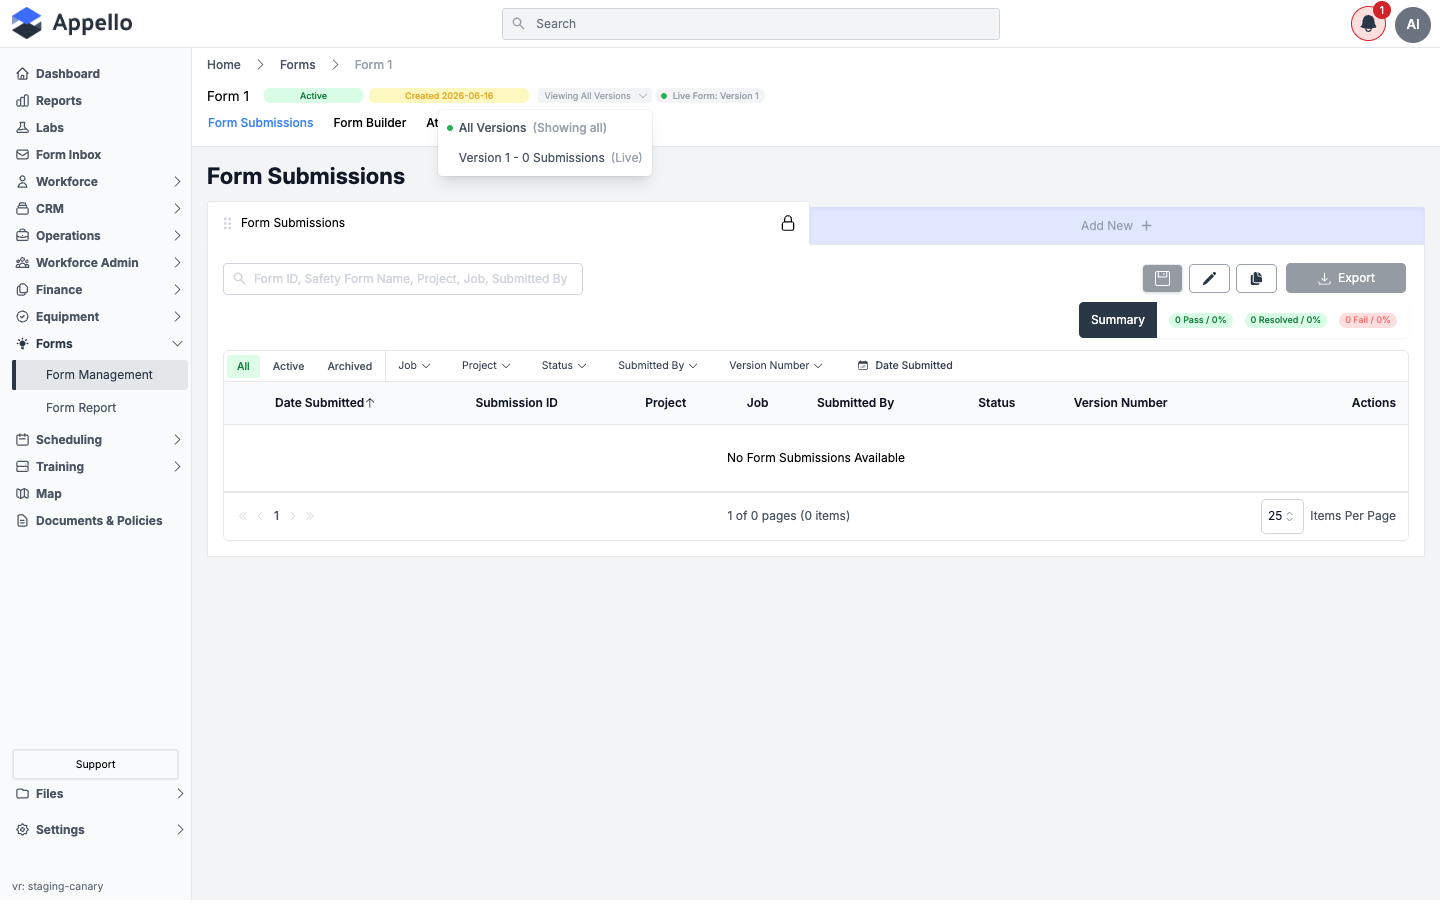
Use it on the Form Submissions tab to filter the list down to submissions from one specific version, or back to All Versions. The Form Builder, Details, and Settings tabs use their own Currently Viewing: Version N selector in the same spot to switch which version's questions and settings you're looking at.
The demo form used for this page has a single version with zero submissions, so there's no screenshot above of switching between two real versions, or of the "create a new version" prompt that a locked, submitted-against version triggers.
Form Duplication
Duplicate an existing form to start a new one from a copy of its questions, rather than building from scratch:
-
Open the form you want to copy, on its Details tab.
-
Click the pencil icon next to Form Information to open the edit panel.
-
Click Actions → Duplicate.
-
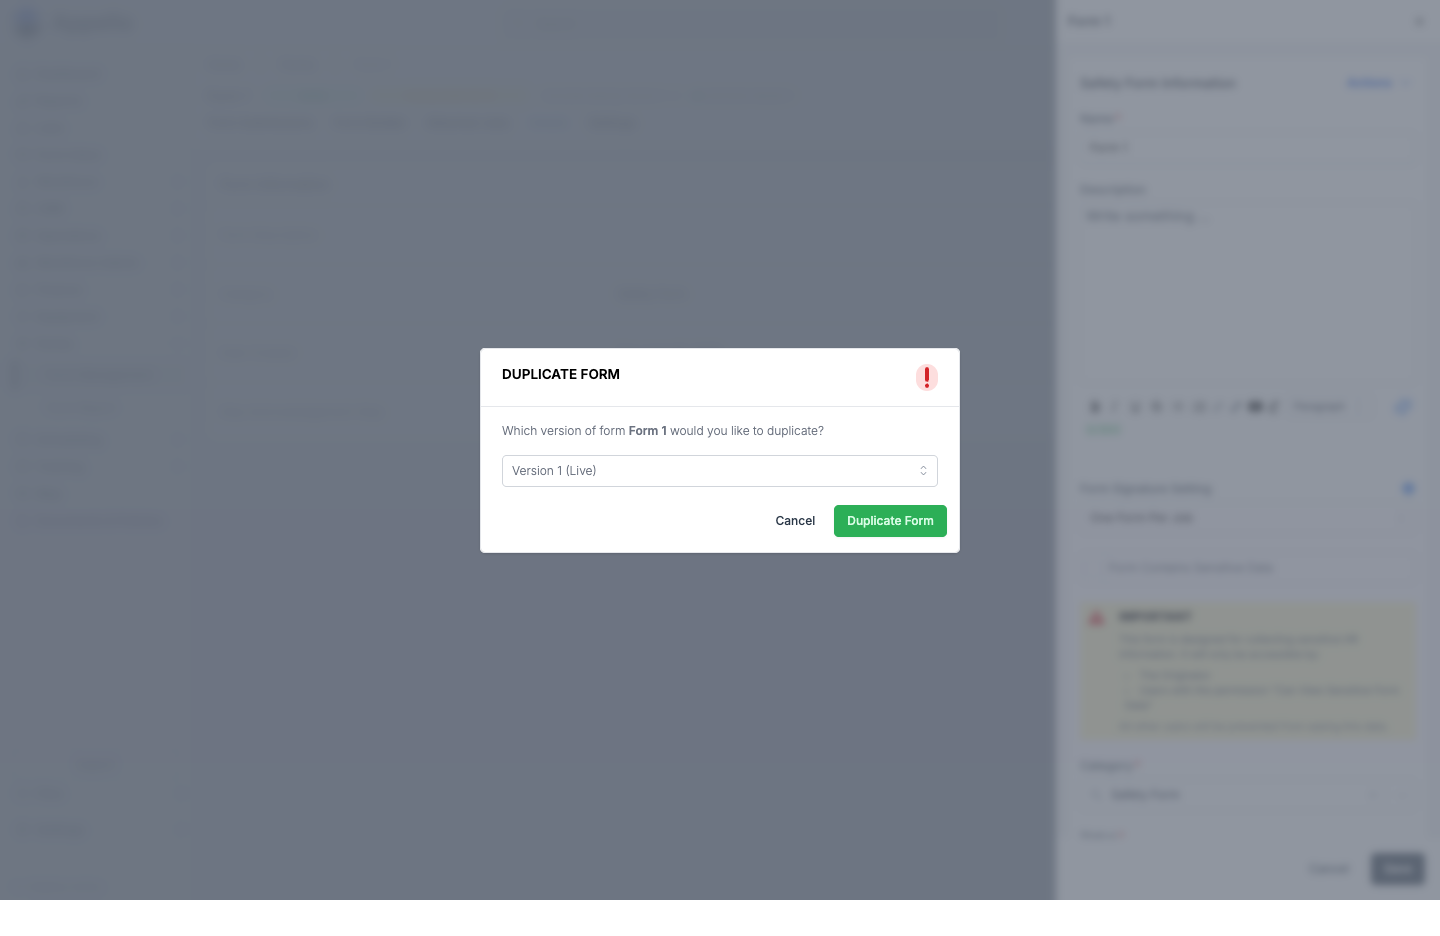
Choose which version of the form to duplicate from the dropdown (a form with more than one version lets you copy from any of them, not just the live one).
-
Click Duplicate Form. The copy opens in the Form Builder with all fields from the chosen version pre-populated.
-
Rename it and make any changes, then save.
Form Detail Page (/safety-inspection-forms/[id])
Where it is: click any form's name from the Form Management list, or a form's name from
another record's Form Submissions tab. URL: /safety-inspection-forms/<id>.
Opening a form lands you on its detail page: a header (badges, the version selector, and the Archive/Restore/Delete/Publish Version buttons -- see Version Control above) and five tabs.
| Tab | Permission | What it shows |
|---|---|---|
| Form Submissions | Safety Form → View | Every submission of this form -- see below. |
| Form Builder | Safety Form → Edit | The question editor -- see below. |
| Attached Jobs | Job → View | Jobs this form is required on -- see below. |
| Details | Safety Form → View | The form's name, description, category, and creation date. |
| Settings | Safety Form → Edit | Notification recipients, default signatories, and access control. |
Form Submissions tab
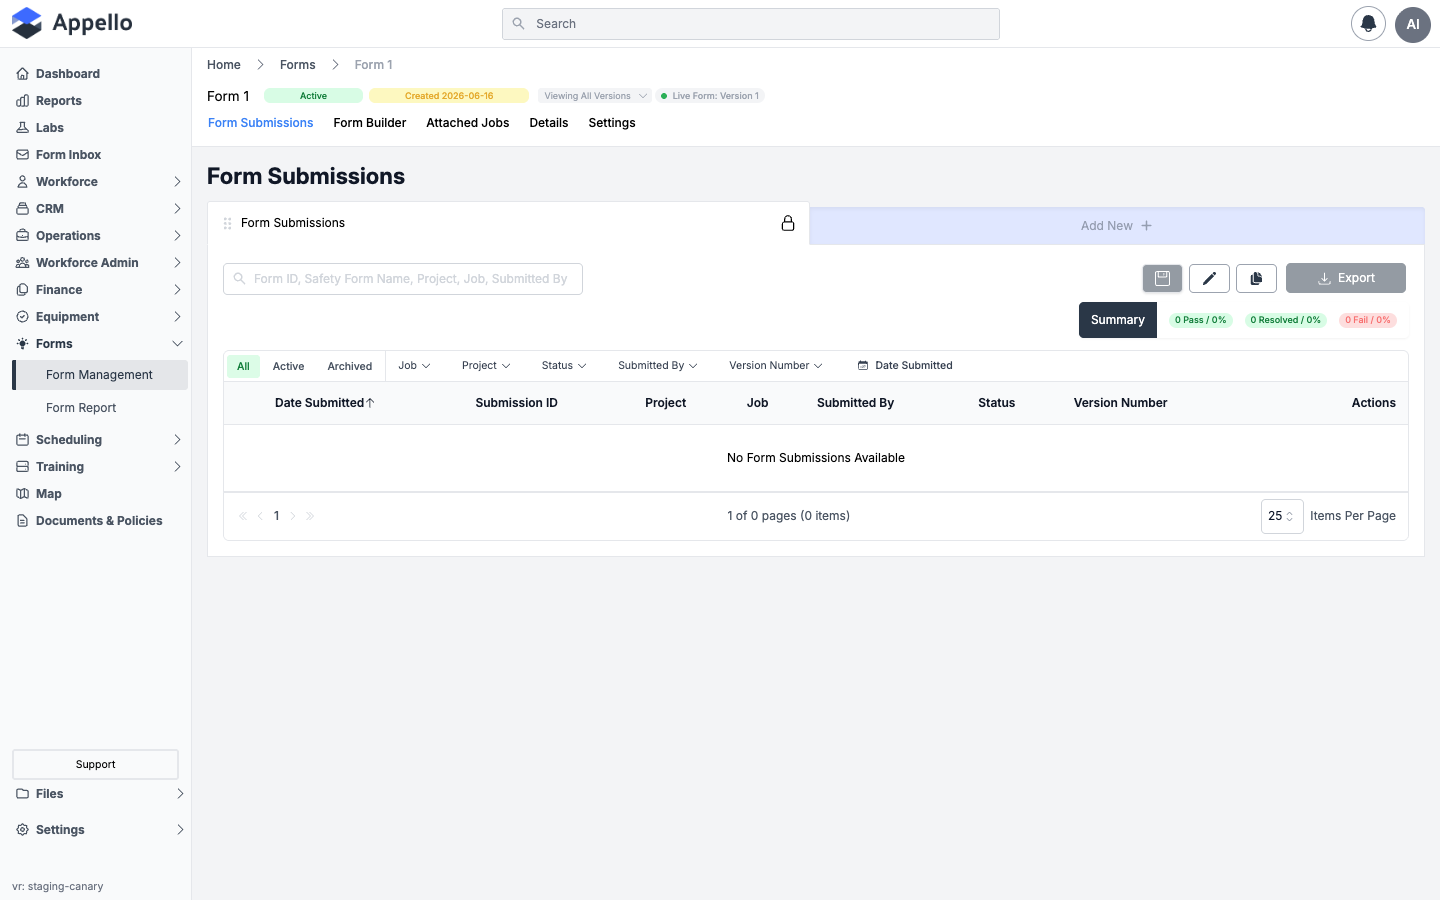
This is the same submissions table used by Form Inbox and Form Report, scoped to this form (and, if you pick one from the Viewing All Versions dropdown, to a single version -- see Viewing Older Versions above).
| Control | Behavior |
|---|---|
| Summary | A rollup badge showing Pass / Resolved / Fail counts and percentages across the filtered rows. |
| Search | Free-text search (placeholder: "Form ID, Safety Form Name, Project, Job, Submitted By"). |
| All / Active / Archived | Quick tabs controlling which submissions are included by archive state. |
| Job / Project / Status / Submitted By / Version Number / Date Submitted | Filter dropdowns narrowing the list. |
| Export | Downloads the current view as CSV. |
| Add New | Starts a new submission of this form from the office -- disabled here without a job/user context; see Form Inbox → Starting a Form from the Office. |
Table columns: Date Submitted, Submission ID, Project, Job, Submitted By, Status, Version Number, Actions. Click a row to open the submission -- see Form Submission Detail.
Shown empty on the demo instance -- "No Form Submissions Available" -- because the seeded "Form 1" has zero completed submissions.
Form Builder tab
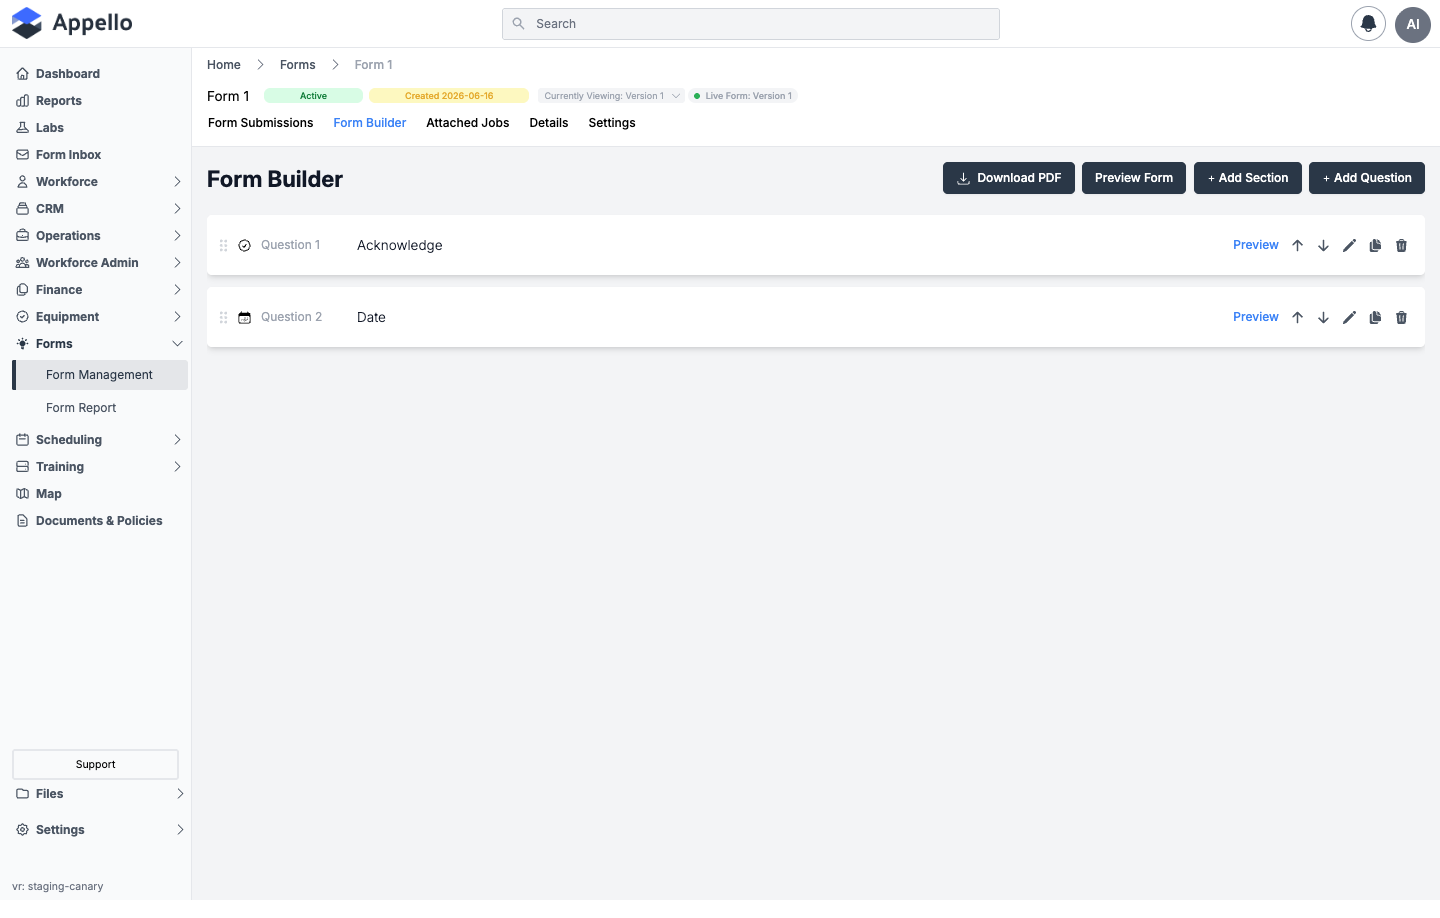
| Control | Behavior |
|---|---|
| Download PDF | Exports a blank, fillable version of this form as a PDF. |
| Preview Form | Opens the form exactly as a field worker would see it on mobile/web, without submitting anything. Disabled when the form has no questions. |
| Add Section | Opens the question panel without a Question Type picker, creating a container question other questions can be nested inside. |
| Add Question | Opens the question panel with the Question Type picker -- see every field and question types below. |
| Drag handle (⠿) | Drag a question to reorder it, or nest it under a section. Nesting is capped at two levels deep -- a drop that would go deeper is rejected. |
| ↑ / ↓ arrows | Move a question one position up or down without dragging. |
| Preview | Per-question preview of just that question. |
| Pencil / copy / trash icons | Edit, duplicate, or delete the question. |
A locked-version banner appears -- "This form version cannot be edited as it is in use. If required, please create a new version" -- once the current version has at least one submission, and drag-and-drop editing is disabled from then on. The demo form's single version has zero submissions, so there's no screenshot of that state above. See Versions and In-Flight Submissions above.
Question types
The Question Type dropdown offers the types below. It excludes Conditional, which is only reachable through a section's nested-question flow rather than this picker:
| Type | Behavior |
|---|---|
| Text | Free-text answer. Can require an image upload alongside the answer (Include Asset Upload). |
| Numeric | Numeric input. |
| Date | Date picker. |
| Time | Time-of-day picker. |
| Multiple Choice | One or more selectable Choices, each of which can carry its own valid-answer / mandatory-form logic. |
| Yes / No | Two-option boolean answer. |
| Pass / Fail | Two-option boolean answer whose result feeds the Pass/Fail/Resolved rollups used across Form Submissions, Form Inbox, and Form Report. |
| Photo | Camera capture or photo upload. |
| File | Attach a document. |
| Signature | PIN-based digital signature. Supports Repeatable for capturing more than one signature. |
| Person | Picks a person, optionally restricted to one or more User Groups. |
| Equipment | Picks an equipment record, optionally restricted by Refine Equipment List / Equipment Categories -- see Form Assignment to Equipment above. |
| Acknowledgement | The worker taps a button (customizable Acknowledge Button Text, default "Acknowledge") -- no free-text answer. |
| Risk Assessment | A fixed question named "Risk Assessment" (not editable) with its own scoring configuration; always mandatory. |
| Conditional | Not in the manual Question Type list. Drives show/hide of nested child questions, with configurable skip/continue labels, and supports Repeatable. |
This list doesn't match the "Available Field Types" table earlier on this page (Text Area, Dropdown, Checkbox, Radio Buttons, Section Header, Instruction Text) one-for-one -- that earlier table describes the concepts in field-builder terms a reader would expect, while this one lists the type names the product actually shows you. Where they overlap the behavior is the same; where they don't, trust this table.
Question fields
Every question is built from the same underlying fields, though which ones appear depends on the selected Type (see above):
| Field | Required | Type | Effect |
|---|---|---|---|
| Type | Yes | Select | The question type; determines which of the fields below apply and which type-specific options render. |
| Name | Yes | Text | The question wording shown to the field worker. Fixed to "Risk Assessment" for that type. |
| Description | No | Rich text | Optional help text shown under the question; supports attaching a PDF. |
| Position | n/a -- not directly editable | Order in the list | The question's order. Set by dragging or the ↑/↓ arrows, not typed in. |
| Mandatory | No, off by default | Toggle | When on, the field worker must answer before submitting. |
| Include Asset Upload | No, off by default | Toggle | Text questions only -- prompts the worker to upload an image after answering. |
| Choices | Depends on type | List of options + valid answers | For Multiple Choice, Pass / Fail, Yes / No, and Acknowledgement -- the selectable options and which of them count as a pass/valid answer. |
| User Group | No | Multi-select | Person questions only -- restricts the picker to members of the selected group(s). |
| Equipment Categories | No | Multi-select | Equipment questions only -- restricts the equipment picker to the selected categories (Refine Equipment List). |
| Type-specific settings | Depends on type | Set from the question panel | For example, skip/continue labels for Conditional, or scoring for Risk Assessment. |
| Repeatable | No, off by default | Toggle | Conditional and Signature questions only -- lets the worker repeat that section/signature multiple times in one submission. |
Valid answers
For Pass / Fail, Yes / No, Multiple Choice, and Acknowledgement questions, each Choice can be marked as a valid/passing answer and can trigger follow-on behavior -- a choice can require attaching an additional mandatory form when it's selected. This is the same mechanism behind the Conditional Logic show/hide behavior described above.
Publishing a new version
Editing questions on a version that already has a submission isn't allowed -- you're prompted to create a new version first, and nothing goes live until you explicitly publish it. See Version Control above for the full mechanics, including exactly what the publish confirmation says and what happens to submissions already filed under the old version.
Attached Jobs tab
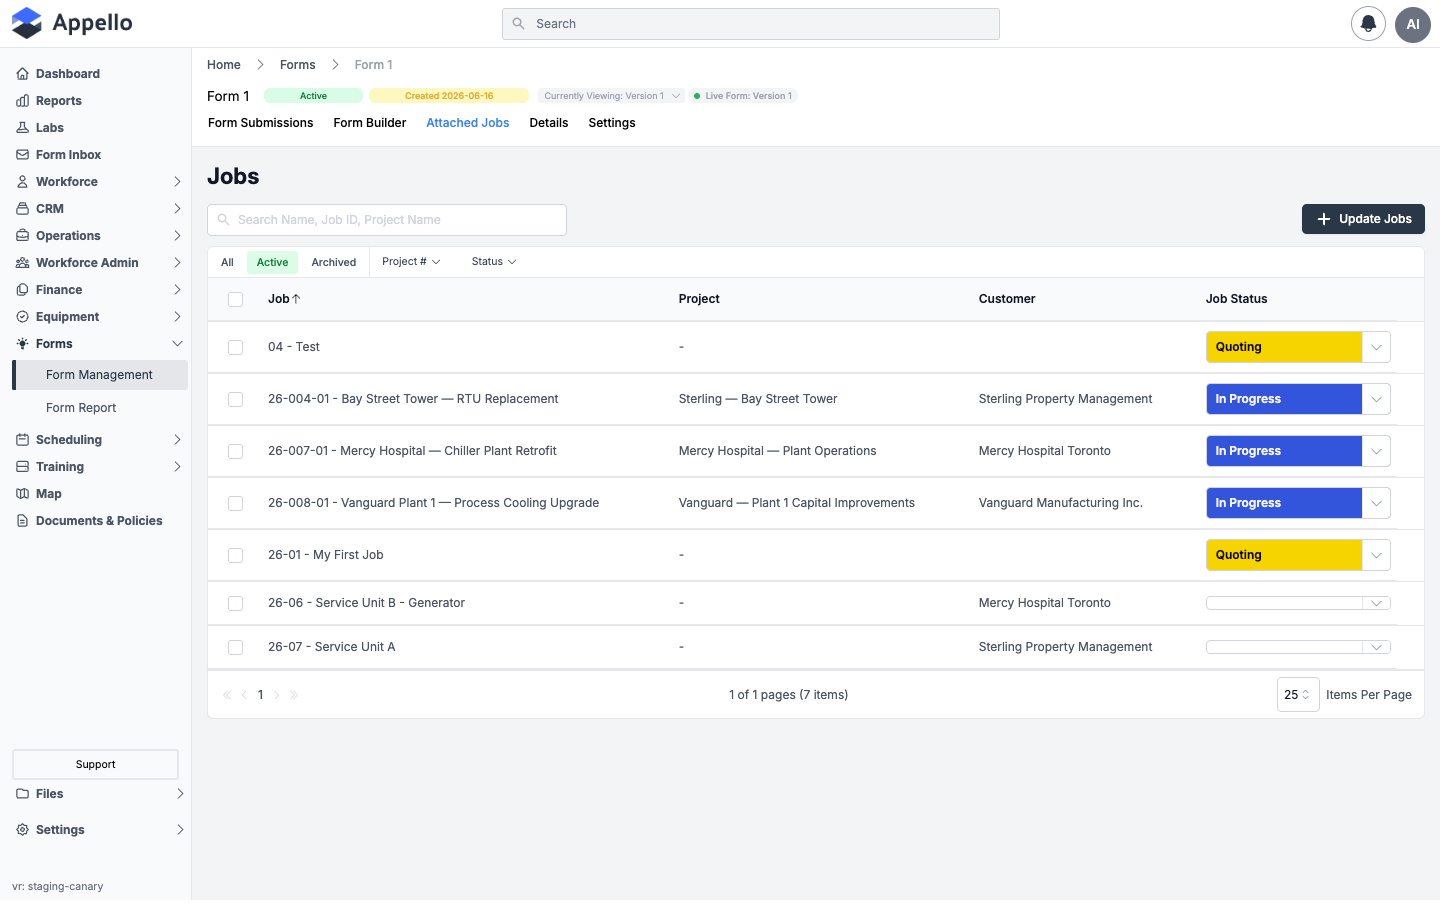
Lists every job this form is currently required on. Columns: Job (linked), Project (linked), Customer (linked), Job Status (inline-editable dropdown). Above the table: search (placeholder: "Search Name, Job ID, Project Name"), All / Active / Archived quick tabs, Project # and Status filters, and Update Jobs.
Use Update Jobs to attach this form to more jobs, or check jobs and use the bulk Archive action to detach them (this only removes the requirement -- it doesn't touch the job or the form). The full connect workflow -- Attach to all open jobs vs. picking jobs individually -- is documented under Assigning Mandatory Forms to Jobs → From the Form above.
Details tab
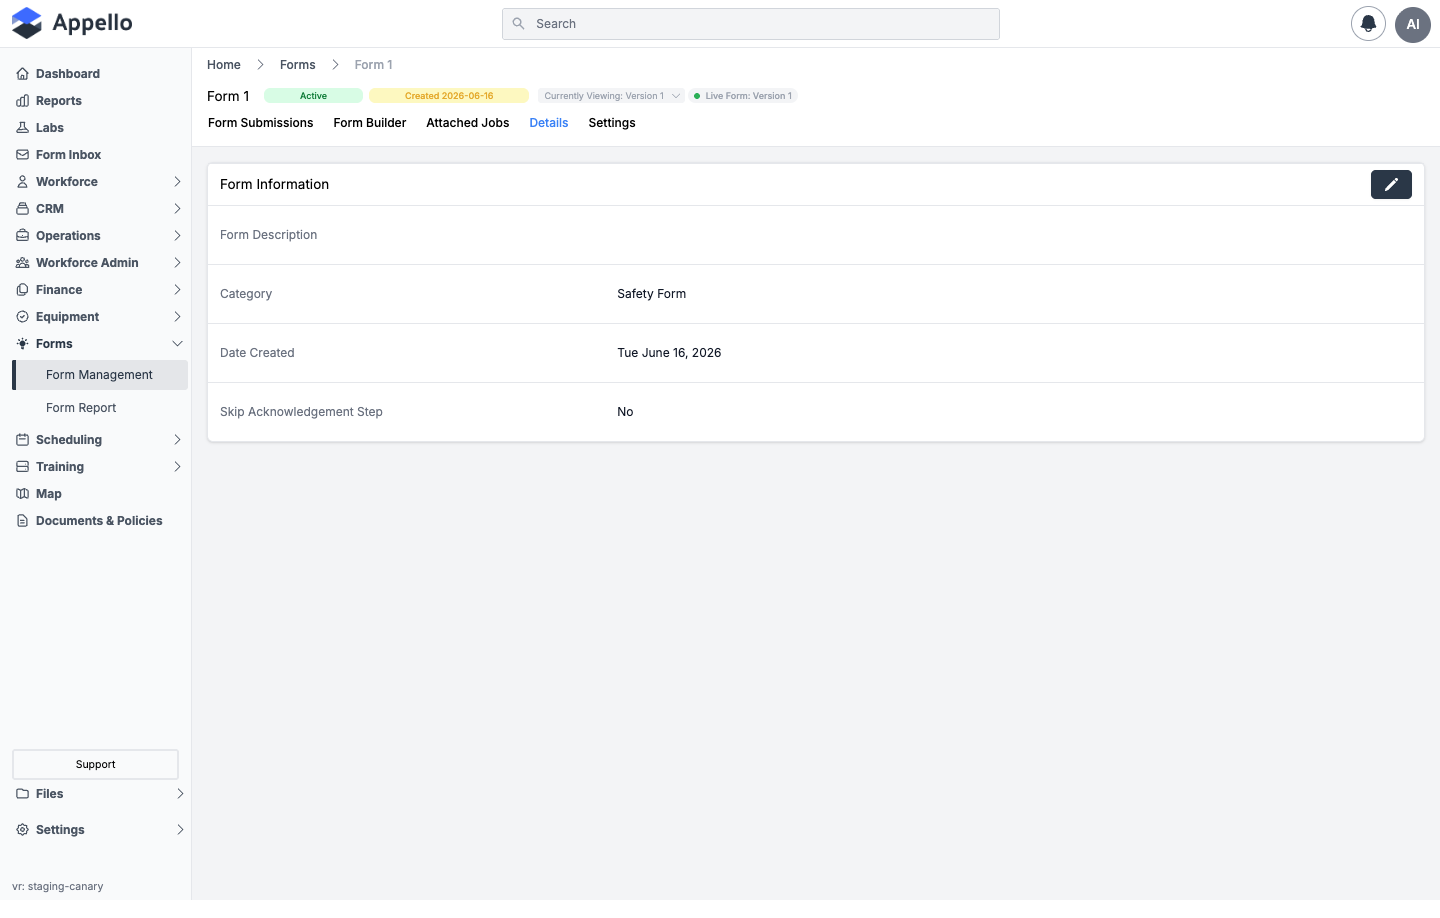
| Row | Description |
|---|---|
| Form Description | The active version's description. |
| Category | The form's category. |
| Date Created | When the form wrapper was created. |
| Skip Acknowledgement Step | Yes/No -- mirrors the setting from the Create Form panel. |
The pencil icon opens the same panel as Create Form (see Create Form: Every Field above), pre-filled for editing, with an Actions → Duplicate option -- see Form Duplication above.
Settings tab
| Setting | What it does |
|---|---|
| Wait for all signatures before sending | When on, the submission notification email isn't sent until every required signatory has signed. |
| Recipients | Users, contacts, or groups who get a notification email every time this form is submitted against any job. |
| Default Signatories | Users automatically required to sign every submission of this form. |
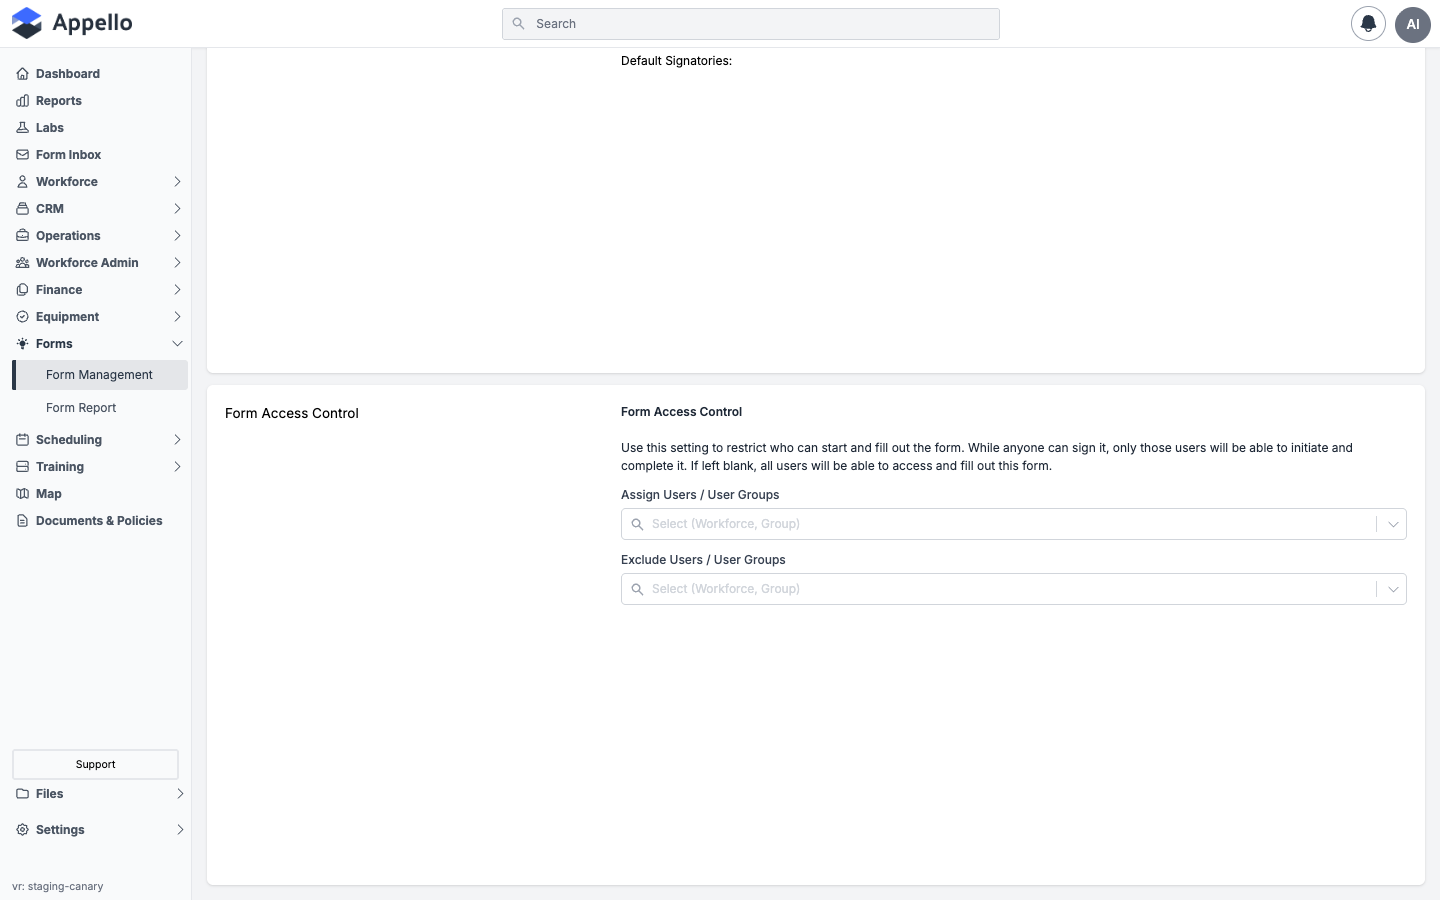
| Setting | What it does |
|---|---|
| Assign Users / User Groups | Restricts who can start and fill out this form to the listed users/groups. Anyone can still sign it. Left blank, everyone can access and fill it out. |
| Exclude Users / User Groups | Removes specific users (e.g. members of an otherwise-assigned group) from being able to start or fill out the form. |
How Forms Connect to Other Features
| Feature | Integration |
|---|---|
| Jobs | Forms are assigned to specific jobs |
| Mobile App | Workers fill out forms on the mobile app with GPS + timestamp |
| Form Inbox | Completed forms appear in the office inbox for review |
| Files | Form attachments (photos, documents) auto-upload to the job's file folder |
| Equipment | Equipment inspection forms can be linked to specific equipment records |
| Notifications | Submitters and reviewers receive notifications |
Related Pages
- Form Submission Detail — Open and review a single submission
- Form Inbox — Review, sign off on, and resolve submitted forms
- Form Report — View form submission analytics
- Job Detail Page — A job's own Settings tab, where mandatory forms can also be managed
- Leave Submissions — Similar approval workflow for leave requests