Employee Expenses
Field and office staff submit reimbursable out-of-pocket expenses for manager review. Expenses are linked to a job, equipment, and/or cost code, flowing into job costing and payroll once approved.
Navigation
Sidebar → Workforce Admin → Employee Expenses
URL: /employee-expenses
Reaching this page requires the Expense — View permission. Without it the page is not reachable from the sidebar or by direct URL.
Two other machine-readable names sometimes turn up alongside Employee Expenses in generated references — BreakTimeAllowance and EmployeeAgreement / EmployeeAgreementContract. They are not part of this screen. Break time allowances and employee agreements live under Settings → Human Resources, a separate page from Employee Expenses; this page only covers the Employee Expenses list, its create/edit panel, and its approval workflow.
Overview
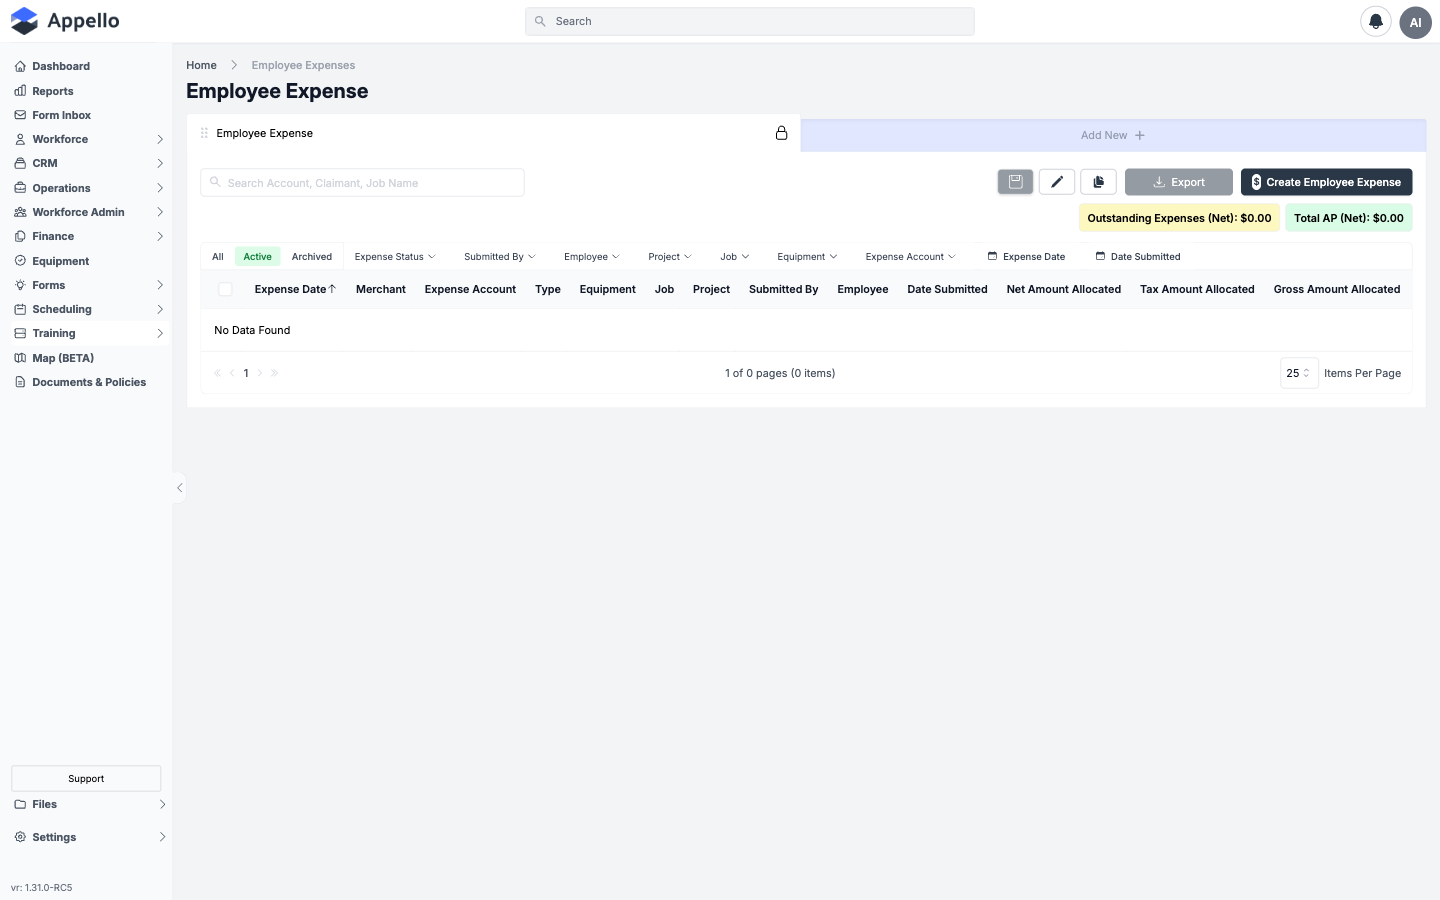
The Employee Expenses page lists every expense an employee has submitted — one row per expense — with its allocation, amount, and approval status. It is a filtered view of the same underlying Expense record used by Accounts Payable: "Employee Expense" and "Account Payable" are the two kinds of expense record, and this page shows only Employee Expenses.
The demo instance has no Employee Expense records at all, so the list is shown empty ("No Data Found") in every screenshot on this page, including the one above. Column names, filter chips, and form fields below are confirmed from the table's column configuration and from the live, empty UI — not from a populated row.
List columns
The columns below are everything the Employee Expenses table can show. Which ones are visible by default versus added through the column picker varies; the screenshot shows the table with most columns turned on.
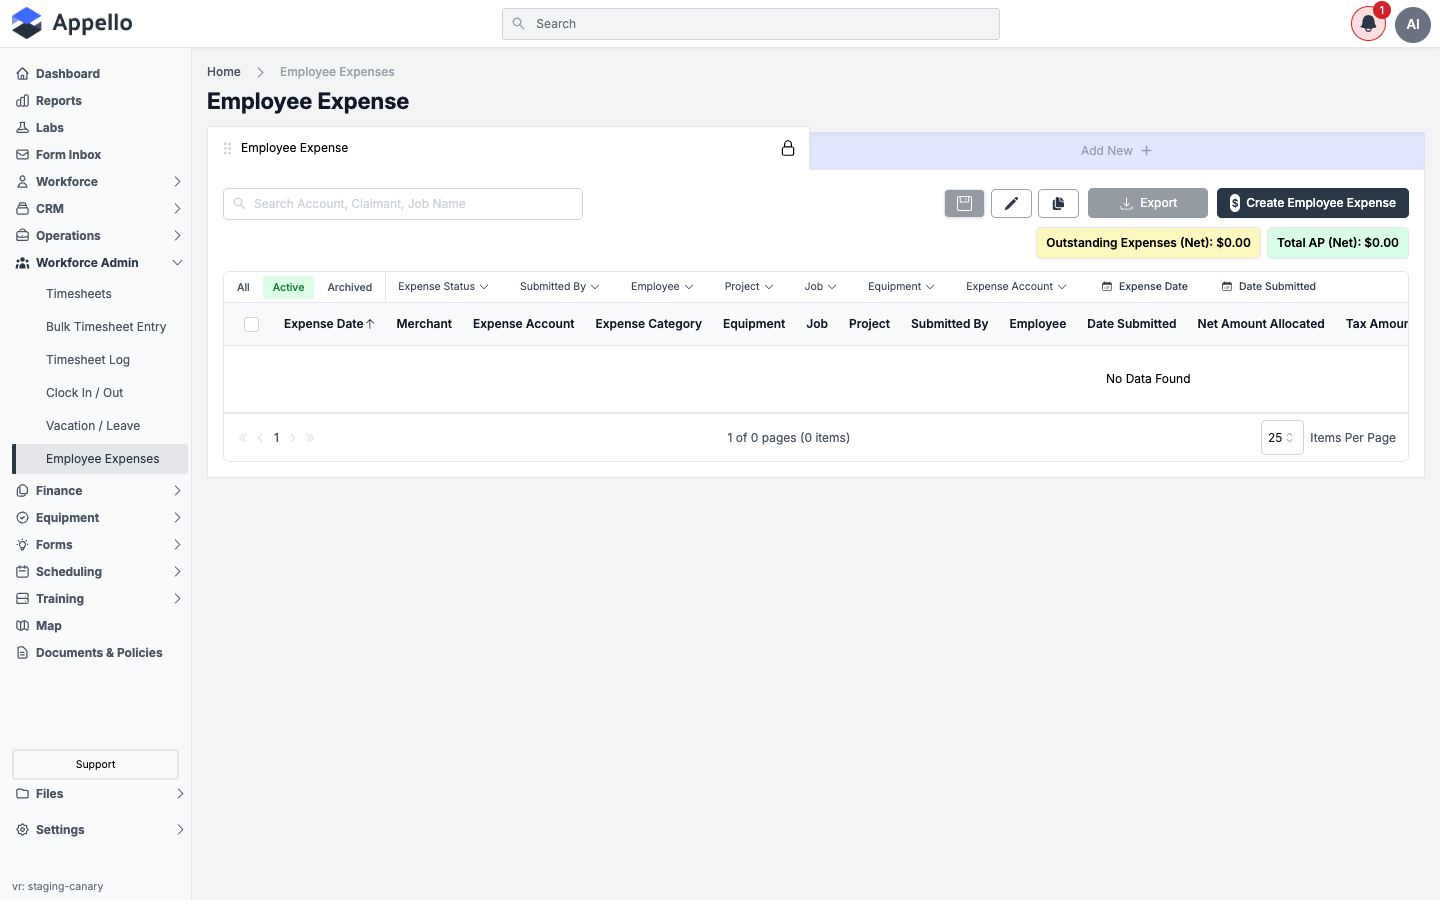
| Column | Description |
|---|---|
| Expense Date | Date the expense was incurred (Date of Expense on the form). Sortable. |
| Invoice Number | Optional vendor invoice number, mainly relevant when a Vendor / Supplier is attached (see Non-reimbursable vendor expenses). |
| Merchant | Free-text name of the vendor or merchant where the purchase was made. |
| Vendor / Supplier | The linked Company record, when one is attached. Shown automatically when the list is opened from a Company's own page; add it manually elsewhere. |
| Expense Account | The GL account item (Chart of Accounts item) the expense's cost rolls into. The same underlying field is labelled "GL Account" on Accounts Payable bills. |
| Expense Category | Always Employee Expense on this page. Read-only here; it only differs on the shared Accounts Payable list. |
| Equipment | The equipment the expense is allocated to, when Allocate To is set to Equipment. |
| Job | The job the expense is allocated to, when Allocate To is set to Job. |
| Project | The project of the allocated job, if that job belongs to a project. |
| Submitted By | The user who created the expense record — may differ from Employee, e.g. an office admin entering an expense on a worker's behalf. |
| Employee | The worker being reimbursed. Only set when Reimbursable Expense is on. |
| Date Submitted | Timestamp the record was created. This is the default sort column (newest first). |
| Net Amount Allocated / Tax Amount Allocated / Gross Amount Allocated | Sums pulled from the expense's allocation line item(s). Differ from Net/Tax/Gross Amount on the record itself only when Split Expense divides one expense across several allocation lines. |
| Has Been Reimbursed | Editable inline from the list. Whether the employee has actually been paid back — independent of lock state. |
| Locked | Whether the record is locked against edits. Only meaningful when the instance's connected accounting system is Sage 50 (Canada), QuickBooks, or Spectrum. |
| Expense Status | InReview, Approved, or Rejected — see Approval workflow below. |
| QuickBooks Online Sync Status | This expense's sync record with QuickBooks Online, on instances whose QBO integration covers Employee Expenses. |
Filters, quick tabs, search, sort, and export
| Control | Type | Effect |
|---|---|---|
| All / Active / Archived | Quick tabs | Switches between every record, non-archived records only (default), and archived records only. |
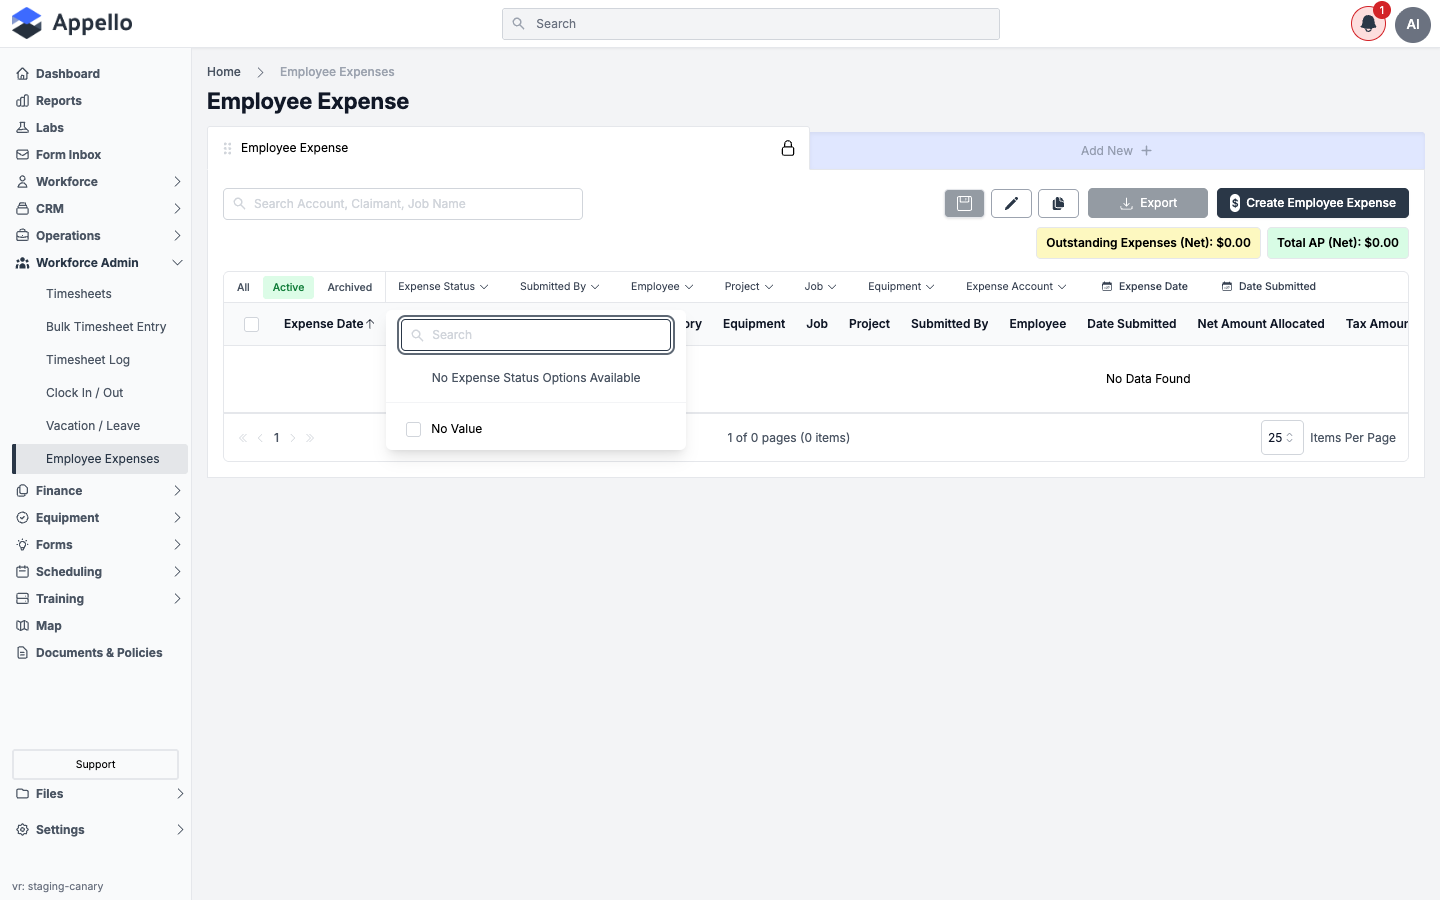
| Expense Status | Filter chip | Multi-select by status. On the demo instance it shows "No Expense Status Options Available" because there are no expense records to derive the option list from. |
| Submitted By | Filter chip | Filter by the user who created the record. |
| Employee | Filter chip | Filter by the worker being reimbursed. |
| Project | Filter chip | Filter by the allocated job's project. |
| Job | Filter chip | Filter by the allocated job. |
| Equipment | Filter chip | Filter by the allocated equipment. |
| Expense Account | Filter chip | Filter by the GL account item the expense is allocated to. |
| Expense Date | Filter chip (date range) | Filter by the date the expense was incurred. |
| Merchant | Filter chip | Filter by merchant name. |
| Expense Category | Filter chip | Filter by type — always Employee Expense on this page. |
| Date Submitted | Filter chip (date range) | Filter by when the record was created. |
| Vendor / Supplier, Locked | Filter chips (job-scoped list only) | Appear only when this same list is embedded on a Job → Financials & Reporting → Expenses tab (see Costing an expense to a job). |
| Search Account, Claimant, Job Name | Search box | Free-text search across the expense's vendor/account, claimant (employee), and job name. |
| Column headers | Sort | Click a header to sort by that column. Default sort is Date Submitted, newest first. |
| Export | Button | Exports the current filtered view to CSV. Disabled when there are no rows to export (as on the demo instance). Instances with a connected accounting system may also see an accounting-format export here, gated by that system's export settings for Employee Expenses. |
| Create Employee Expense | Button | Opens the Create Employee Expense panel — see below. |
Create an Employee Expense
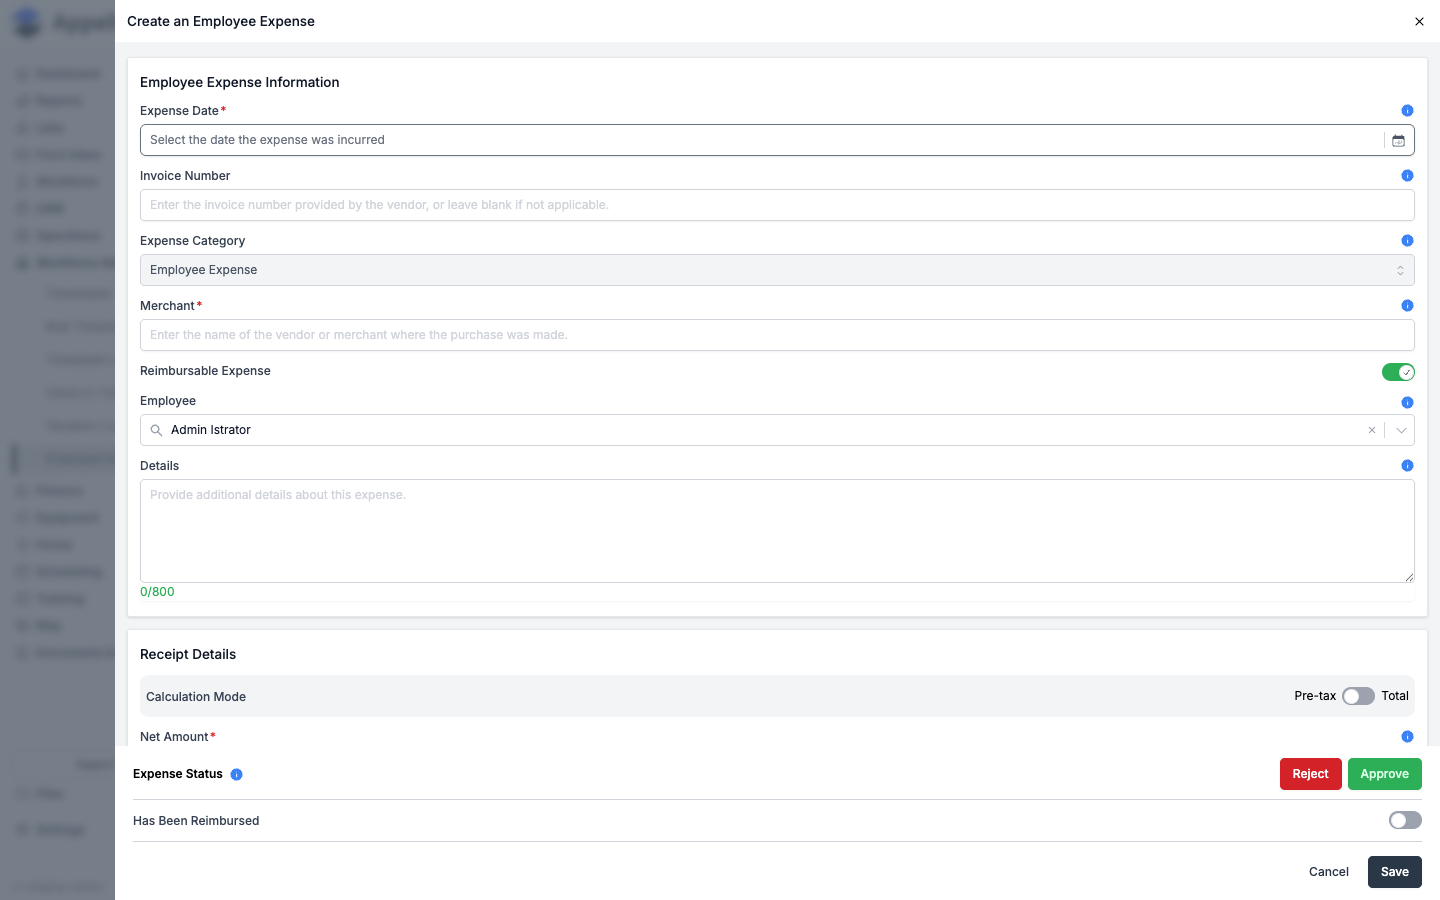
Click Create Employee Expense (top right of the list) to open the panel. The same panel, with the record's saved values, opens when you click a row's View Details link to edit an existing expense.
The panel is a shared Expense form used for both Employee Expenses and Accounts Payable; the fields below are what it shows when opened from this page.
Panel — top half
| Field | Required | Type | Effect |
|---|---|---|---|
| Expense Date | Yes | Date | The date the expense was incurred. |
| Invoice Number | No | Text | Optional vendor invoice number. If a Vendor / Supplier and invoice number are both present, saving checks for a duplicate invoice number on that vendor and asks you to confirm before saving anyway. |
| Expense Category | Yes (fixed) | Select (disabled) | Always Employee Expense; the dropdown is present but disabled from this page — you cannot switch it to Account Payable here. |
| Merchant | Yes | Text | Name of the vendor or merchant where the purchase was made. |
| Vendor / Supplier | No — only shown when Allow Vendors / Suppliers on Employee Expenses is on | Company picker | Optionally associates a vendor/supplier company with the expense. See Non-reimbursable vendor expenses. |
| Reimbursable Expense | — | Toggle | On: the panel asks for an Employee to reimburse. Off: the panel asks for a Reimbursement Type instead (e.g. company card), since there is no employee to pay back. Default is controlled by the Default New Expenses to Reimbursable instance setting. |
| Employee | Yes, when Reimbursable Expense is on | User picker (active, non-guest users only) | The worker to reimburse. |
| Reimbursement Type | Yes, when Reimbursable Expense is off | Select/combobox | How the company paid (e.g. company card). On instances with QuickBooks Online payment-account sync enabled for employee expenses, this list also offers QBO payment accounts. |
| Details | No | Textarea (800 char) | Free-text notes about the expense. |
Allocate To grid
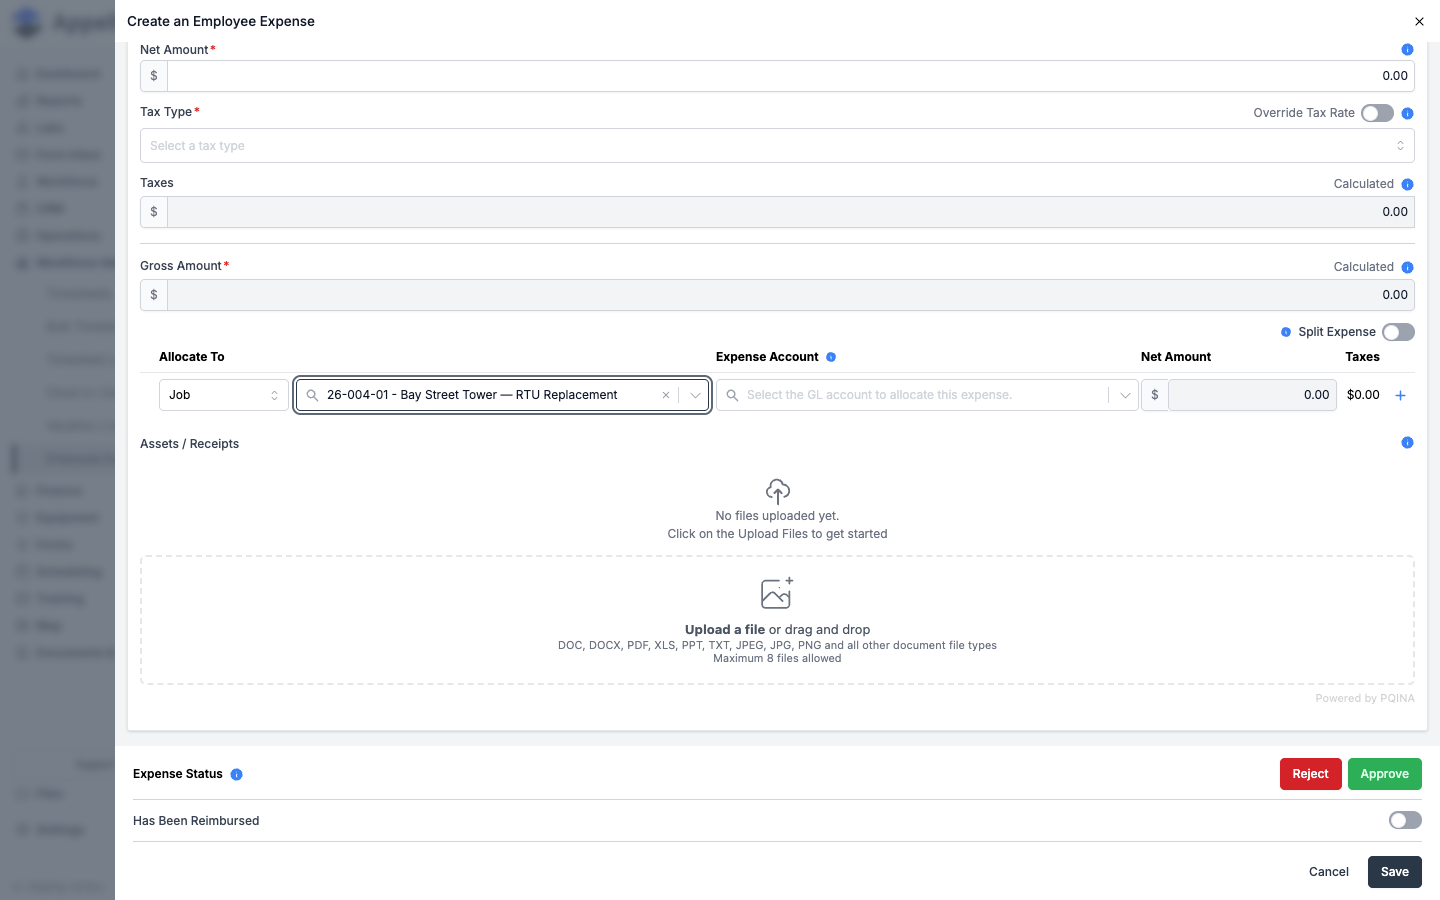
This is what makes the expense show up in job costing — separate from the Reimbursable Expense toggle, which only controls who gets paid back.
| Control | Required | Type | Effect |
|---|---|---|---|
| Split Expense | — | Toggle | Off (default): a single allocation row. On: add multiple Job/Equipment allocation rows, each with its own Net/Gross Amount and Taxes; a row's amounts must add up to the expense total to save. |
| Allocate To | Yes | Select | Job or Equipment — what this allocation row is charged against. |
| Select Job / Select Equipment | Yes | Search/combobox | The specific job or equipment record for this row. Job options are restricted to jobs you're a project lead on when your Job view permission is project-based. |
| Expense Account | Yes | Combobox | The GL account item this allocation line's cost rolls into. The same Job/Equipment + Expense Account combination cannot be used twice across rows. |
| Net Amount (or Gross Amount in Total calculation mode) | Yes, when Split Expense is on | Currency | This row's share of the expense. |
| + (Allocate to Cost Code) | — | Button | Appears only on Job rows. Adds a Cost Code sub-row nested under that job line, offered only from cost codes belonging to that specific Job + Expense Account combination. Add more than one to split the job line across several cost codes; the row's amounts must sum to the parent job line's amount. Not available on Equipment rows. |
| Expand/collapse chevron | — | Icon button | Shows or hides a job row's Cost Code sub-rows once at least one has been added. |
| Trash icon | — | Button | Removes a row (or, on a sub-row, removes that cost-code split). |
| Assets / Receipts | No | File upload | Attach one or more receipt files (DOC, DOCX, PDF, XLS, PPT, TXT, JPEG, JPG, PNG, and most other document types; up to 8 files). |
An earlier version of this page said there was no cost-code field on the expense allocation — that was wrong. A Job allocation row can carry one or more Cost Code sub-rows, each tied to that row's specific Job + Expense Account combination. The demo instance had no Expense Accounts configured for the job used in the screenshot above (the picker showed "Nothing found"), so a populated cost-code split could not be captured live.
Panel — bottom half (tax, status, lock)
| Field | Required | Type | Effect |
|---|---|---|---|
| Calculation Mode | — | Toggle (Pre-tax / Total) | Pre-tax: enter the Net Amount and taxes are calculated from the selected Tax Type. Total: enter the Gross Amount and the net/tax split is back-calculated. |
| Net Amount (Pre-tax mode) | Yes | Currency | The expense subtotal before tax. |
| Tax Type | Yes, unless Override Tax Rate is on | Select | The tax rate applied to the expense. |
| Override Tax Rate | — | Toggle | Lets you enter the tax amount manually instead of picking a Tax Type. The instance's own help text warns this transaction will not sync or export to any accounting system. |
| Taxes | Depends on Calculation Mode | Currency | Calculated automatically in most cases; editable directly when Override Tax Rate is on, or back-calculated per line item when Split Expense has more than one row. |
| Gross Amount (Total mode) / Total | Yes (Total mode) | Currency | The full amount including tax. |
| Locked | — | Toggle | Only shown when the instance's connected accounting system is Sage 50 (Canada), QuickBooks, or Spectrum. Requires the separate Expense — Lock permission; without it the toggle is disabled with the tooltip "You do not have permission to lock this expense." While locked, the whole form is disabled and the panel shows "This record cannot be modified as it has been transferred to Accounting for processing." |
| Has Been Reimbursed | — | Toggle | Hidden entirely for non-reimbursable expenses (there's nothing to reimburse). Records that the employee has actually been paid back — independent of Locked. |
| Exported to Sage 50 Canada / Exported to QuickBooks / Exported to Spectrum | — | Read-only timestamp | Shows the last export time to whichever accounting system is connected, or "Not exported." Only one of the three appears, matching the connected system. |
| Expense Status (Approve / Reject) | — | Action bar | See Approval workflow below. Only shown to users with the Expense — Approve permission; everyone else sees plain Save/Cancel buttons instead. |
Approval workflow
- A worker or an office admin creates the expense (from the mobile app with a receipt photo, or from this desktop panel) and saves it. Saving without choosing Approve or Reject sets the record's status to InReview — there is no separate "draft" state on this form.
- Saving a new InReview expense sends an Expense Submitted notification. Recipients are the users subscribed to that notification who hold the Expense — View permission — it is not limited to a fixed "approver" role.
- A user with the Expense — Approve permission opens the expense — this permission is also what makes the Approve/Reject action bar appear at all — reviews the receipt, the allocation, and the amount, and clicks Approve or Reject. Rejecting requires a reason, entered in the Reason for expense rejection field.
- Approved sends an Expense Approved notification to the employee being reimbursed (the record's Employee field) and triggers a job-cost recalculation for the job(s) the expense is allocated to.
- Rejected sends an Expense Rejected notification to that same employee. Moving an already-Approved expense back to Rejected or InReview also triggers a job-cost recalculation, so the job's Actual costs stay correct.
- Once Approved and marked Reimbursable, the expense is picked up by payroll through the pay-period reports — see Reimbursement and payroll below — not by a separate "send to payroll" action on the expense itself.
On mobile, workers submit expenses (with a receipt photo) and see their own expense status from the Appello mobile app; see Mobile: Expenses, Leave & Certifications for that side of the workflow.
Resync from QuickBooks — not on this screen
The shared expense panel has a Refresh from QuickBooks action that re-pulls attachments and
re-syncs a bill from QuickBooks Online. It is gated to Accounts Payable bills only (type === "AccountPayable", status In Review, and the Expense — Approve permission) and does not
appear on Employee Expenses at all. If you're looking for that control, see
Accounts Payable and
QuickBooks Online: Accounting Connection for what
the resync does and how the QuickBooks Online connection more broadly keeps Appello and QuickBooks
in sync.
Bulk actions
Select one or more rows with the checkboxes to reveal bulk actions in the list toolbar:
| Action | Effect |
|---|---|
| Archive | Archives the selected expenses. They move out of the Active tab into Archived, and no longer count toward the Outstanding/Total AP totals shown on the list. |
| Restore | Restores previously archived expenses back to Active (available from the Archived tab). |
| Delete | Permanently deletes the selected expenses. The list first checks for related records and can warn you how many would be affected before you confirm. |
| Lock / Unlock | Toggles the Locked state on the selected expenses in one action — same effect as the Locked toggle on the individual panel, and subject to the same Expense — Lock permission. |
Reimbursement and payroll
Once an expense is Approved and marked reimbursable, it is picked up by payroll the same way approved timesheet hours are: through the pay-period reports, not by a separate "send to payroll" action on the expense itself.
The Reimbursable Expense toggle
Every expense has a Reimbursable Expense toggle on the create/edit panel. When it is on, the expense requires an Employee (the worker to reimburse); when it is off, the panel asks for a Reimbursement Type instead, since there is no employee to pay back.
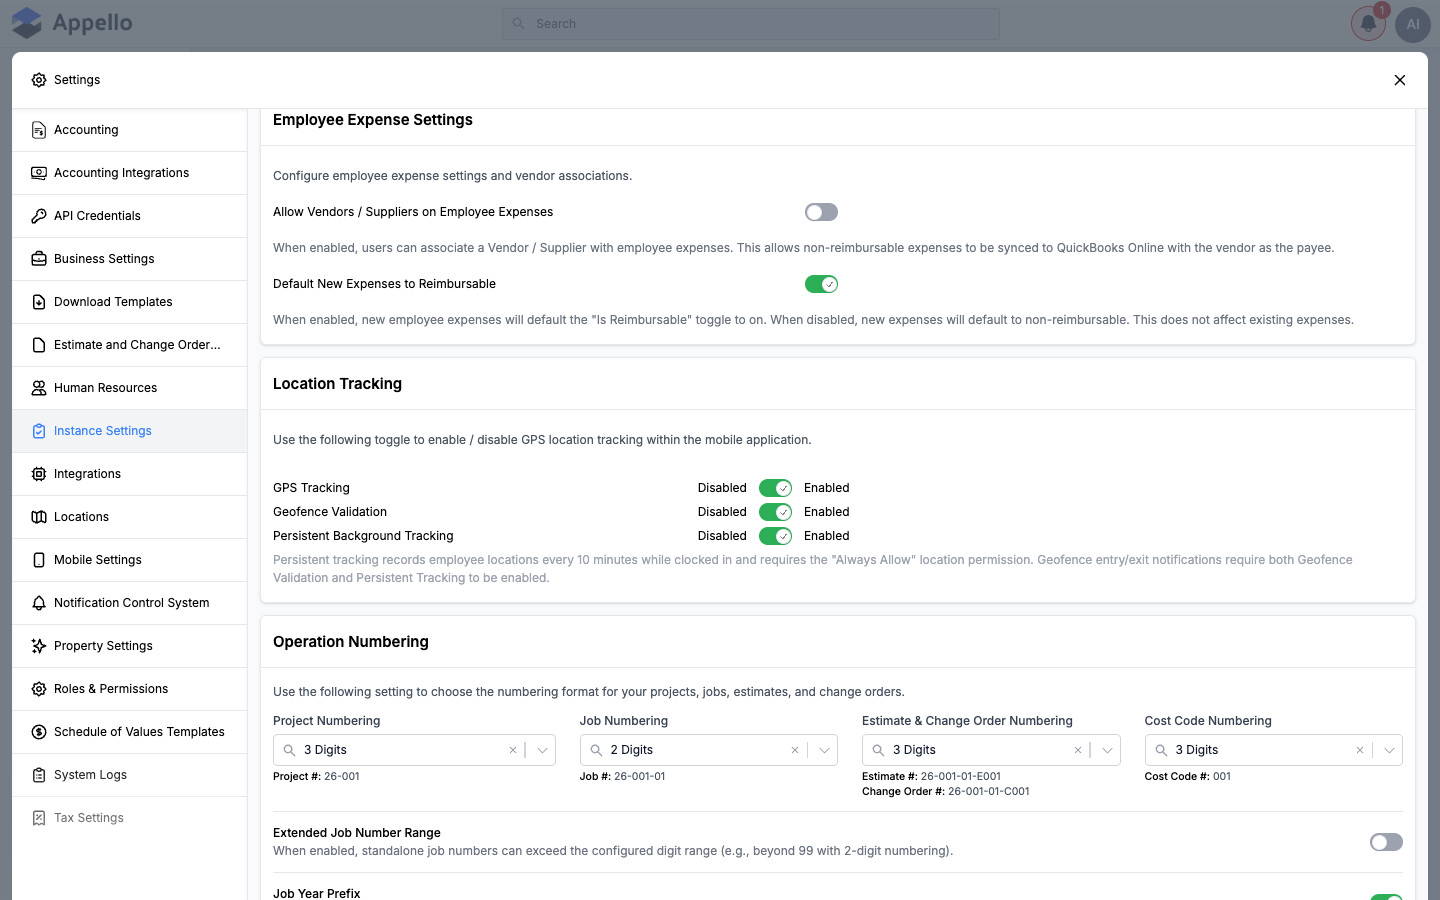
Whether a new expense starts with this toggle on or off is controlled instance-wide:
- Go to Settings → Instance Settings.
- Find the Employee Expense Settings card.
- Toggle Default New Expenses to Reimbursable.
| Setting | Location | Effect |
|---|---|---|
| Default New Expenses to Reimbursable | Settings → Instance Settings → Employee Expense Settings | When on, a brand-new expense starts with Reimbursable Expense switched on. When off, new expenses start non-reimbursable. Existing expenses are never changed by this setting — it only affects the initial value on a new record. |
Full instance-wide settings reference: Instance Settings.
Appearing on the Payroll Report and in payroll exports
Reimbursable expenses do not have their own line item on a job's labour cost report — they surface on the Payroll Report for the pay period in which they were logged, alongside travel, board, and parking:
| Payroll Report column | What it is |
|---|---|
| Out of Pocket Expenses Subtotal / Tax / Total | The reimbursable employee expenses logged in that pay period, net and gross |
| Expenses Grand Total | Travel + Board + Parking + the out-of-pocket expense total above |
Because the Payroll Report and its exports (CSV, and any payroll-software format enabled for your instance) are the same feature documented in Timesheet Export & Payroll, see that page for the full column layout, the pay-period selector, and how to run a payroll-software export — an approved reimbursable expense simply adds to those same "Out of Pocket" figures for the worker's pay period.
The demo instance has no employee expense records, so the Out of Pocket columns could not be captured with a non-zero value here. The column names and the fact that they sum reimbursable expenses for the pay period come from the Payroll Report's own documentation, not from a populated screenshot on this page.
Locking an expense
An expense can be locked once it has been transferred to your accounting system for payroll or AP processing, so nobody edits it out from under that transfer:
- The Locked toggle only appears on the expense when your instance's connected accounting system is Sage 50 (Canada), QuickBooks, or Spectrum.
- Locking (and unlocking) requires a permission separate from ordinary expense edit access — without it, the toggle is disabled with the tooltip "You do not have permission to lock this expense."
- While an expense is locked, the entire form is disabled and cannot be saved. The panel shows the warning "This record cannot be modified as it has been transferred to Accounting for processing."
- From the Employee Expenses list, Locked is also available as a filter and as a bulk action — select one or more rows to lock or unlock them together.
The job-scoped expense list (see Costing an expense to a job below) exposes the same Locked and Has Been Reimbursed filters, so you can check payment/lock state without leaving the job:
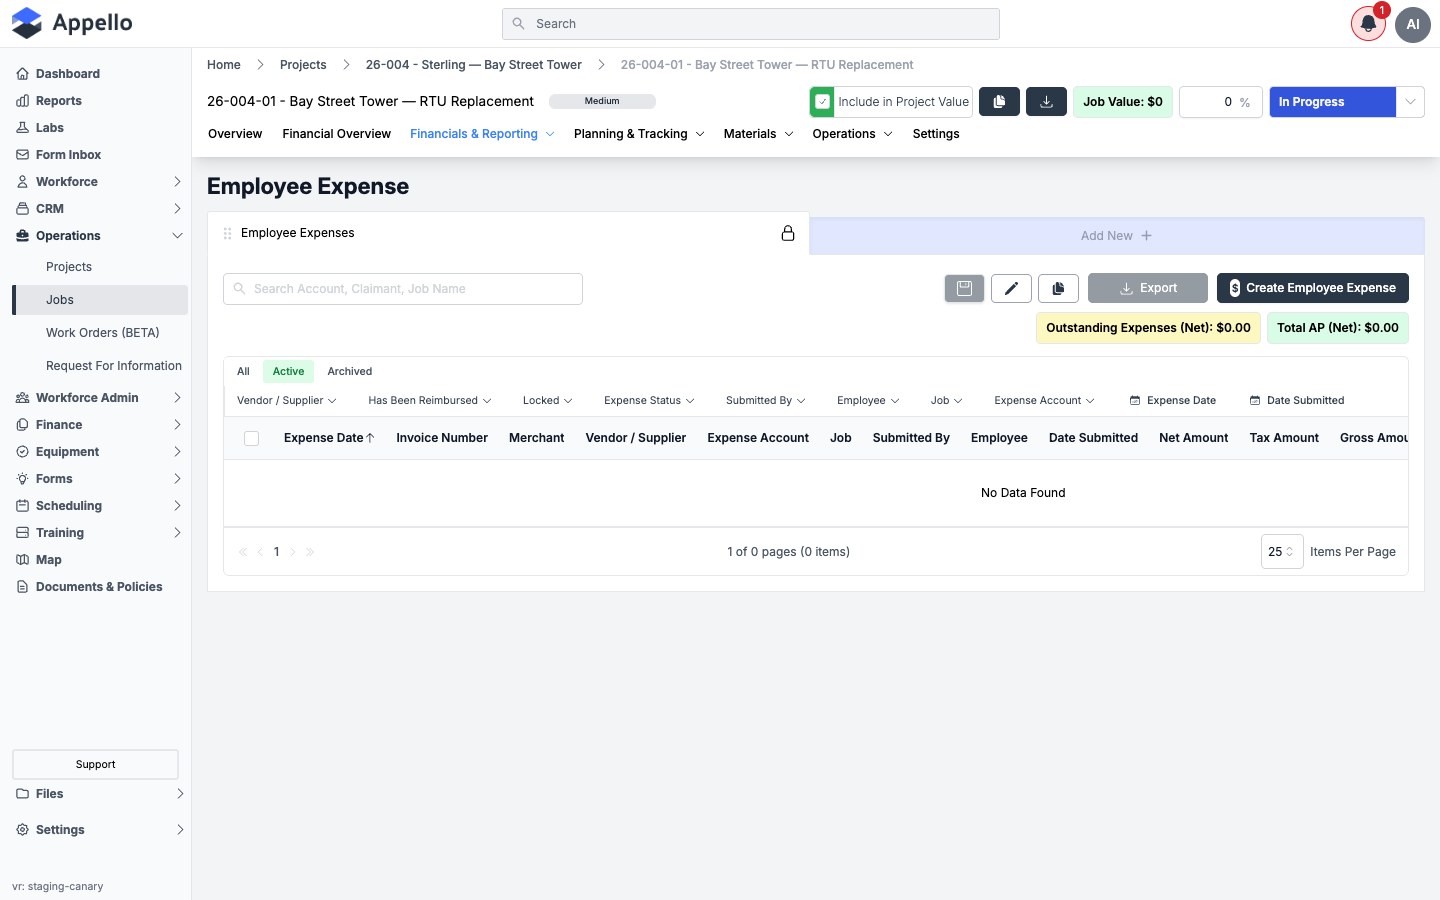
Has Been Reimbursed is a separate toggle from locking — it just records that the employee has actually been paid back, independent of whether the record is locked against further edits.
The demo instance has no expense records to lock, and the connected-accounting-system gate could not be exercised live. The lock behavior, the permission gate, and the warning text above are described rather than captured from a populated screenshot.
Costing an expense to a job
An expense's Allocate To section is what makes it show up in job costing — see the Allocate To grid above for the field-by-field breakdown, including how a Job row can also carry one or more Cost Code sub-rows.
Where it shows up in job costs
Once an expense is allocated to a job, two places on that job reflect it:
- Job → Financials & Reporting → Expenses — the same Employee Expenses list, pre-filtered to this job. Use it to review, approve, or check the reimbursement/lock state of every expense charged to the job.
- Job → Financials & Reporting → Financial Summary — the job's cost breakdown by account item, under the Financials tab's Expenses section (alongside Direct Labour, Equipment Time, and Travel Expenses). An approved expense's Net Amount and tax add to the Actual column for the account item it was allocated to.
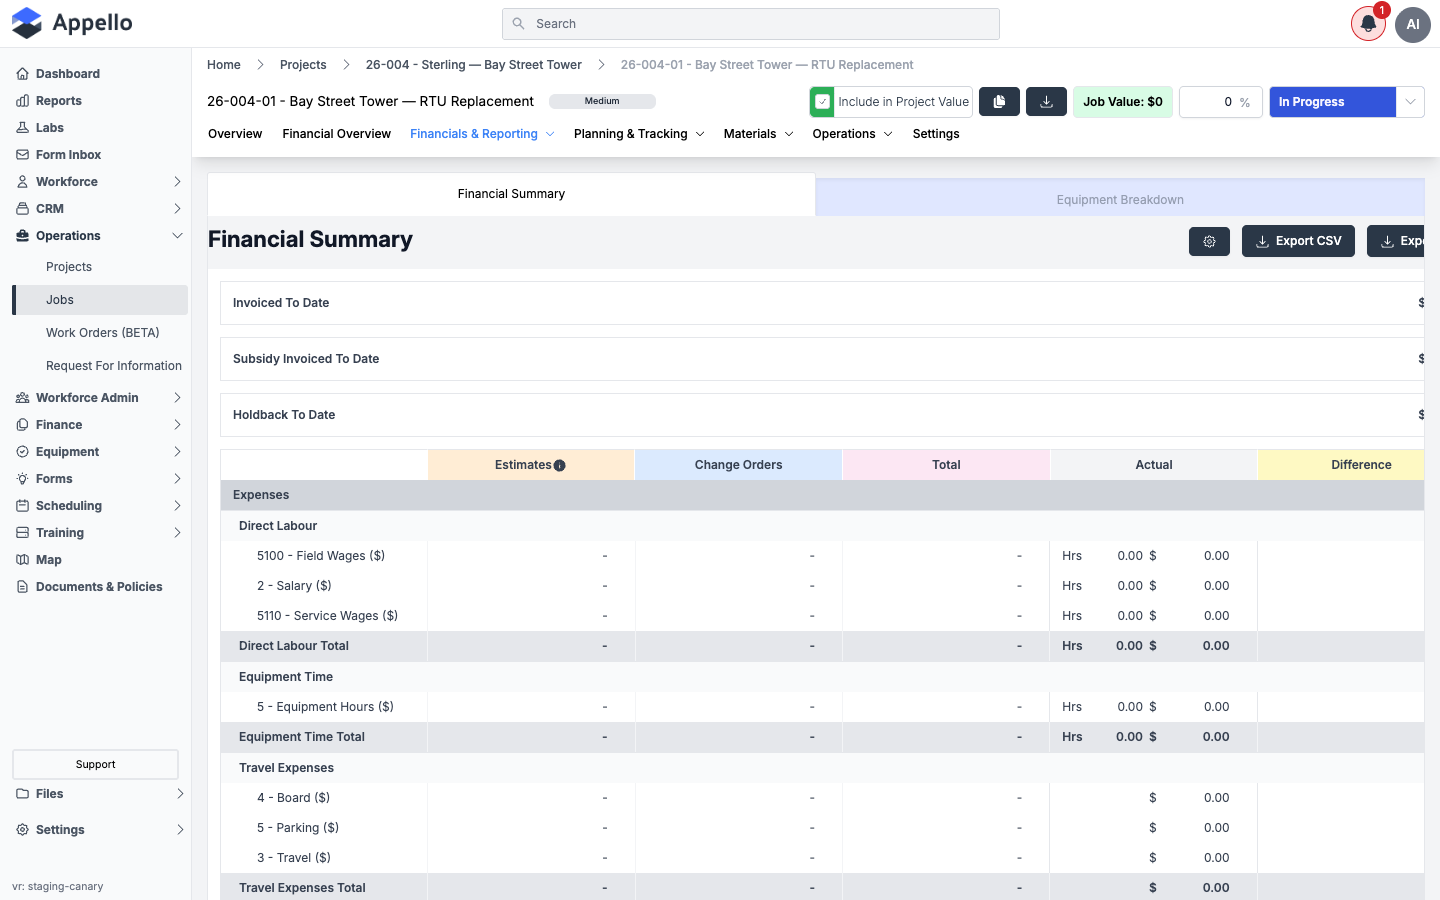
The job used above ("Bay Street Tower — RTU Replacement") has no expenses allocated to it on the demo instance, so its Financial Summary shows only the standard Direct Labour / Equipment Time / Travel Expenses rows with zero actuals — no Employee Expense account-item row was available to capture live. Source code confirms the Financial Summary's underlying data includes approved, in-review, and rejected employee-expense totals per account item; the exact row label and its position in the Expenses section could not be confirmed against a populated instance.
Non-reimbursable vendor expenses
If a vendor or supplier fronted a cost that your company will pay directly — rather than an employee paying out of pocket — you can record that on the same Employee Expenses screen instead of creating a separate Accounts Payable bill, but only if your instance allows it:
- Go to Settings → Instance Settings → Employee Expense Settings.
- Turn on Allow Vendors / Suppliers on Employee Expenses.
With that setting on, the expense form shows an optional Vendor / Supplier company picker below Merchant. Associating a vendor there is intended for non-reimbursable expenses — the Reimbursable Expense toggle and the Vendor / Supplier field are independent controls, but the setting's own description frames the vendor field as the way to sync a non-reimbursable expense to QuickBooks Online with the vendor as the payee, rather than reimbursing an employee. With a Vendor / Supplier and an Invoice Number both present, saving also checks for a duplicate invoice number already used by that vendor and asks you to confirm before saving anyway.
See Instance Settings for where this setting lives among the rest of the instance-wide configuration.
The demo instance has Allow Vendors / Suppliers on Employee Expenses turned off (see the screenshot in Reimbursement and payroll above), so the Vendor / Supplier field could not be captured live on the create/edit panel. The field's presence, its position below Merchant, and its "non-reimbursable expenses synced to QuickBooks Online" description come from the setting's own help text; whether the product technically enforces vendor-linked expenses to be non-reimbursable, or simply expects that workflow, could not be confirmed in this pass.
Permissions and settings
| Name | Type | Effect |
|---|---|---|
| Expense — View | Permission | Required to reach Employee Expenses at all. |
| Expense — Create / Edit / Delete | Permission | Governs the Create Employee Expense button, editing an existing record, and the bulk Delete action. |
| Expense — Approve | Permission | Required for the Approve/Reject action bar to appear on the panel at all — without it you only get Save/Cancel. Also gates the Accounts Payable-only "Refresh from QuickBooks" resync. |
| Expense — Lock | Permission | Required to change the Locked toggle, individually or via the bulk Lock/Unlock action. |
| Default New Expenses to Reimbursable | Instance setting | Settings → Instance Settings → Employee Expense Settings. Sets the starting value of Reimbursable Expense on new records only. |
| Allow Vendors / Suppliers on Employee Expenses | Instance setting | Settings → Instance Settings → Employee Expense Settings. Shows the Vendor / Supplier picker on the panel and enables duplicate-invoice checking for it. |
| Connected accounting system (Sage 50 Canada / QuickBooks / Spectrum) | Instance-wide integration | Determines whether the Locked toggle and the matching "Exported to ..." read-only field appear on the panel. See Accounting Connection. |
Related Pages
- Accounts Payable — Vendor-side AP expenses; the same underlying record type, and the only place the "Refresh from QuickBooks" resync action appears
- QuickBooks Online: Accounting Connection — What the QuickBooks Online sync does across Appello, including AP resync
- Mobile: Expenses, Leave & Certifications — Submitting an expense with a receipt photo from the mobile app
- Instance Settings — Where Employee Expense Settings (Default New Expenses to Reimbursable, Allow Vendors / Suppliers on Employee Expenses) live
- Timesheet Matrix — Out-of-pocket expenses visible in the timesheet slideout
- Timesheet Export & Payroll — Payroll Report columns and running a payroll export
- Cost Codes & Schedule of Values — How job costs (including allocated expenses and their cost-code splits) roll up under cost codes