Accounts Payable Expenses
Vendor bills and AP-style expenses for materials, subcontractor invoices, and other project costs. Code each expense to a job and cost code, route through your approval chain, and track payment status.
Navigation
Sidebar → Finance → Accounts Payable
URL: /expenses
Gated by the Expense: View permission — a user without it does not see Accounts Payable in the Finance sidebar group at all.
Overview
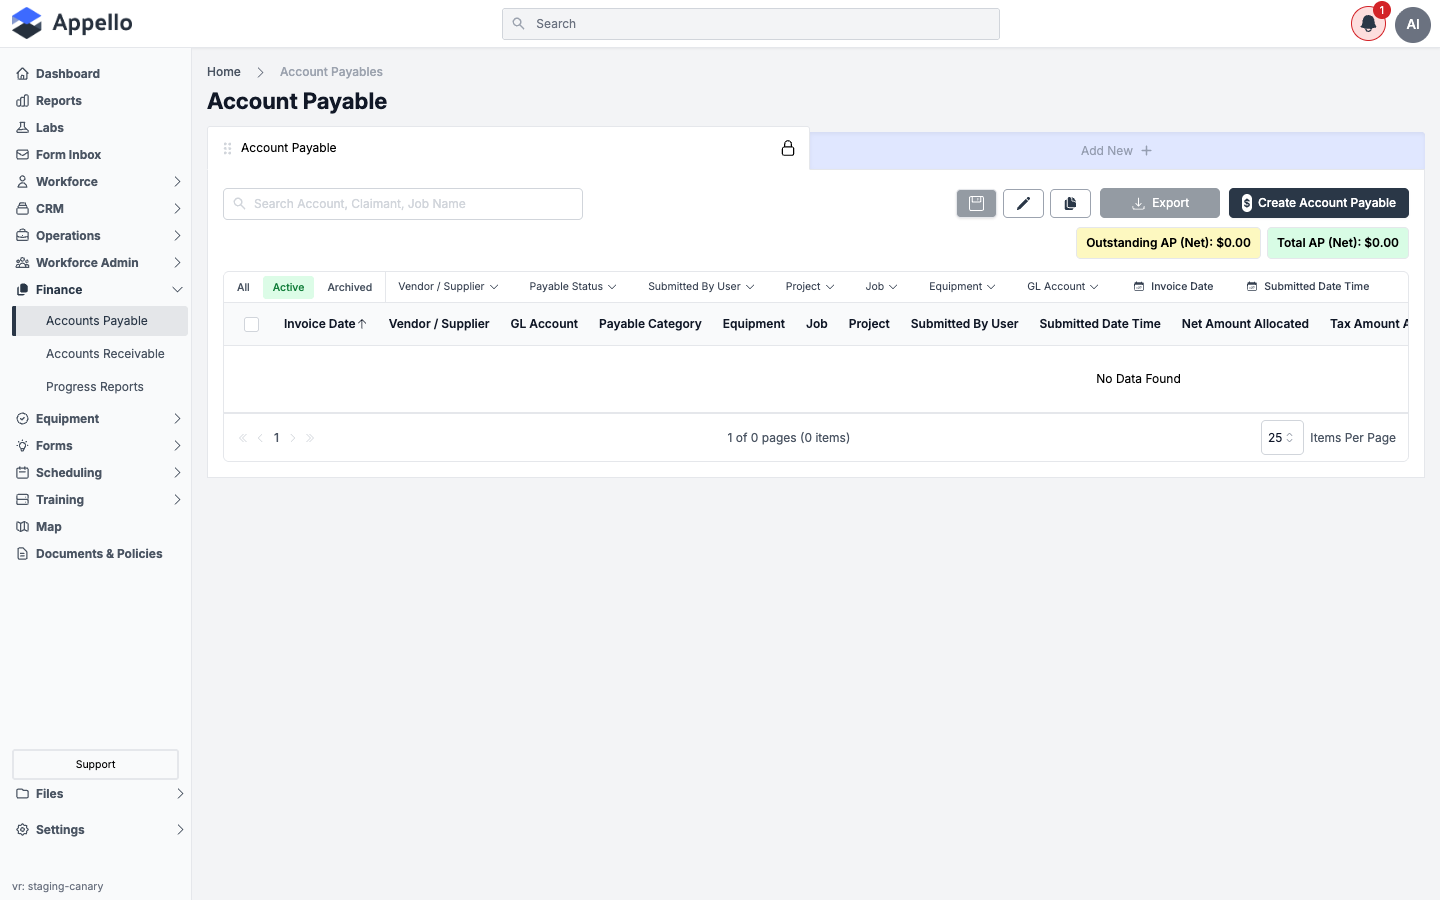
/expenses is the company-wide list of every AP bill in your instance, regardless of job. Use its filters, quick tabs, and search to find bills, open Create Account Payable to enter a new vendor bill, and use row and bulk actions to move bills through approval, locking, and archiving.
This demo instance has no AP bills recorded, so the list above is shown in its empty state ("No Data Found"). The columns, filters, and controls described below are unchanged whether or not rows are present.
Columns, Filters, and List Controls
Quick tabs and search
| Control | Effect |
|---|---|
| All / Active / Archived | Quick tabs above the filter row. Active (not archived) is the default; Archived shows bills removed from the active list via bulk Archive; All shows both. |
| Search | Free-text search box, placeholder "Search Account, Claimant, Job Name" — matches against the vendor/account, claimant, and job name. |
| View controls (icons beside the "Account Payable" card title) | This list follows the same saved-view pattern as other Appello lists: a lock icon marks the default system view as not renamable/deletable, a save icon (enabled only with unsaved filter/column changes) saves them back to the view, a pencil (edit) icon renames the view or changes which columns it displays, and a duplicate icon copies the current view as a starting point for your own. Add New creates an additional saved view of this list with its own name and column selection. |
| Export | Opens a menu with Export as CSV, which downloads the currently filtered/searched result set. Disabled when there are no rows to export (as on this demo instance). |
Filter chips
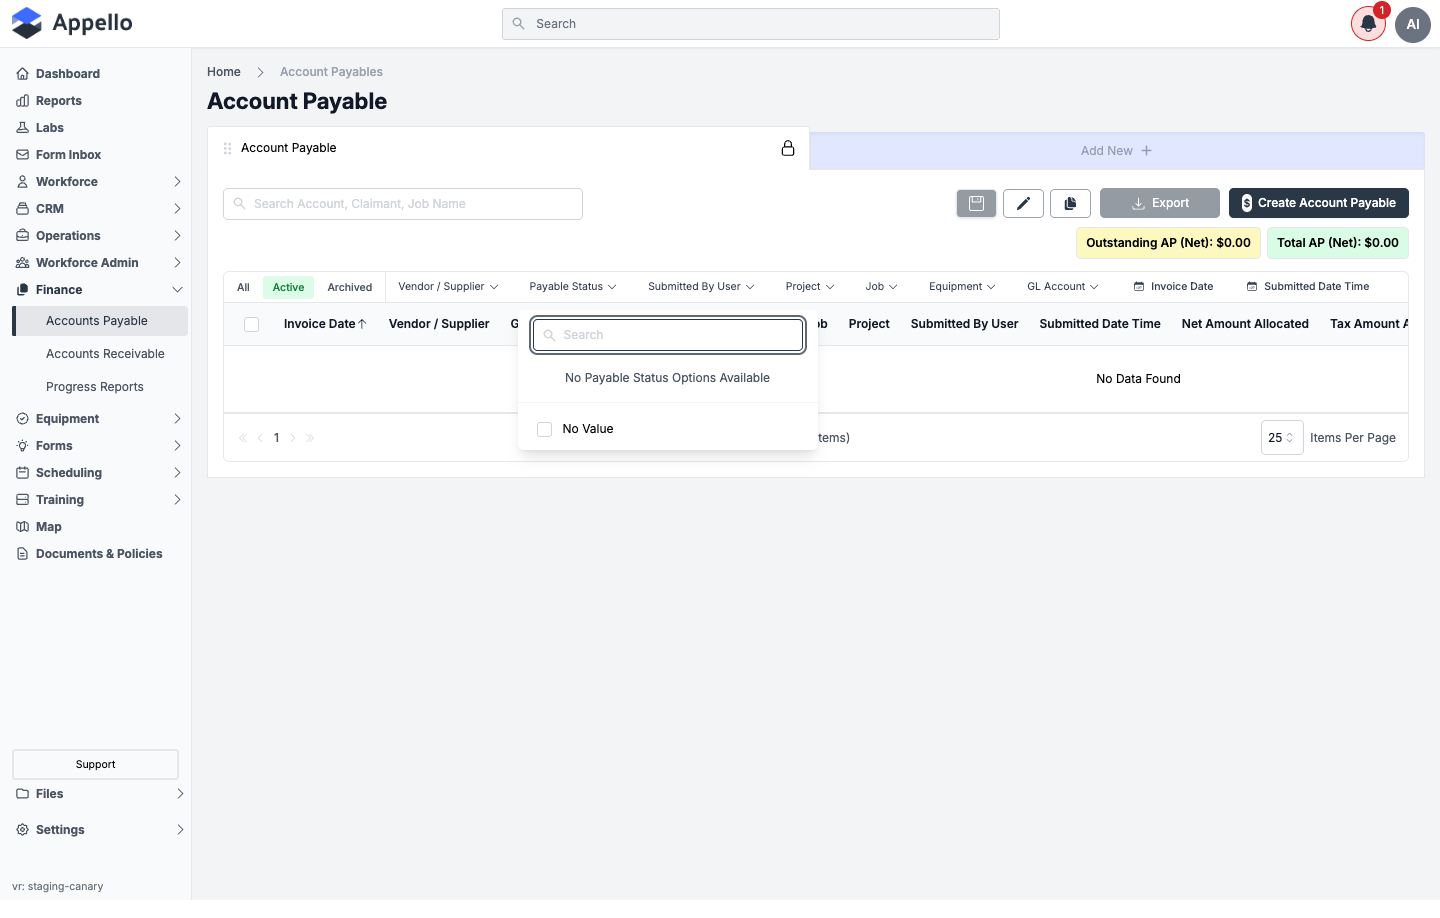
| Filter | Filters by |
|---|---|
| Vendor / Supplier | The company the bill was issued by. |
| Payable Status | InReview / Approved / Rejected — see Approve, Reject, and Lock Workflow below. |
| Submitted By User | The user who entered the bill. |
| Project | The project of the job(s) the bill is allocated to. |
| Job | The job(s) the bill is allocated to, via its Allocate To lines. |
| Equipment | The equipment the bill is allocated to, via its Allocate To lines. |
| GL Account | The account item any allocation line is coded to. |
| Invoice Date | Date range on the vendor's invoice date. |
| Submitted Date Time | Date range on when the bill was entered in Appello. |
On this demo instance, opening a filter with no data behind it (for example Payable Status, with no bills yet recorded) shows "No [X] Options Available" — the filter dropdown only lists values that actually occur among current records.
Columns
The default view on this instance shows, in order:
| Column | Shows |
|---|---|
| Invoice Date | The vendor's invoice date (expenseDate). Sortable — this view's default sort is Invoice Date, ascending. |
| Vendor / Supplier | The company the bill was issued by. |
| GL Account | The account item(s) the bill's allocation lines are coded to. |
| Payable Category | The bill's sub-type. Always Account Payable on this list — the field exists because the same underlying Expense record type also drives the Employee Expenses list. |
| Equipment | Any equipment the bill is allocated to. |
| Job | Any job(s) the bill is allocated to. |
| Project | The project of any allocated job. |
| Submitted By User | Who entered the bill. |
| Submitted Date Time | When the bill was entered. |
| Net Amount Allocated | Sum of the bill's Allocate To line Net Amount values. |
| Tax Amount Allocated | Sum of the bill's Allocate To line tax values. |
| Gross Amount Allocated | Net + tax allocated. |
| Net Amount | The bill's total pre-tax amount. |
| Taxes | The bill's total tax amount. |
| Gross Amount | The bill's total including tax. |
Which columns are visible, and their order, is configurable per saved view via the pencil (edit view) icon described above.
Totals
Two chips sit above the table, next to Export:
- Outstanding AP (Net or Gross) — total of bills matching the current filters that are not yet paid.
- Total AP (Net or Gross) — total of all bills matching the current filters.
Selecting one or more rows adds a third chip, Selected AP, totaling just the checked rows. Whether these read Net or Gross depends on the Include Tax in Financials instance setting.
Create an Account Payable Bill
Where it is: Create Account Payable button, top-right of the list.
Opens the same form used to edit an existing bill, pre-filled for a new Account Payable-type expense.
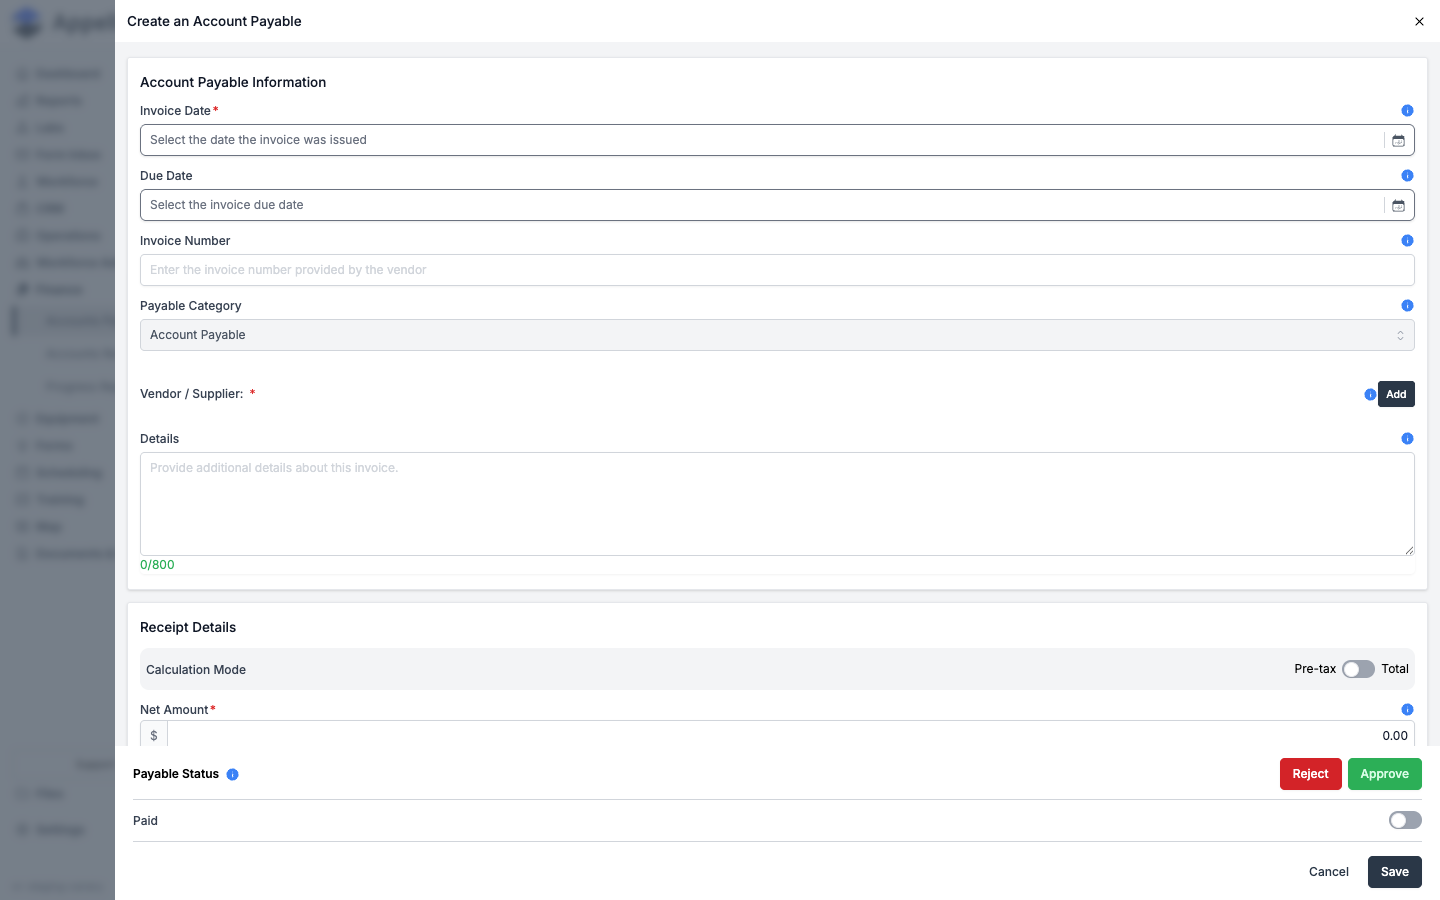
Account Payable Information
| Field | Required | Type | Effect |
|---|---|---|---|
| Invoice Date | Yes | Date | The date the vendor issued the invoice. Maps to expenseDate. |
| Due Date | No | Date | Payment due date. Maps to dueDate. |
| Invoice Number | No | Text | The vendor's invoice reference (invoiceNumber). If the same invoice number already exists for the same vendor, saving shows a "Duplicate Invoice Number Detected" confirmation naming the existing bill's date — you can still save anyway. |
| Payable Category | — | Disabled select | Fixed to Account Payable for this list (type); the field is shared with the Employee Expenses form, where it is editable. |
| Vendor / Supplier | Yes | Assign-company flyout | The company being paid (companyId). Add opens a company search/assign flyout filtered to companies flagged as payable. |
| Details | No | Textarea, 800 char max | Free-text notes about the invoice (details). |
Receipt Details
| Field | Required | Type | Effect |
|---|---|---|---|
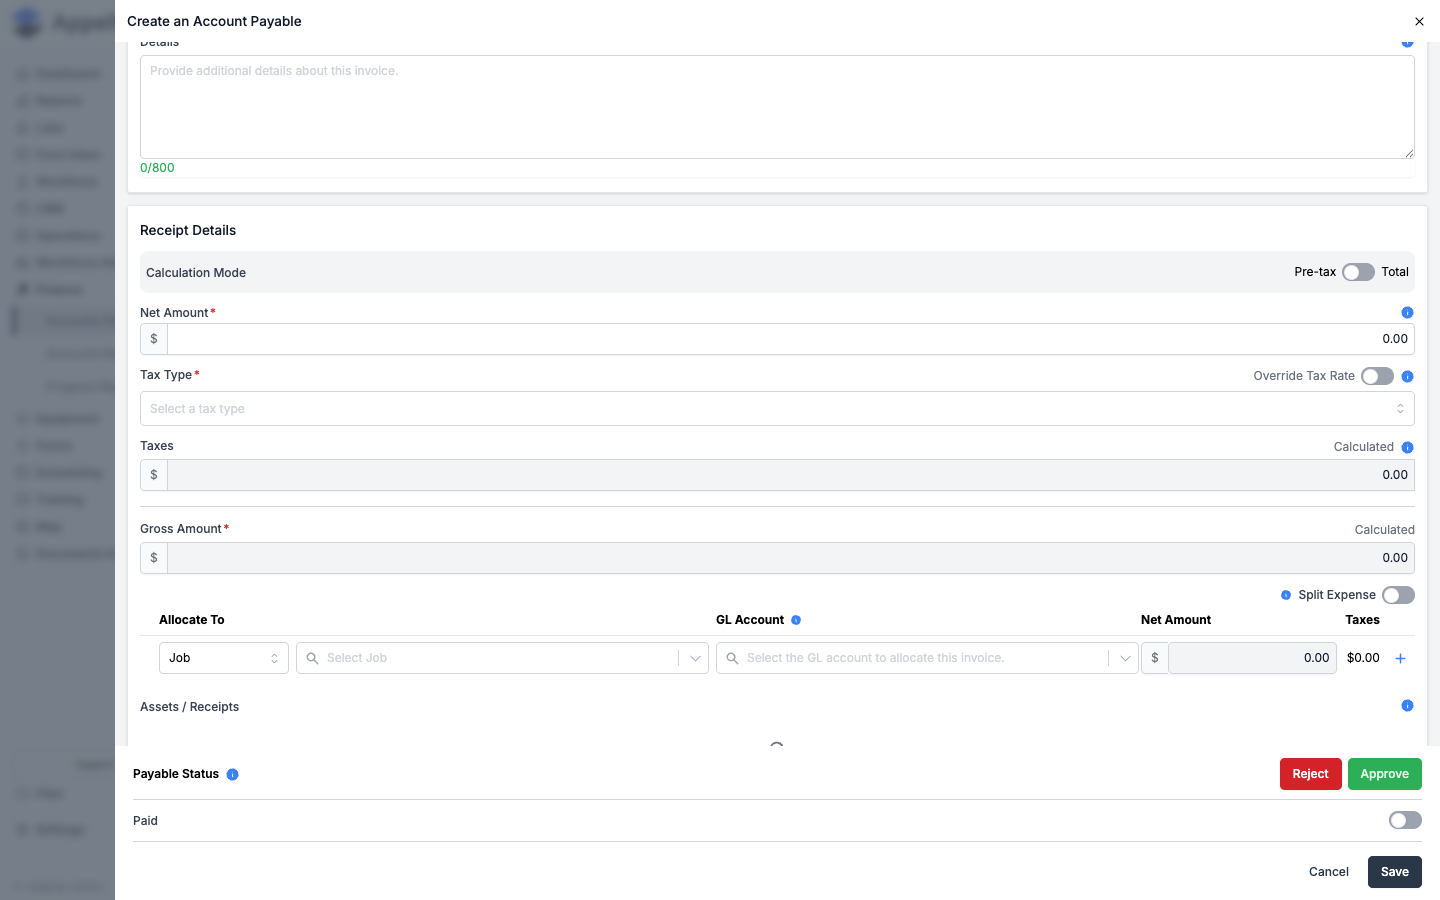
| Calculation Mode | — | Toggle: Pre-tax / Total | Pre-tax (PreTax): enter Net Amount, tax and Gross Amount are calculated. Total (Total): enter Gross Amount, tax and Net Amount are back-calculated. Maps to calcMode. |
| Net Amount | Yes | Currency | The bill's pre-tax amount (subTotal). Editable in Pre-tax mode; calculated (read-only) in Total mode. Cannot be zero. |
| Tax Type | Yes, unless Override Tax Rate is on | Select | The tax type applied to the whole bill (taxTypeId), defaulting to the instance's default tax type. Its Override Tax Rate toggle switches to manually entering Taxes, with a warning that an overridden bill will not sync or export to any connected accounting system. |
| Taxes | Yes | Currency | Tax amount (taxes). Calculated from Tax Type unless Override Tax Rate is on. When the bill is split across more than one Allocate To line in Pre-tax mode, this value is back-calculated from the per-line tax and may show penny-rounding differences. |
| Gross Amount | Yes | Currency | The bill's total including tax (total). Editable in Total mode; calculated (read-only) in Pre-tax mode. Cannot be zero. |
Allocate To (job/equipment coding)
The Allocate To grid — Job/Equipment, GL Account, Net Amount, Taxes, and the Split Expense toggle to add more than one allocation line — is the same grid described in How a bill gets coded to a job below, under the job-scoped view.
Assets / Receipts
An attachment uploader (drag-and-drop or file picker) for the invoice PDF or photo, stored against the bill and shown in its Assets / Receipts section. Multiple files are supported.
Payable Status footer (sticky)
A sticky bar at the bottom of the panel carries the approval controls (Reject / Approve), a Paid toggle, and Cancel / Save — see Approve, Reject, and Lock Workflow next.
On an instance with a connected desktop accounting system (Sage 50 Canada or Spectrum), the panel also shows a read-only Locked toggle and an Exported to [system] timestamp row. This demo instance has no accounting system connected, so neither row renders — see Accounting system connection for how that connection is set up.
Linking a Bill to a Work Order
Where it is: On a job's Work Orders tab, open a work order → Materials → Add material → Add Custom (the custom-line editor) → Link to Expense. WOLinkExpenseModal in source.
What it's for: Marks a custom Work Order material line as already covered by an existing AP bill (or Employee Expense) on the same job, so the same cost isn't counted once through the WO line and again through the bill.
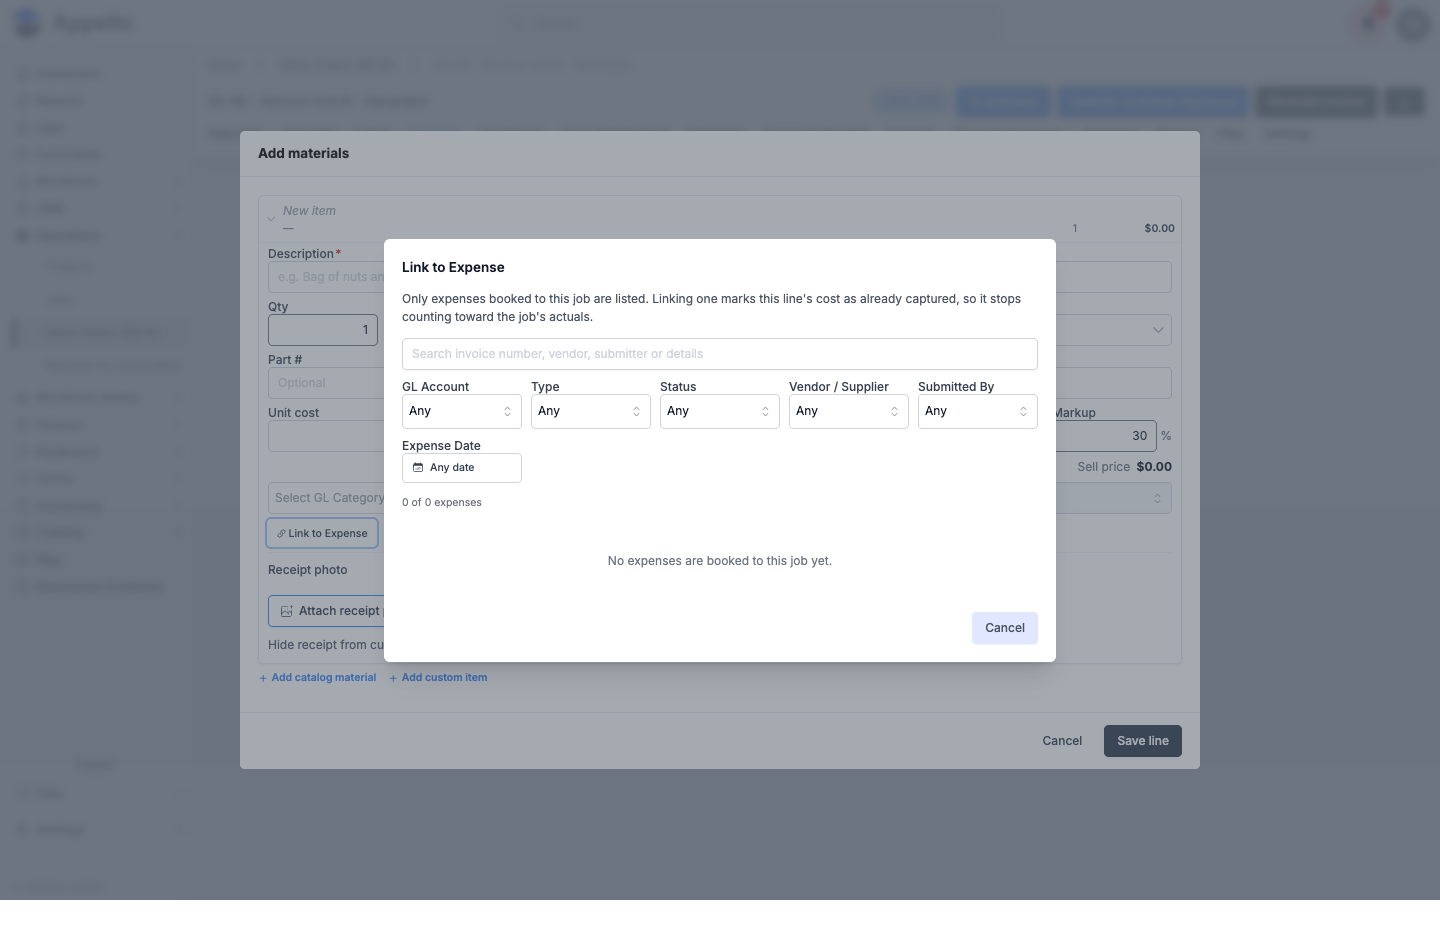
| Control | Effect |
|---|---|
| Search | Matches invoice number, vendor, submitter, or details. |
| GL Account | Pre-filtered to the WO line's own GL account when opened from a line that already has one; clearable. |
| Type | Account Payable or Employee Expense. |
| Status | The expense's Payable/Expense Status. |
| Vendor / Supplier | The bill's vendor, or the expense submitter's claimed vendor. |
| Submitted By | Who entered the expense. |
| Expense Date | Date range on the expense date. |
| Clear filters | Resets all of the above. |
| Clicking a row | Selects that expense and returns to the WO line editor, which now shows "Cost captured by [vendor/claimant]" with an Unlink button. |
Only expenses already booked to this job are listed — one booked to a different job or to no job at all does not appear, since linking one relieves this WO line from counting toward the job's actuals. On this demo instance the job behind the work order has no AP bills or employee expenses yet, so the picker shows "No expenses are booked to this job yet."
Approve, Reject, and Lock Workflow
Statuses: every bill is one of In Review, Approved, or Rejected (there is no separate "Draft" status — a new bill lands In Review the moment it's saved, unless the creator also has approval rights and sets it to Approved or Rejected at creation).
- A user with Expense: Edit (but not Expense: Approve) fills in the bill and clicks Save. The bill is created with status In Review, and everyone who normally reviews AP bills gets an AP bill submitted notification.
- A user with Expense: Approve opens the bill. Instead of a plain Save/Cancel footer, they see the Payable Status action bar with Reject and Approve buttons (plus the Paid toggle described below).
- Clicking Approve and saving sets status to Approved, notifies the bill's submitter (AP bill approved), and — if the bill is coded to a job — triggers a recalculation of that job's financials.
- Clicking Reject opens a required reason field; saving sets status to Rejected and notifies the submitter (AP bill rejected).
- Saving with neither pressed (or un-pressing one) returns the bill to In Review.
- Moving a previously Approved bill to any other status re-triggers the job financial recalculation, so a reversed approval doesn't leave stale costs on the job.
- Locked (only shown once a desktop accounting system — Sage 50 Canada or Spectrum — is connected): a separate Expense: Lock permission gates this toggle. A locked bill cannot be edited or its status changed; the panel shows "This record cannot be modified as it has been transferred to Accounting for processing." Toggling lock is also available as a bulk action from the list (see below).
- Paid: the Paid toggle in the sticky footer marks the bill as reimbursed/settled (
hasBeenReimbursed) independently of approval status. Once a payment method has been recorded, a read-only Paid Using row shows it.
Bulk Actions: Archive, Delete, Restore, Lock
Select one or more rows' checkboxes to reveal the bulk action bar.
| Action | Effect | Permission |
|---|---|---|
| Archive | Moves the selected bills to the Archived tab. Reversible via Restore. | Base list edit rights |
| Restore | Moves archived bills back to Active. | Base list edit rights |
| Lock | Toggles Locked on the selected bills, the same field described above. | Expense: Lock |
| Delete | Removes the selected bills from the list entirely — before confirming, Appello reports how many related records would also be affected. Unlike Archive, there is no Deleted tab to restore from, so treat Delete as effectively permanent from this list's UI. | Expense: Delete |
Refresh from QuickBooks
An individual In Review bill that is already linked to QuickBooks Online can be manually re-synced from its edit form with a Refresh from QuickBooks action next to the QuickBooks sync status badge — it re-pulls missing PDF attachments and refreshes QBO-sourced fields without waiting for the next webhook. It only appears when the bill is In Review, already QBO-linked, the signed-in user has Expense: Approve, and the QuickBooks Online → Appello Accounts Payable sync is enabled.
This is one part of the broader accounting connection; see Accounting system connection for how bills sync in both directions, how vendors/GL accounts/tax types are mapped, and the full AP sync: QuickBooks Online → Appello behavior. This page does not duplicate that detail.
Permissions and Settings
| Name | Type | Effect on this page |
|---|---|---|
| Expense: View | Permission | Required to see Accounts Payable in the sidebar and open /expenses at all. |
| Expense: Edit (create/edit) | Permission | Required to create or edit a bill; without Approve, saving only ever lands the bill at In Review. |
| Expense: Approve | Permission | Shows the Payable Status action bar (Reject/Approve) instead of a plain Save/Cancel footer; also required to see and use Refresh from QuickBooks. |
| Expense: Lock | Permission | Enables the Locked toggle (single-record and bulk); without it, the toggle is visible but disabled with a "You do not have permission to lock this expense" tooltip. |
| Expense: Delete | Permission | Required for the bulk Delete action. |
| Accounting System connection | Instance setting | Whether an accounting system is connected (and which one — Sage 50 Canada, Spectrum, or QuickBooks Online) controls whether the Locked toggle and Exported to [system] row appear at all, and which one shows. |
| Default Tax Type | Instance setting | Pre-fills Tax Type on a new bill. |
| Include Tax in Financials | Instance setting | Whether the Outstanding AP / Total AP / Selected AP chips read Net or Gross. |
Accounts Payable by Job
The company-wide list above covers every AP bill across your instance. From a job's detail page you can see the same kind of list scoped to just that job — useful when you want to review what's been billed against a single job without filtering the full AP list yourself.
Navigation: Open a job, then Financials & Reporting → Accounts Payable
URL pattern: /jobs/{jobId}?tab=account-payable
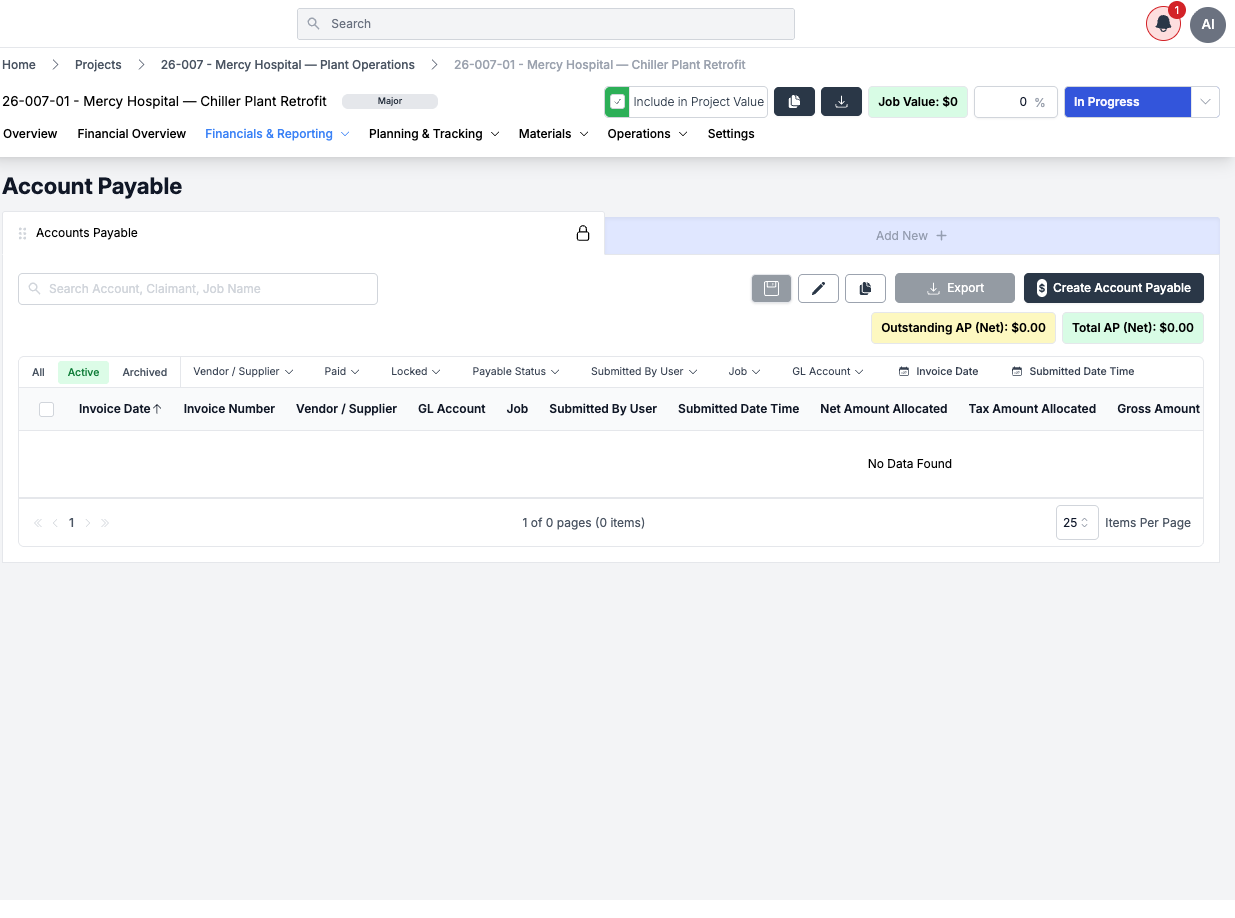
What it shows
The job's Accounts Payable tab is the same list table as /expenses, pre-filtered to the current job:
- Columns — Invoice Date, Invoice Number, Vendor/Supplier, GL Account, Job, Submitted By User, Submitted Date Time, Net/Tax/Gross Amount Allocated, and Net/Taxes/Gross Amount. The Job column and Job filter still appear even though the list is scoped to one job.
- Filters — the same filter set as the company-wide list (Vendor/Supplier, Paid, Locked, Payable Status, Submitted By User, Job, GL Account, Invoice Date, Submitted Date Time), plus the All / Active / Archived tabs and a search box.
- Totals — Outstanding AP (Net) and Total AP (Net) chips above the table, scoped to this job's bills only.
- Create Account Payable — opens the same bill form as the company-wide list, but with Allocate To pre-set to Job and this job already selected.
How a bill gets coded to a job
A bill's coding lives in the Allocate To grid near the bottom of the Account Payable form (below Net Amount / Tax Type / Gross Amount):
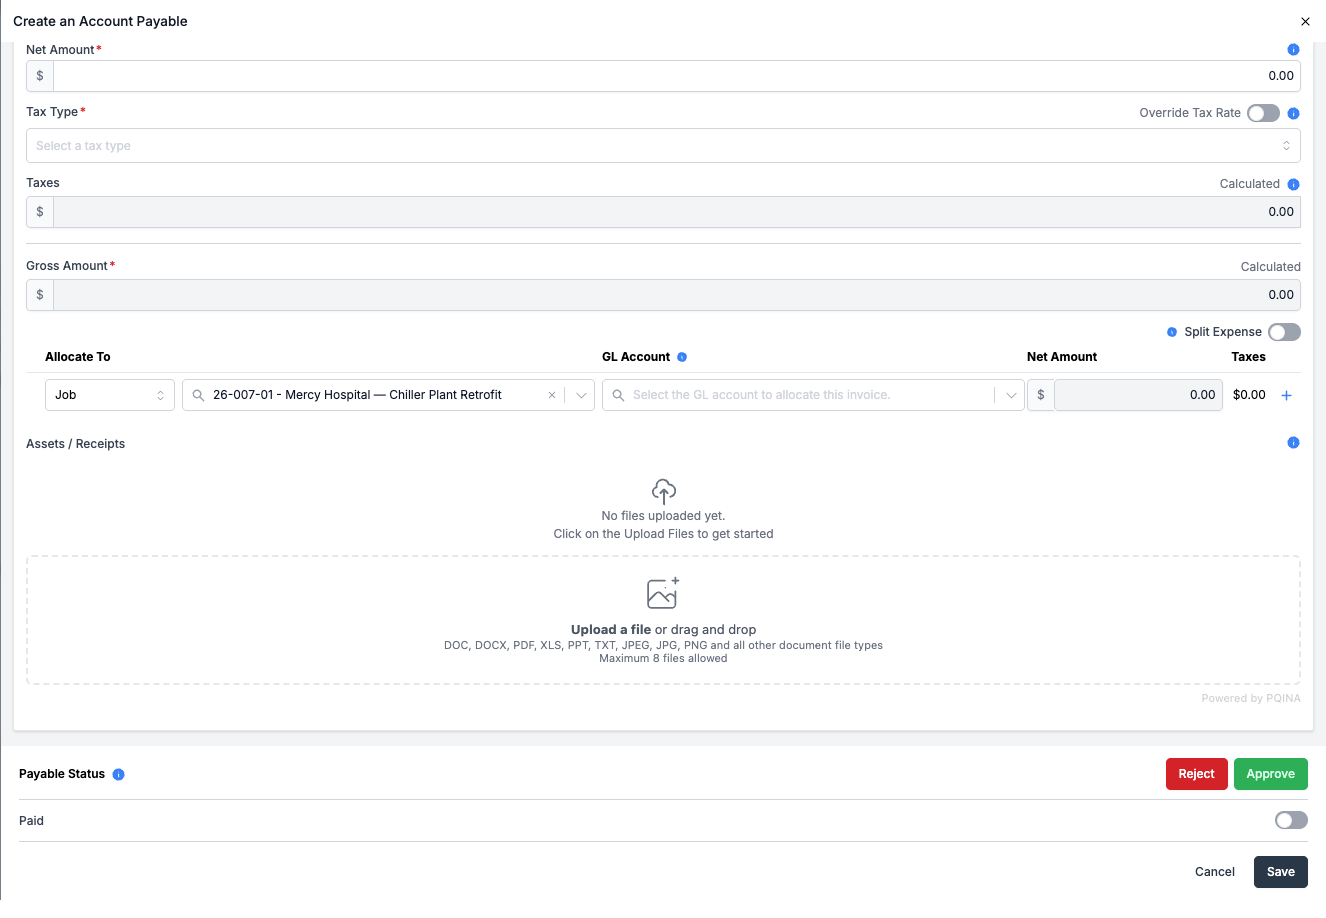
- Allocate To — choose Job (or Equipment) as the reference type for the line.
- Select the job (pre-filled when the bill is created from that job's Accounts Payable tab) and the GL Account to code the amount to.
- Enter the Net Amount for that line — the + button next to the line adds a Cost Code sub-line under it, so the same job allocation can be split across cost codes.
- Use Split Expense to add additional Job/Equipment allocation lines when one bill covers more than one job.
The instance used for these screenshots had no AP bills recorded against the job at the time of writing, so the job-scoped list above is shown in its empty state. The columns, filters, and totals are unchanged whether or not rows are present.
How AP Connects to Job Costing
When an AP expense is approved and coded to a job's cost code, the amount posts to the job's financial summary. This feeds the earned-vs-burned analysis alongside labour costs from timesheets, and rolls into the job's cost-code breakdown — see Job Cost Report and Cost Codes & Schedule of Values.
Related Pages
- Employee Expenses — Worker reimbursement expenses
- Accounting system connection — How AP bills sync with QuickBooks Online, Sage 50, or Spectrum, and how to set it up
- Progress Reports — Job financial summaries that include AP costs
- Job Cost Report — Where coded AP bills show up in the job's financials
- Cost Codes & Schedule of Values — Cost code setup that coded AP bills post against